11 Heater assembly - removal
and refitting
2
Note: Refer to the warnings given in Section 1
of this Chapter before proceeding.
Recirculating type (early models)
Removal
1 Disconnect the battery negative lead.
2 Refer to Chapter 1 and drain the cooling
system.
3 Make a note of their relative positions, then
disconnect the heater motor electric leads at
the terminal connectors.
4 Slacken the demister and water hose clips.
5 To prevent water damage to the carpets or
upholstery, place polythene sheeting in the
appropriate places on the floor and seating.
6 Undo and remove the screws that secure
the heater unit to the parcel shelf and carefully
lift away the heater unit.
Refitting
7 Refitting is the reverse of removal, but the
following additional points should be noted:
a) Open the heater tap on the rear of the
engine and slowly refill the cooling system
as described in Chapter 1.
b) If the heater does not warm up, it is an
indication that there is an air lock. To
clear, disconnect the return hose from the
lower radiator hose and plug the hole.
Now extend the return hose to reach the
radiator filler neck. Start the engine and
observe the flow of water from the return
hose. When the bubbles cease, switch off
the engine and reconnect the hose.
Fresh air type (later models)
Removal
8 Disconnect the battery negative lead.
9 Refer to Chapter 1 and drain the cooling
system.
10 On models with a centre console, remove
the console and the facia glovebox securing
screws. This will enable the console to be
moved as necessary for greater access to the
heater.
11 To prevent water damage to the carpets
or upholstery, place polythene sheeting in the
appropriate places on the floor and seating.
12 Carefully pull the demister and air inlet
tubes out of the heater unit.
13 Undo and remove the two screws that
secure the front of the heater to the parcel
shelf.
14 Slacken the nut that secures the rear of
the heater to the body mounted bracket (see
illustration).
15 Make a note of the electrical connections
to the blower motor and switch, then
disconnect the wires.
16 Slacken the clips and disconnect the
heater water hoses.
17 Carefully lift the heater unit from the
slotted rear brackets, hold the fingers over the
matrix pipe ends (or plug with corks) and lift
the unit from the car.
18 Finally drain any remaining coolant from
the unit.
Refitting
19 Refitting the heater assembly is the
reverse sequence to removal. Refill the
cooling system as described in Chapter 1 on
completion.
12 Heater assembly -
dismantling and reassembly
3
Recirculating type
Dismantling
1 Remove the heater assembly from the car
as described in Section 11.
2 Detach the spring clips securing the
demister flap to the cover plate and lift off the
flap (see illustration).
3 Undo and remove the screws securing the
cover plate to the cowling and lift off the cover
plate and motor assembly.
Cooling, heating and ventilation systems 3•7
3
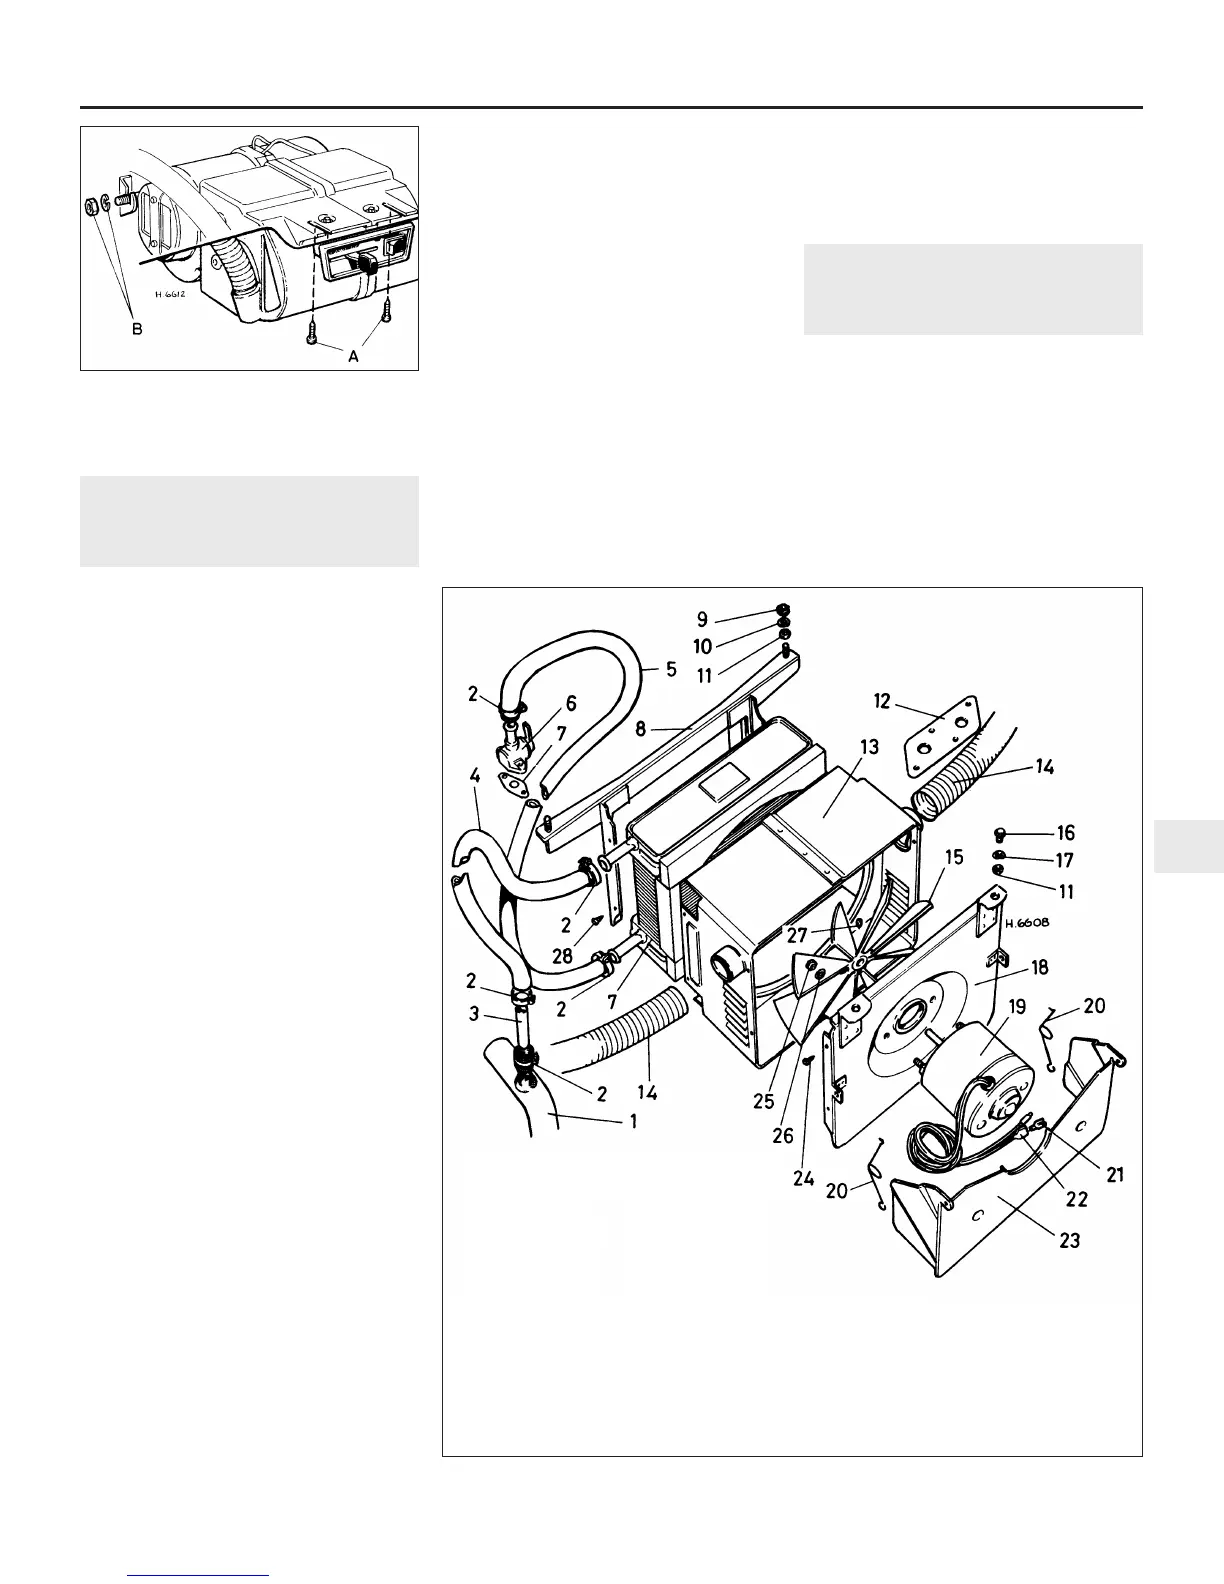
11.14 Fresh air heater attachment points
A Securing screws - heater to parcel shelf
B Nut and spring washer - heater to rear
bracket
12.2 Exploded view of the
recirculatory heater
1 Hose
2 Clip
3 Connection
4 Outlet hose
5 Inlet hose
6 Tap
7 Gasket
8 Mounting
bracket
9 Nut
10 Washer
11 Washer
12 Sealing plate
13 Cowling
14 Demister hose
15 Fan
16 Screw
17 Washer
18 Motor
mounting
19 Motor
20 Spring
21 Connector
22 Sleeve
23 Flap
24 Screw
25 Nut
26 Washer
27 Fan retaining
screw
28 Screw
 Loading...