Operation Continued)-((Model#HDXBR50) OperationContinued)-((Model#HDXBR50)
16
17
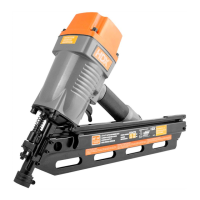
Adjusting the exhaust
1
Theadjustableexhaustonthecapofthetoolallows
userstodirecttheexhaustaccordingtooperator
preference.Toadjustthedirection,turntheexhaustcap
inthedesireddirection.
Loading Fasteners
2
Connectthetooltotheairsource.
Pushdownonthelatchbutton(A).Pullbackonthe
magazinecover(B).
Insertastickoffastenersintothemagazinerail (C).
Makesurethepointedendsofthefastenersare
restingonthebottomledgeofthemagazinewhen
loading.Makesurethefastenersarenotdirtyor
damaged.
Pushthemagazinecover (B) forwarduntillatchbutton
popsup.
WARNING: Thetoolmayfirewhenitis first
connectedtotheairsource.Alwaysconnectthe
tooltotheairsourcebeforeloadingfastenersto
preventinjuryfromunintendedcycling.Alwaysmake
surethetool’smagazineisemptyatthebeginning
ofeachworksession,beforeconnectingtoanair
source
.
WARNING:Keepthetoolpointedawayfromyourself
andotherswhenloadingfasteners.Failuretodoso
couldresultinpossibleseriouspersonalinjury.
WARNING:Useonlythosefastenersrecommended
forusewiththistool.Fasteners not identified for use
with this tool by the tool manufacturer are able to
result in a risk of injury to persons or tool damage
when used in this tool.
WARNING: Neverloadfastenerswiththeworkpiece
contactortriggeractivated.Doingsocouldresultin
possibleseriouspersonalinjury.
MagzineRail(C)
Magzine
Cover(B)
3
Unloadingfasteners
Unloadingisthereverseofloading,exceptalways
disconnecttheairsourcebeforeunloading.
WARNING: Alwaysunloadallfastenersbefore
removingtoolfromservice.
WARNING:Alwaysdisconnecttheairsourcebefore
unloading.
Clearing jams
4
Occasionally, afastenermaybecomejammedinthefiring
mechanismofthetool,makingthetoolinoperable. To
removeajammedfastener,followthestepsbelow:
Disconnectthetoolfromairsource.
Removefastenersfromthetool. Failuretodosowill
causethefastenerstoejectfromthefrontofthetool
Completelyremovethesmallnosescrews andthe
topnoseplate torevealthejammedfastener.
Using caution not to bend or damage the driver blade,
using pliers or a screwdriver if required to clear the
jammed fastener.
Putthenoseplate backonthenose, fasteningit
withthescrews.
Reconnect the tool to the air source.
Reload the tool with fasteners.
.
(D)
(E)
(E)(F)
(D)
WARNING: Makesurethereisnofastenerin
magazinebeforeclearingajam.
WARNING:Disconnectthetoolfromtheairsource
wheneverclearingajam.Afterdisconnectingthe
toolfromtheaircompressor,there,shouldstillbe
enoughairpressuretofirethetool.Aftertheair
hoseisdisconnected, alwaysfirethetoolintoscrap
woodrepeatedlytomakesureallofthe
compressedairisexpended.
Setting the air pressure
5
Theamountofairpressurerequireddependsonthe
sizeofthefastenersandtheworkpiecematerial.
Begintestingthedepthofdrivebydrivingatestnail
intothesametypeofworkpiecematerialusedforthe
actualjob. Driveatestfastenerwiththeairpressure
setat90-95psi.Raiseorlowertheairpressuretofind
thelowestsettingthatwillperformthejobwith
consistentresultsItmaybepossibletoachievethe
desireddepthwithairpressureadjustmentsalone.
.
Nose(F)
Nose plate(E)
Nose screw(D)
Latchbutton(A)
HOMEDEPOT.COM
Please contact 1-800-514-6729 for further assistance.