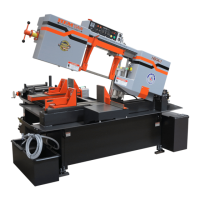
The device described in this manual is a HEM SAW Horizontal Air Saw Machine, designed for cutting various materials with a band saw blade. The manual specifically details the procedure for changing the blade on these machines, highlighting safety precautions and step-by-step instructions for different models.
Function Description:
The HEM SAW Horizontal Air Saw Machine is a cutting tool that utilizes a band saw blade to make precise cuts. It features an arm that can be raised and lowered, controlled by an air system, and a blade tensioning mechanism to ensure proper cutting performance. The machine is equipped with a self-tracking system for the blade, which adjusts the blade's position on the wheels as they rotate. Different models (Manual Air Saws, A-1 Air Saws, A-4, and A-C Air Saws) have varying control mechanisms for the arm and motor, but the core function of cutting with a horizontal band saw blade remains consistent. The machine also includes safety features such as blade guards and warnings regarding blade tension and handling.
Important Technical Specifications:
While the manual doesn't provide a comprehensive list of all technical specifications for the entire machine, it does offer crucial details related to blade tension, which is a critical operational parameter.
-
Blade Tension: The manual includes a "BLADE TENSION CHART" specifying the recommended PSI for different saw models:
- H90A-1, H90A-4, H90A-C: 25,000 PSI
- H105A-4, H105A-C, H105M, H105LA-4, H105LA-C, H105LM: 20,000 PSI
- CYCLONE A-4, CYCLONE A-C, CYCLONE M: 20,000 PSI
- SIDEWINDER A-1, SIDEWINDER A-C, SIDEWINDER M: 25,000 PSI
This chart is essential for ensuring the blade is tensioned correctly, which directly impacts cutting accuracy and blade longevity. The manual also mentions that for models with the Optional Air Powered Blade Tensioner, the system automatically tensions the blade to the proper setting.
-
Blade Guide Caps Torque: The manual refers to a "Guide Cap Torque Chart" (found in a separate section of the manual, not provided here) for the correct torque specifications when tightening the blade Guide Caps. This indicates that precise tightening of these components is necessary for proper blade alignment and safety.
Usage Features:
The manual outlines several usage features related to operating the saw, particularly during blade changes:
- Arm Control:
- Manual Air Saws: An "ARM Switch" with "LIFT" and "AUTO" positions. "LIFT" raises the arm.
- A-1 Air Saws: An "ARM Switch" with a "LIFT" position to raise the arm.
- A-4 and A-C Air Saws: An "ARM RETRACT" button on the control panel to raise the arm.
- Feed Rate Control: A "Feed Rate Knob" that, when turned clockwise, closes the air flow to the cylinder, preventing the saw arm from falling during blade installation/change.
- Sliding Blade Guard: A movable guard that needs to be raised and moved out of the way for blade access.
- Blade Tension Handle/Knob/Switch:
- Manual Tension: A "Blade Tension Handle" is turned counter-clockwise to release tension and clockwise to tighten.
- Optional Air-Powered Blade Tensioner: Features a "Blade Tension lever" (OFF/ON) and a "Blade Tension Knob" for initial snugging of the blade before the automatic tensioning system takes over.
- Wheel Covers: Door handles are provided to open the Drive and Idle Wheel Covers, which must be open to remove and install the blade.
- Motor Control:
- Manual Air Saws: A spring-loaded "MOTOR Switch" with "START" and "OFF" positions.
- A-1 Air Saws: A "MOTOR switch" with "ON" and "OFF" positions.
- A-4 and A-C Air Saws: "MOTOR ON" and "Safety Start" buttons, and an "OFF" button.
- Self-Tracking System: The saw has a self-tracking system that adjusts the blade's position on the wheels when the motor starts, ensuring proper alignment.
- Miter Position (Optional): For mitering band saws, the arm can be swung slightly to a miter position to facilitate opening band wheel doors, especially with optional top clamps.
Maintenance Features:
The manual implicitly describes several maintenance-related features and procedures:
- Blade Change Procedure: The entire document is a detailed guide on how to safely and correctly remove and install a new blade, which is a routine maintenance task.
- Blade Guide Caps: These components can be loosened and tightened, and the manual suggests they might be removed for cleaning the Blade Guides.
- Blade Brush Assembly: The manual instructs users to check and set the blade brush to make light contact with the blade, ensuring the wires sweep only through the gullet of the teeth. Improper setting can lead to blade dulling and premature brush wear, indicating that this is a regular adjustment or inspection point.
- Bumper Block Carbide: The manual emphasizes ensuring the blade is properly located on the Bumper Block Carbide near the Idle Wheel, suggesting this is a critical alignment point that needs regular verification.
- Wheel Inspection: Users are instructed to check the position of the blade on the wheels, ensuring the teeth do not touch the wheel and the blade does not ride on the wheel flanges. This is a crucial check for preventing damage to both the blade and the machine's wheels.
Safety Features and Warnings:
Safety is a paramount concern throughout the manual, with numerous warnings:
- CAUTION!!!! Wear gloves: Emphasizes the sharpness of band saw blades and the risk of serious injury, amputation, or death.
- CAUTION (Blade Tension): Warns about the danger of too little tension causing the blade to fall prematurely and the risk of injury from the sharp blade.
- ▲ WARNING (IMPACT HAZARD - Tension-rod failure): Highlights the danger of tension-rod failure leading to dangerous recoil, injury, or death, advising users to stand to the side when tensioning the blade. This warning is repeated multiple times.
- DO NOT STAND IN FRONT OF THE TENSION HANDLE: Specific instruction to avoid injury if the tension handle comes out under great tension.
- CAUTION!! Be careful as the blade will attempt to un-twist: A warning during blade removal from guides, indicating the blade's stored energy.
- NOTICE!!!! Be careful when handling saw blades: Warns against damaging the tooth edge, as chipped or broken teeth cause cutting problems.
- NOTE: Make sure the blade is installed with the teeth pointing down and facing in the correct direction: Crucial for correct operation and safety.
- DO NOT over tension the blade with the Blade Tension Slide Knob: Specific instruction for models with optional air-powered tensioners to avoid over-tensioning during the initial snugging phase.
In summary, the HEM SAW Horizontal Air Saw Machine is a robust cutting tool with various models offering different control interfaces. Its operation involves precise blade tensioning, careful blade handling, and regular checks of components like blade guides and brushes to ensure safe and efficient cutting. The manual serves as a critical guide for performing the essential task of blade replacement, emphasizing safety at every step.