Do you have a question about the Heatcraft INTELLIGEN and is the answer not in the manual?
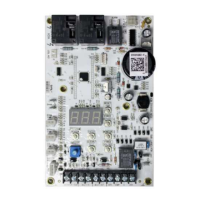
Instructions for future reference; equipment assembly and wiring required before use. Ensure control transformer is properly set up.
Control transformers with 240V tap may need adjustment to 208V for 25-29VAC power to the IntelliGen board.
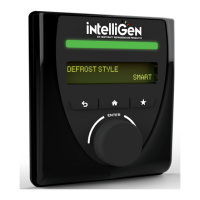
Explains how to use the IRC User Interface buttons (Home, Back, Favorites) and screen elements (Display, LED Status Light Bar, Knob).
Details the meaning of GREEN, RED, YELLOW, and WHITE LED states for system and EV status, and errors.
Indicates that the EV Unit is currently OFF.
Enter the Expert PIN to access configuration settings. The default PIN is 999999.
Choose 'EU' to proceed with configuring the system from the IRC UI.
The IRC attempts to discover all connected units in the system after configuration mode is selected.
Confirms the number of EV units found and allows continuation of the setup process.
Name the unit by selecting a base name (Freezer, Cooler, Unit, Box) using the knob.
Assign a unit name suffix (e.g., 1A, 1B) by turning and pushing the knob.
Select the primary evaporator for sensing box temperature if multiple evaporators are configured.
Indicate if a condensing unit is wired to an evaporator by selecting YES.
Specify which evaporator is wired to the condensing unit by selecting it.
Set the country by selecting from a list using the knob.
Choose the correct time zone from the available options.
Enable or disable daylight savings time.
Enter the current year, month, day, hour, and minute.
Choose the appropriate defrost type from the available selections.
Select the desired defrost style from the available options.
Choose the refrigerant used in the system.
Set the desired box temperature set-point.
Initiate the system startup sequence once all configurations are complete.
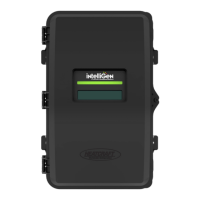
The intelliGen™ Refrigeration Controller (IRC) is a sophisticated device designed to manage and optimize refrigeration systems. It acts as the central brain for controlling various components of a refrigeration unit, ensuring efficient operation and precise temperature management. The controller is equipped with a user-friendly interface that allows for easy setup, monitoring, and adjustment of system parameters.
The primary function of the intelliGen Refrigeration Controller is to provide comprehensive control over refrigeration evaporators and their associated condensing units. It facilitates the discovery and configuration of connected evaporators, allowing users to define unit names, assign primary evaporators for box temperature sensing, and specify wiring connections to condensing units. The controller supports various defrost types and styles, enabling tailored defrost cycles to maintain optimal coil performance and prevent ice buildup. It also allows for the selection of different refrigerants, ensuring compatibility and efficient operation across a range of refrigeration systems.
A key aspect of its functionality is temperature management. Users can set a precise box temperature set-point, and the controller will work to maintain this temperature by managing compressor operation and other system components. The device continuously monitors system status and provides visual feedback through an LED Status Light Bar, indicating normal operation, alarms, or errors. This real-time monitoring helps in quickly identifying and addressing any issues that may arise within the refrigeration system.
The intelliGen controller is also designed with intelligence in mind, offering features like automatic equipment discovery to simplify the initial setup process. It can identify multiple connected evaporators and guide the user through the configuration of each unit. Furthermore, it incorporates date, time, time zone, and daylight savings settings, which are crucial for scheduling operations like defrost cycles and logging data accurately.
The intelliGen Refrigeration Controller boasts an intuitive user interface (IRC UI) that makes interaction straightforward. Navigation is primarily achieved through a knob/enter button, which allows users to rotate left and right to browse menu options and press to select. Dedicated buttons for Home, Back, and Favorites enhance usability, providing quick access to frequently used functions and the main menu. The OLED screen displays detailed information, including temperature readings, parameters, and other relevant data, ensuring users have a clear overview of the system's status.
During the initial setup, the controller guides the user through a step-by-step configuration process. This includes entering an expert PIN for access, selecting the configuration mode (e.g., from the EV), and initiating equipment discovery. Once units are discovered, users can assign unique base names and suffixes to each evaporator, making identification and management easier. The UI also facilitates the selection of the primary evaporator responsible for sensing the box temperature, which is critical for accurate temperature control in multi-evaporator systems.
The controller's ability to determine if a condensing unit is wired and to which evaporator it is connected simplifies complex system setups. Users can easily select the appropriate defrost type (e.g., Low Temp Electric) and defrost style (e.g., Smart) to optimize energy consumption and maintain system efficiency. The refrigerant selection feature ensures that the controller operates with the correct thermodynamic properties for the chosen refrigerant, maximizing performance.
The LED Status Light Bar is a prominent usage feature, providing immediate visual cues about the system's health. A static green light indicates normal operation, while a static red light signals an alarm. A flashing red light pinpoints the specific EV unit where an alarm originated. Similarly, yellow lights indicate errors, with a flashing yellow light identifying the source. A static white light signifies that an EV unit is being identified, and no LED light means the EV unit is currently off. This color-coded system allows for quick diagnosis and troubleshooting without needing to delve into complex menus.
While the manual primarily focuses on initial setup and usage, several aspects of the intelliGen Refrigeration Controller contribute to ease of maintenance. The clear LED Status Light Bar is a significant maintenance aid, as it provides immediate visual diagnostics of system issues. By quickly identifying whether an alarm or error exists and pinpointing its origin (e.g., a specific EV unit), technicians can efficiently troubleshoot and address problems, reducing downtime and potential product spoilage.
The controller's ability to display detailed parameters on the OLED screen allows for comprehensive monitoring of system performance. This data can be invaluable for preventative maintenance, enabling technicians to observe trends, identify potential issues before they escalate into major failures, and fine-tune system settings for optimal operation.
The requirement for a proper control circuit transformer setup, as highlighted in the "Prior Assembly Needed" section, is a foundational maintenance consideration. Ensuring the correct voltage tap (240V or 208V) for the IntelliGen board is crucial for its stable operation and longevity. This attention to power supply details helps prevent electrical issues that could lead to controller malfunction or damage.
Furthermore, the emphasis on having the latest firmware revision, accessible through the intelliGen controls website, points to the controller's support for ongoing improvements and bug fixes. Regular firmware updates can enhance performance, add new features, and address security vulnerabilities, contributing to the long-term reliability and maintainability of the device. The availability of an installation and operation manual, along with customer service contacts, provides essential resources for troubleshooting and obtaining support, further aiding in the maintenance and upkeep of the refrigeration system.
| Brand | Heatcraft |
|---|---|
| Model | INTELLIGEN |
| Communication Protocol | Modbus RTU |
| Power Supply | 24 VAC/DC |
| Display | LCD |