EasyManua.ls Logo

Heath Zenith 7352 - User Manual

Heath Zenith 7352
6 pages
Print Icon
To Next Page IconTo Next Page
Loading...
© 2014 HeathCo LLC
Wireless
Home Alert Kit
Install Wireless Chime
Plug in wireless chime. IMPORTANT: To
avoid resetting chime memory, wait 30
seconds before pressing the push button
or the “TEST” button inside the sensor. See
Troubleshooting, Problem 3 if chime memory
was accidentally reset.
Figure 1
WARNING: To prevent possible
SERIOUS INJURY or DEATH:
NEVER allow small children near
batteries.
If battery is swallowed, immediately
notify doctor.
Model 7352
Wireless
plug-in
chime
Door sensor with battery,
Door magnet, Magnet spacer
Wireless
push button
Hardware
pack
(x2)
Important considerations: The sensor must be mounted to the door jamb. The
magnet should be attached to the door. Sensor is for indoor use only.
This package includes (Style of door sensor, push button, and chime may vary
from illustration):
Chime Volume Control
Access Door (See Tune
Settings or Troubleshooting)
C
H
I
M
E
V
O
L
U
M
E
Question and Answer IconNeed help?

Do you have a question about the Heath Zenith 7352 and is the answer not in the manual?

Summary

Wireless Home Alert Kit Overview

Important Considerations and Safety

Key usage guidelines and critical safety warnings for preventing injury or death.

Chime Volume Control

Instructions for adjusting the volume level of the wireless chime unit.

Install Wireless Chime

Guidance on plugging in and setting up the wireless chime unit for operation.

Install Door Sensor

Prepare and Test Door Sensor

Steps to prepare the sensor by removing the battery tab and testing its operational range.

Mount Door Sensor Components

Instructions for physically attaching the door sensor and magnet to the frame using screws or tape.

Install Push Button

Prepare and Test Push Button

Procedure for removing the battery tab and testing the push button's functionality.

Mount Push Button

Guidelines for attaching the push button to a surface using screws or double-sided tape.

Tune Settings

Selectable Chime Tunes

Information on the different selectable chime tunes and how to change them.

Tune Setting Table

A table mapping switch settings to specific chime tunes.

Troubleshooting

Chime Not Sounding or Quitting

Diagnosing and resolving issues where the chime does not sound or stops working.

Chime Not Working After Installation

Troubleshooting steps when the chime fails to operate post-installation.

False Triggers

Resolving instances where the chime sounds unintentionally due to interference or other issues.

Regulatory Information

FCC Compliance Statement

Details regarding compliance with FCC Rules and Industry Canada standards.

Overview

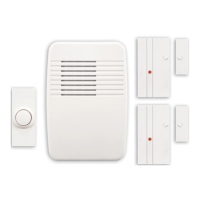
This document describes the Heath Zenith Wireless Home Alert Kit, Model 7352, a system designed to provide wireless alerts for home security or convenience. The kit typically includes a wireless plug-in chime, a door sensor with a battery, a door magnet, a magnet spacer, a wireless push button, and a hardware pack. The design of these components may vary slightly from the illustrations provided in the manual.

Function Description

The Heath Zenith Wireless Home Alert Kit functions as a notification system. When the door sensor detects that a door has been opened (or the push button is pressed), it wirelessly transmits a signal to the plug-in chime, which then sounds an audible alert. This system can be used for various purposes, such as indicating when a door is opened, serving as a doorbell, or providing a simple alert for entryways. The door sensor is specifically designed for indoor use.

Usage Features

The system offers several user-friendly features for installation, operation, and customization:

  • Wireless Chime Installation: The wireless chime is designed for easy installation; simply plug it into a standard wall outlet. To prevent accidental resetting of the chime's memory, it's important to wait 30 seconds after plugging it in before pressing any buttons on the push button or the "TEST" button inside the sensor.
  • Chime Volume Control: The chime includes a volume control feature, allowing users to adjust the loudness of the alert to their preference. This adjustment is made by unplugging the chime, setting the desired volume using the control, and then plugging it back in.
  • Door Sensor Installation: The door sensor installation involves a few steps to ensure proper functionality. First, an orange battery tab must be removed from the sensor to activate it. Before permanent mounting, it's recommended to test the range by holding the sensor and magnet in the desired location and verifying that the chime sounds when the magnet is moved away from the sensor. The sensor can be mounted using either screws or double-sided tape. A critical aspect of the door sensor installation is maintaining a maximum gap of 1/2 inch (13 mm) between the sensor and the magnet. Additionally, the alignment arrows on both components must be aligned and facing each other. If the magnet is recessed, an optional spacer can be used to ensure proper alignment. For screw mounting, the back cover of the sensor is removed, attached to the wall, and then the sensor snaps onto the back cover. For tape mounting, foam tape is applied to the back cover, which is then stuck to the door frame.
  • Push Button Installation: Similar to the door sensor, the push button requires the removal of an orange battery tab before use. Users should test the range by temporarily positioning the push button and pressing it to confirm the chime sounds. The push button can also be mounted using screws or double-sided tape. For screw mounting, the back cover is removed, attached to the door jamb or wall, and the front of the push button snaps on. For tape mounting, the surface of the door jamb or wall should be clean before attaching the push button with double-sided tape.
  • Tune Settings: The chime offers selectable tunes, including "Ding" (one note), "Ding-Dong" (two notes), and "Westminster" (eight notes). The factory setting is typically "Westminster." Users can change the tune by accessing the chime's internal settings. This involves disconnecting the chime from its power source, opening the access door, and adjusting switch 2 according to the "Tune Setting Table" provided in the manual. It's important to note that the chime models are designed to work with up to 5 transmitters (push buttons and/or sensors, sold separately) and can play only two different tunes, regardless of the number of transmitters used.
  • System Synchronization: The push button/sensor and chime are factory-synced. However, if they become unsynced, the manual provides instructions for re-synchronization. This involves unplugging the chime, ensuring switch 1 on both the chime and transmitter is set to OFF, waiting 30 seconds, and then pressing and holding the push button or the "TEST" button inside the sensor within 20 seconds of plugging the chime back in. The "Ding-Dong" tune will play to confirm synchronization.

Maintenance Features

The manual also outlines important considerations for maintenance and troubleshooting to ensure the longevity and proper functioning of the device:

  • Battery Management: The door sensor and push button operate on batteries. Users are advised to ensure batteries are installed correctly and to check their charge periodically, replacing them when necessary. A critical safety warning emphasizes that small children should never be allowed near batteries, and if a battery is swallowed, medical attention should be sought immediately.
  • Troubleshooting Guide: A comprehensive troubleshooting section addresses common issues:
    • Chime not sounding or ringing once and quitting: This could be due to incorrectly installed or dead batteries in the push button/sensor, the chime not receiving power, or the push button/sensor and chime being unsynced. Corrective actions include checking battery installation, replacing batteries, ensuring the chime is plugged in, and re-syncing the devices.
    • Chime not working after installation despite good battery: This often occurs if the chime or transmitter is mounted on or near metal studs or concrete surfaces, which can reduce transmission range. Corrective actions involve using wood shims to move the device away from metal surfaces or relocating the chime to a different wall outlet or away from concrete.
    • Chime sounding when not intended (false triggers): This indicates interference from another wireless device. The recommended corrective action is to reset the chime. This involves unplugging the chime, ensuring switch 1 on both the chime and transmitter is set to OFF, waiting 30 seconds, and then pressing and holding the push button or the "TEST" button inside the sensor within 20 seconds of plugging the chime back in. This process erases the chime's memory, after which the devices need to be re-synced.
  • Regulatory Information: The device complies with FCC Rules Part 15 and RSS-210 of Industry Canada, ensuring it meets regulatory standards for electromagnetic compatibility. Users are cautioned that unauthorized changes or modifications could void their authority to operate the equipment.

Overall, the Heath Zenith Wireless Home Alert Kit is designed for straightforward installation and operation, with clear instructions for customization and troubleshooting to maintain its functionality.

Heath Zenith 7352 Specifications

General IconGeneral
WattageUp to 300W
Adjustable SensitivityYes
Adjustable Time DelayYes
Weather ResistanceYes
Mounting TypeWall Mount
TypeMotion Activated
Detection Range70 feet
Voltage120V

Related product manuals