14 / 25
PL
SK
EN
CS
HU
• Standard accessories are subject to change without notice.
• This product requires assembly. The product must be assembled correctly before use.
WARNING! B
The plug of the machine (apparatus) must be unplugged from the mains supply before
any intervention, assembly, service, adjustment, etc. This will eliminate the possibility of
electric shock and accidental start-up of the active parts of the machine.
THIS WARNING IS NOT REPEATED IN ANY FOLLOWING POINTS!
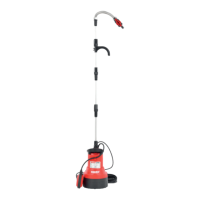
ASSEMBLY
C Prepare gaskets that will need to be inserted between all joints!
1. Mount one or more straight outlet pipe parts on the pump outlet thread (depending on
the required pumping depth, the hook on one of the parts is designed to be suspended
from the edge of the pumped tank).
2. Tighten the fitting.
3. Connect the bent part of the outlet pipe to the straight part.
4. Install the end quick coupler to the end of the bent part.
5. Connect the outlet valve to the quick coupler.
6. We recommend attaching the power cord to the pipe with a cable tie (not included).
7. Adjust the float switch cable to the desired length by attaching it to the bracket on the pump
body.
To ensure maximum flow of transported water, it is possible to use a connection hose
with a diameter of 3/4” and connect it directly to the pump thread (without aluminium
pipe).
INSTALATION OF THE PUMP
C Never hang the pump by the discharge hose, float or supply cable.
If there is damage to the power cable of the pump , this must be repaired or replaced
only by an authorized service center.
CAUTION! A
Permanent installation of this appliance must be performed by a person with
relevant professional electrical qualification.
Note: I
The pump can exclusively be used in vertical position!
• Always immerse the pump or pull it into/out of the water suspended by the handle.
The hook on the aluminium tube is only intended for hanging a pump already immersed.
Not for handling it!
 Loading...