EasyManua.ls Logo

HEINEKEN BLADE - User Manual

HEINEKEN BLADE
2 pages
Print Icon
To Next Page IconTo Next Page
Loading...
BLADE
Quick start
1. Positioning
Remove the Blade from its
packaging and place it flat in
the indicated position.
2. Installing the handle
Position the handle in its housing
and tighten the screw using the
special tool included in the Blade
kit
3. Installing the feed cable
Raise the Blade and insert the
cable (supplied) in the socket
4. Power supply
Connect the feed cable to a
220V socket.
Please Note. It is necessary to
wait 8h before starting once the
Blade is connected.
5. Installing the drip tray
Position the drip tray at the front
of the Blade, pushing it into its
housing until hearing «click».
6. Pre-cooling the keg
Before starting the Blade, the keg
must be pre-cooled for
16-24 hours at a temperature of
3-4°C
7. Charging the keg
Open the tap cover
8. Preparing the keg step 1
Remove the keg from its
packaging
9. Preparing the keg step 2
Unroll completely the “beer tube”
with the valve inserted in the keg
10. Preparing the keg step 3
Press the orange valve with a finger
until hearing a «click». At this point
the keg is ready to be installed.
11. Positioning the keg
Position the keg vertically inside
the cooling chamber with the
valve pointing downwards and
the “beer tube” straight towards
the tap.
12. Inserting the «tube»
Remove the red cap and bend the
beer tube until it completely enters
the channel and the top of the
orange valve corresponds with its
appropriate housing.
Question and Answer IconNeed help?

Do you have a question about the HEINEKEN BLADE and is the answer not in the manual?

Summary

BLADE Quick Start Guide

Initial Setup of the Blade

Positioning the Blade, installing the handle, feed cable, and drip tray.

Power Supply and Keg Pre-cooling

Connecting power, waiting 8 hours, and pre-cooling the keg for 16-24 hours.

Keg Preparation and Connection

Charging the keg, preparing the beer tube, positioning the keg, and inserting the tube.

Finalizing Setup and Tapping the Beer

Securing Keg Connections and Dome

Fastening the beer tube, closing the tap cover, and positioning the transparent dome.

Device Operation and Pressurization

Switching on the Blade, pressurizing the keg, and activating the lighting.

Temperature Check and Tapping

Verifying correct temperature and pouring beer.

Overview

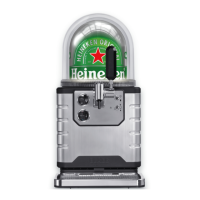
The BLADE is a compact, countertop draft beer system designed to deliver a premium draft beer experience. It utilizes BrewLock technology, ensuring fresh, high-quality beer with every pour.

Function Description:

The BLADE system is designed to store, cool, pressurize, and dispense beer from specialized kegs. Its primary function is to provide a professional draft beer solution in various settings, from homes to commercial establishments, without the need for complex CO2 systems or extensive installation. The system maintains the beer at an optimal serving temperature and pressure, ensuring a consistent and enjoyable pour.

Important Technical Specifications:

  • Power Supply: The device operates on a 220V power supply.
  • Pre-cooling Time: Kegs require a pre-cooling period of 16-24 hours at 3-4°C (approximately 37-39°F) before being installed in the BLADE system.
  • Initial Setup Wait Time: After connecting the BLADE to power, an initial waiting period of 8 hours is required before operation. This allows the system to stabilize and reach optimal cooling conditions.
  • Temperature Control: The system features a temperature dial to monitor and ensure the beer is at the correct serving temperature, indicated by a needle close to the first line at the bottom of the dial.
  • BrewLock Technology: This proprietary technology ensures that the beer remains fresh and carbonated without external CO2, as the beer is pushed out of a sealed, collapsible inner bag within the keg.

Usage Features:

The BLADE system is designed for ease of use, with a straightforward setup and operation process:

  • Positioning: The device should be placed on a flat, stable surface.
  • Handle Installation: A handle is easily installed and secured with a screw using a provided tool.
  • Power Connection: The feed cable is inserted into a socket on the device and then connected to a 220V power outlet.
  • Drip Tray: A drip tray clicks into place at the front of the unit to catch any spills, maintaining cleanliness.
  • Keg Preparation:
    • Kegs are removed from their packaging.
    • The "beer tube" with the valve is unrolled completely.
    • An orange valve on the keg is pressed until a "click" is heard, indicating it's ready for installation.
  • Keg Installation:
    • The tap cover is opened.
    • The keg is positioned vertically inside the cooling chamber with the valve pointing downwards and the beer tube directed towards the tap.
    • The red cap is removed from the beer tube, which is then bent and inserted into a channel until the orange valve aligns with its housing.
    • The end of the beer tube is pressed into its housing until a "click" is heard, securing it.
    • The tap cover is then closed.
  • Dome Positioning: A transparent dome is placed vertically over the installed keg.
  • Power On: The system is switched on using a power switch located on the lower right side.
  • Pressurization: The keg is pressurized by pressing down the bottom lever on the right of the tap. A green LED illuminates after approximately 2 seconds, indicating successful pressurization.
  • Lighting: An optional lighting feature, located around the base of the keg, can be activated by raising the top lever on the right of the tap.
  • Tapping: Once the temperature is correct and the keg is pressurized, beer can be dispensed by operating the tap.

Maintenance Features:

While the manual primarily focuses on setup and usage, some aspects imply maintenance considerations:

  • Pre-cooling Requirement: The need to pre-cool kegs for 16-24 hours at 3-4°C is crucial for optimal performance and beer quality, suggesting proper planning and refrigeration of kegs.
  • Initial Power-on Wait Time: The 8-hour wait after initial power connection allows the cooling system to reach its stable operating temperature, which is a critical step for the longevity and efficiency of the cooling components.
  • Drip Tray: The removable drip tray simplifies cleaning and prevents spills from accumulating on the countertop or within the unit, contributing to hygiene and ease of maintenance.
  • BrewLock System: The sealed nature of the BrewLock kegs minimizes exposure to air, reducing the need for complex cleaning procedures associated with traditional draft systems (e.g., beer lines, CO2 regulators) and extending the freshness of the beer. The system is designed for quick and easy keg changes, further simplifying maintenance.
  • Temperature Monitoring: The integrated temperature dial allows users to easily verify that the system is operating within the correct temperature range, which is vital for both beer quality and the efficient functioning of the cooling unit. Regular checks ensure the system is performing as expected.

In summary, the BLADE is a user-friendly, self-contained draft beer system that leverages BrewLock technology to offer a convenient and high-quality beer dispensing experience with minimal setup and maintenance requirements.

HEINEKEN BLADE Specifications

General IconGeneral
BrandHEINEKEN
ModelBLADE
CategoryKitchen Appliances
LanguageEnglish