This document provides user instructions for the Helavo Rollator Series H1010, which applies to models H1010 - H1019.
Function Description
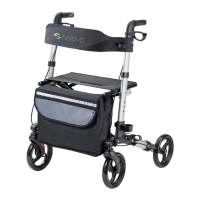
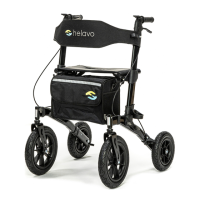
The Helavo Rollator Series H1010 is designed as a walking aid for individuals with reduced mobility. It is suitable for both indoor and outdoor environments and can also be used for transporting smaller objects. The rollator features a foldable design for easy storage and transportation, and includes a multifunctional bag for carrying items.
Important Technical Specifications
- Applicable Models: H1010 - H1019
- Maximum User Weight: 300 lbs
- Handle Height Adjustment Range: 31.1 - 37.4 inches
- Assembly Time: Approximately 10 minutes (no tools required)
- Components: Frame, two cane holders, multifunctional bag, wing screws, bolt, attachment strap, user instructions, product inserts.
Usage Features
Intended Use:
The rollator is intended for use on solid ground by persons with a maximum weight of 300 lbs. Users should possess the necessary physical, visual, and cognitive abilities to operate the rollator safely.
Assembly:
The rollator is delivered pre-assembled and can be fully assembled in a few steps without tools. It is recommended to place a blanket underneath to protect the floor during assembly.
- Remove the rollator and packaging material.
- Remove the orange attachment strap, which can be reused to secure the rollator in its folded position.
- Lay the rollator down with the backrest (A) facing up. Loosen the wing screws (D) on the front wheels (E).
- Unfold the front wheels (E) and secure them with the loosened wing screws (D).
- Turn the rollator so the handles (F) are facing up. Pull the bracket off the bolt (I) from the inside of the rear wheel and pull the bolt (I) out.
- Unfold the rear wheel axle of the rear wheel (K).
- Fasten the rear wheel axle (K) with the previously loosened bolt (I) by inserting the bolt into the provided hole.
- Fasten the bracket over the unfolded rear wheel axle (K) and pull it over the end of the bolt (I). Repeat for the second rear wheel.
- Check that both bolts (I) and wing screws (D) are securely tightened.
- Put the rollator in an upright position and pull it apart by both handles (F). Push it down on both sides of the seat (B) until it locks into place with a "click" sound, indicating it is fully unfolded.
- Attach the multifunctional bag (C).
- Hook the tabs of the multifunctional bag (C) to the provided brackets.
Adjusting the Height:
To adjust the handle height, press the spring button (H) on the frame and move the handle to the desired height. Ensure the spring buttons on both handles are locked and both handles are set to the same height. The ideal handle height is when your arms are hanging, and your wrist is at the height of the handle, allowing for a slightly bent elbow when gripping.
Brakes:
- Braking: Pull the brake handles (G) upward to brake the rollator.
- Parking Brake: Push the brake handles (G) downward to lock the rear wheels. This activates the parking brake.
- Releasing Parking Brake: Pull the brake handles (G) upward to release the parking brake.
Adjusting the Brakes:
To adjust the rear brake (L), locate the adjustment screw and locking nut on the rear wheels (K). Turn the adjustment screw counterclockwise to increase tension, then secure it by turning the locking nut clockwise while holding the adjustment screw in place.
- Important: Incorrect brake adjustment (too loose or too tight) can affect brake function. A too-tight brake may drag on the wheel, while a too-loose brake may impair operation.
Removable Cane Holders:
Attach the cane holders (J) to both sides of the frame by sliding them onto the provided positions from above.
Folding and Storing the Rollator:
- Pull the handle in the middle of the seat (B) firmly upwards to fold the rollator.
- Continue to push the rollator on both sides of the frame.
- Secure the folded rollator with the orange attachment strap at the brackets where the multifunctional bag (C) hangs.
Transportation of the Rollator:
To prepare for transportation, set the handle height (F) to the lowest possible level.
- Remove the bolt (I) and fold in the rear wheels (K). Push the bolts back through the provided holes and fasten the brackets (reverse of assembly steps 5-8).
- To store the rollator in the multifunctional bag (C), loosen the wing screws (D) of the front wheels (E). Fold in the front wheels and fasten them with the previously loosened screws (reverse of assembly steps 3-4).
The multifunctional bag (C) can be expanded by opening its lower zipper and pulling it apart. To shrink it back down, follow these steps in reverse.
Safety Instructions:
- Ensure the parking brake (G) is active when the rollator is parked.
- Check handle height and ensure spring buttons (H) are locked before use.
- Ensure the rollator is completely unfolded and locked into position with a "click" sound.
- Keep hands away from the folding mechanism to avoid entrapment.
- Do not use the rollator as a wheelchair.
- Do not sit on the rollator if the parking brake (G) is inactive or if the rollator is at an angle.
- Do not "drop" onto the seat (B).
- Do not hang objects on the brake handles (G) or hand grips (F).
- Do not stand on the rollator or use it as a stepladder.
Maintenance Features
- Regular Checks: Periodically check for loose wing screws (D) and defective spring buttons (H).
- Brake Function: Periodically check for proper operation of the rear wheel brakes (L).
- Parts Replacement: Replace damaged or worn parts as needed.
Cleaning:
The rollator can be cleaned with a damp cloth or sponge and warm soapy water. An antibacterial surface cleaner can be used if necessary. Thoroughly dry all areas afterward. When cleaning, avoid leaving residue on the seat and handles to prevent slipperiness. Do not use scouring pads or scrapers to avoid damaging the surface coating.