Do you have a question about the helavo H1020 and is the answer not in the manual?
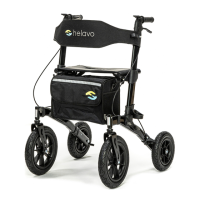
The Helavo Series H1020 Rollator Walker is designed as a walking aid for individuals with reduced mobility, suitable for both indoor and outdoor use on solid ground. It also provides a means for transporting smaller objects. Users should possess the necessary physical, visual, and cognitive abilities to operate the rollator safely.
The rollator is intended to assist individuals with reduced mobility in walking and to transport small items. It is designed for use on solid, flat surfaces, both indoors and outdoors. The user should be capable of operating the rollator safely, possessing adequate physical, visual, and cognitive functions.
The rollator can be assembled in a few simple steps, typically taking about 10 minutes, without the need for tools. It is recommended to place a blanket underneath the rollator during assembly to protect the floor.
Upon unpacking, remove the rollator from its packaging and discard any protective foils. Lay out all parts for assembly, ensuring the seat lies flat.
Rear Wheel Axle Installation: Begin by removing the two wing screws ("M") from the frame at the "RB" mark. Insert the rear wheel axle with the rear wheel ("L") into the frame, aligning the "RB" marking on the axle with the corresponding mark on the frame. Both "RB" markings should face the outer side of the rollator. It is crucial to ensure that the pictured marking on the rear wheel axle is flush with the frame, allowing the wing screw holes ("M") to align with those on the frame. Fasten the rear wheel axle with the wing screws, which were loosened beforehand. Repeat this process for the second rear wheel axle with the "LB" mark on the other side of the frame.
Front Wheel Installation: Remove the wing screw ("E") from the front wheel ("F") at the "RF" marking. Insert the front wheel ("F") into the frame at the corresponding "RF" mark. Fasten the front wheel with the previously loosened wing screw ("E"), ensuring the gray wing screw points inwards. As you turn, the screw head will tighten in the frame. Repeat this for the second front wheel ("F") with the "LF" mark on the other side of the frame.
Unfolding the Rollator: Place the rollator in an upright position. Pull both handles ("A") apart and push down on both sides of the seat ("C") until it locks into place with an audible "click," indicating it is fully unfolded.
Backrest Attachment: Attach the backrest ("B") to both sides of the handles ("A"). Secure it by tightening the grey wing screws ("I"). Ensure the Helavo logo on the backrest faces the front of the rollator. After assembly, the backrest height can be adjusted to the user's preference.
Handle Adjustment: Press and hold the gray height adjustment button ("J") and insert the two handles ("A") into the frame one after the other. Adjust the handles so that both sides are at the same height.
Brake Cable Management: It is recommended to fix the brake cables on both sides of the frame using the provided Velcro tape, as shown in the instructions. Be careful not to cover any reflectors during this step.
Bag Attachment: Attach the bag ("D") by hooking its tabs into the provided hooks on the rollator frame.
Adjusting the Height: To adjust the handle height, press the gray button on the height adjustment mechanism ("J") located on the rollator frame. Adjust the handle to the desired height and repeat the process for the other side. Ensure that the gray buttons on both handles are locked and that both handles are set to the same height. The ideal handle height is achieved when your arms are hanging, and the handles are at the height of your wrist. When placing your hand on the handle, your elbow should be slightly bent. If you find yourself bending over or keeping your arms bent at a right angle, readjust the handle height.
Brakes: The rollator is equipped with brakes for safety and control.
Adjusting the Brakes: The rear brake ("N") can be adjusted using the adjustment screw and locking nut located on the rear wheels ("L"). To increase the tension, turn the adjustment screw counterclockwise. Once the desired tension is achieved, secure the adjustment by turning the locking nut clockwise, holding the adjustment screw in place. It is important to ensure the brake adjustment is neither too loose nor too tight, as this can affect brake function. A brake that is too tight may drag on the wheel, while one that is too loose may compromise braking effectiveness.
Removable Cane Holder: The rollator includes a removable cane holder ("K"). To attach it, slide the cane holder onto the side of the frame in the provided position from above.
Folding and Storing the Rollator: To fold the rollator for storage or transport, pull the handle located in the middle of the seat ("C") firmly upwards. Continue to push the rollator inwards on both sides of the frame until it is fully folded.
Adjusting the Backrest: To adjust the backrest, press the gray width adjustment button ("H") on the backrest ("B"). Adjust the backrest to the appropriate width, repeating for the other side. Ensure that the width adjustment buttons on both sides are locked and that both sides are set to the same height.
Regular maintenance is essential to ensure the safe and proper functioning of your rollator.
Checks:
Cleaning: The rollator can be cleaned using a damp cloth or sponge with warm, soapy water. If necessary, an antibacterial surface cleaner can be used. After cleaning, thoroughly dry all areas. When cleaning, pay special attention to the seat and handles to ensure no residue is left behind that could make the surfaces slippery. Avoid using scouring pads or scrapers, as these can damage the surface coating of the rollator.
| Foldable | Yes |
|---|---|
| Frame Material | Aluminum |
| Seat Width | 45 cm |
| Seat Depth | 40 cm |
| Armrest Height | 23 cm (9 in) |
| Wheel Size | 20 cm |