1-360008/G
7
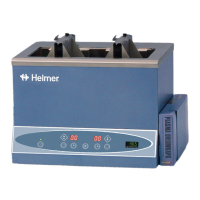
protected heater. The temperature controller activates power to the heater that is located on the
underside of the bath chamber.
Thermometer Holder - Located at the back right corner of the chamber is a set of holes for holding a
thermometer. The Helmer Digital Thermometer, or a thermometer of your choice (glass, digital, dial),
may be placed through the top hole in the bracket that has the rubber grommet, making sure that the
thermometer extends down through the hole of the bracket within the chamber bath to keep the
thermometer in a safe position.
Circuit Breaker - The unit is protected by circuit breaker(s) that are located at the back of the unit.
Chamber Drain Connection - Located on the left side of the exterior, towards the back of the unit, is
the drain valve plug. To empty the chamber bath, simply push the one end of the drain tube that has
the drain fitting (included with the unit) into the drain valve plug until it locks into position. This will
automatically open the valve system and allow the water to flow out of the chamber. After the
chamber is empty, disconnect the drain tube fitting from the drain valve plug by pushing down on the
button located at top of the drain valve plug. If you are draining the chamber water to the right side of
the unit, contact Helmer and request a "U-Fitting Assembly." The U-Fitting Assembly will allow for
the drain tubing to run behind the unit and towards the right without kinking the drain tubing.
Specification:
Weight DH4 = 58 lbs. DH8 = 74 lbs.
115 volt amps = 6 amps = 10
watts = 690 watts = 1150
230 volt amps = 3 amps = 5
watts = 690 watts = 1150
General Operation
A. Step-by-Step Thawing Procedure
1) Start:
Turn the power switch to ON and allow the chamber temperature to stabilize to the factory
preset controller value of 36.5ºC.
2) Verify Temperature Calibration
: After the chamber temperature has stabilized, verify that the
chamber temperature displayed on the digital controller matches the temperature that is displayed
on a calibrated thermometer. If the controller temperature does not match with the calibrated
thermometer, refer to the section entitled "Calibration of the Digital Controller."
3) Load the Plasma Bag(s): Press the Basket Access Button to raise the basket assembly if it is still
lowered into the chamber bath. Insert a frozen plasma bag into a Helmer Plasma Overwrap and
place it into the basket assembly. Make sure that the metal finger tab on the top of the basket
assembly is inserted through the slot in the top of the Plasma Overwrap.
*When loading two bags into each side of a DH8 basket assembly, place
 Loading...