7
GB
This appliance is fitted with a power cord with grounding plug
or electrical connections with grounding wire. The connections
must be properly installed and grounded.
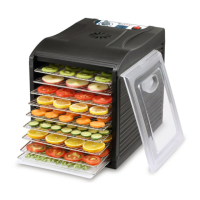
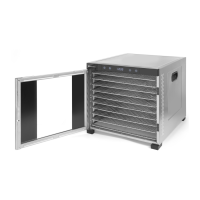
Main parts of the product
(Fig.1 on page 3)
1. Metal housing
2. Stainless steel grid (x 10 for item 229026; x 6 for item
229033)
3. Door
4. Handle (x2)
5. Control panel
6. Ventilation holes
7. Magnetic bar (x2)
8. Foot (x4)
9. Mesh (x1)
10. Bottom pad (x1)
Remark: The content of this manual applies for all listed items
unless specified otherwise. The appearance may vary from the
shown illustrations.
Control panel
(Fig.2 on page 3)
A. ON / OFF button
B. TEMP / TIME button
C. LED display
D. Increase setting (TEMP / TIME)
E. Decrease setting (TEMP / TIME)
Preparation before use
• Remove all protective packaging and wrapping.
• Check that the device is in good condition and with all ac
-
cessories. In case of incomplete or damaged delivery, please
contact the supplier immediately. In this case, do not use the
device.
• Clean the accessories and the appliance before use (See ==>
Cleaning & Maintenance).
• Make sure the appliance is completely dry.
• Place the appliance on a horizontal, stable and heat resistant
surface that is safe against water splashes.
• Keep the packaging if you intend to store your appliance in
the future.
• Keep the user manual for future reference.
NOTE! Due to manufacturing residues, the appliance may emit
a light odor during the first few uses. This is normal and does
not indicate any defect or hazard. Make sure the appliance is
well ventilated.
Note: After cleaning the appliance, it must be switched ON (See
==> Operation instructions) for about 30 minutes with tempera
-
ture set at 70°C. There is some odour or smoke evolved during
the first few cycles. This is normal and does not indicate any
defect or hazard. Make sure the appliance is well ventilated.
Operating instructions
• Place the appliance on a horizontal, stable, non-slip, and
heat-resistant surface.
• Position the food evenly on the trays, ensuring they do not
overlap. In order to have good ventilation inside the appliance,
10% of the tray’s surface should be free from food.
• Remove any trays that are not being used. A total of ten trays
can be used at the same time.
• When inserting the trays, ensure they are aligned with the
same side board correctly. Then, close the door firmly.
• Next, connect the power plug to a suitable electrical pow
-
er supply socket and the appliance is now in the STANDBY
mode. There is a beep sound and ON / OFF button will be
lighted up in blue and the LED display will be shown as “ 0000
“ in white.
• Press the ON / OFF button to start the operation, the LED dis
-
play will show the default time “10:00” (10 hours). All buttons
on the control panel will be lighted up in blue.
Time setting
• Now, you can press button + or - to increase or decrease op
-
eration time. (Range: 00:30 ~ 24:00, interval is 30 minutes).
• The setting time will be stored automatically within few sec
-
onds.
• Then, the appliance will start operation and remaining time
will be shown on the LED display. The fan at the rear side of
the appliance will start rotation.
Temperature setting
• Press TEMP / TIME button once to check the temperature
setting, you can also press button + or - to increase or de
-
crease operation temperature setting. (Default temperature:
70°C, range: 35°C ~ 75°C, interval is 5°C).
• The setting temperature will be stored automatically within
few seconds and return to display remaining time on the LED
display.
• If you want to check the temperature that was set, press
TEMP / TIME button once and the set temperature will be
shown on the LED display.
• During the operation process, you can check or change the
time and temperature setting by pressing the TEMP / TIME
button. And then press button + or - to increase or decrease
the temperature and time setting.
Switch to STANDBY mode
• Press ON / OFF button to turn to STANDBY mode. All the
buttons will go out except the ON / OFF button. And the LED
display will be shown as “ 0000 “ in white.
Time setting end up
• When the setting time counts down to 00:00, the heating el
-
ements stop working first. The cooling fan will still continue
running for about 10 seconds and 20 times of “beep” sound
from the buzzer will be heard to remind the user the opera
-
tion is finished.
• ‘End’ will be shown on the LED display and the appliance is
in STANDBY mode.
• Unplug the appliance and wear gloves (not included) if neces
-
sary to take out the food.
Operating tips
Guidelines for food preparation
• For the reason of safe and hygienic preservation, wash all the
food well before drying.
• Only process non-perished food, any blemishes are to be re
-
moved generously.
• Dehydration results are more even if the food is cut into piec
-
es of roughly the same size.
 Loading...