Installing the Pickup
Consistent String Balance is achieved with this 'Two Hole' installation.
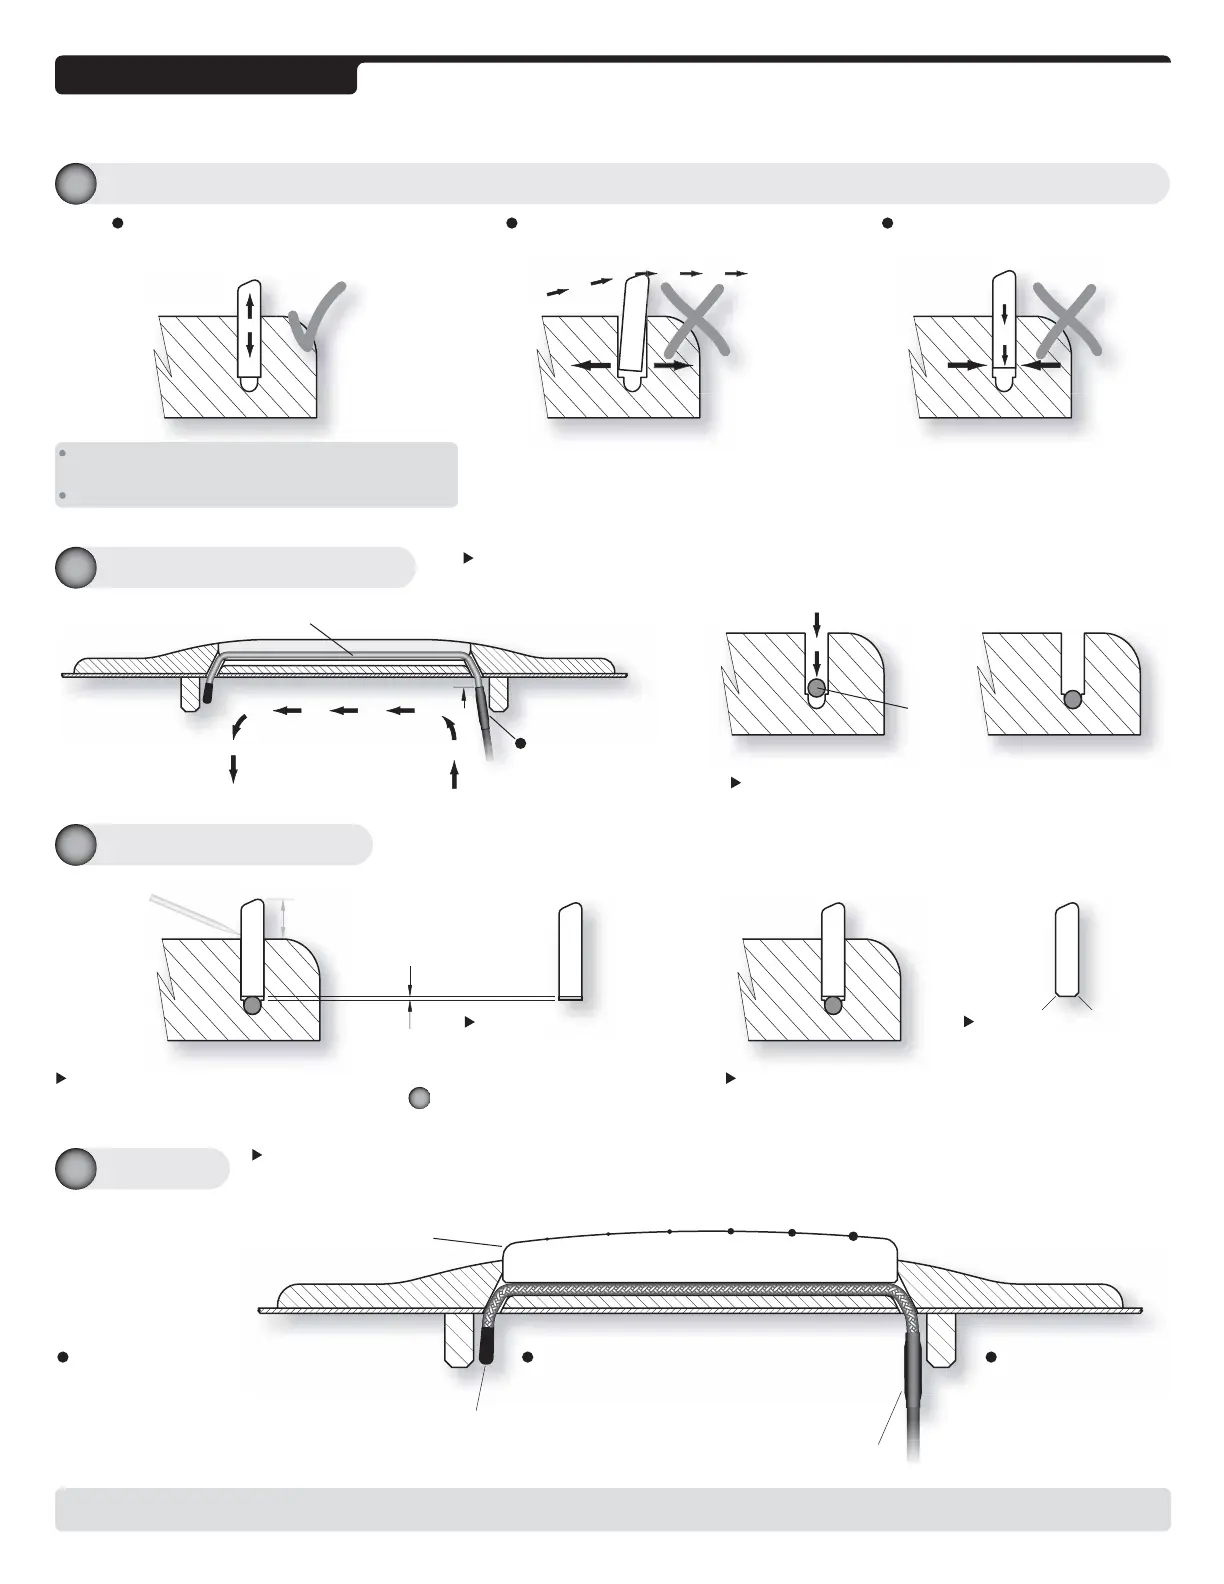
Note: These types of 'Saddle Fits' may sound o.k. acoustically, however, the
saddle needs to be in full contact with the pickup for a good amplified sound
and to insure the best acoustic tone and sustain.
To help maintain the 'Saddle Fit' during variations in humidity and
temperature, lightly wax the bridge and the inside of the saddle slot. Be
sure to remove any excess wax from the slot and especially the groove.
Polishing the sides of the saddle helps create a smooth, sliding fit.
Pass the pickup up through the hole at the 'Low E' side of the bridge and then down through
the hole at the 'High E' side of the bridge.
1
Measure the difference in saddle height using either
the line scribed or the height measured in step .
Trim the difference from the
underside of the saddle.
The underside of the saddle
must be really flat.
Check with a straight edge.
Once the original saddle
height is achieved,
chamfer and debur the
bottom edges of saddle
to help prevent binding.
Check the saddle height.
Using the saddle or a piece of wood, apply just
enough pressure to seat the pickup in the groove.
'Low E' side
The saddle should move freely
up and down in the saddle slot.
Too loose
and the saddle can
bind under string tension.
Too tight
and the saddle
may not be fully seated.
Pickup
Saddle Material: Micarta
®
has a consistent density which
helps with string balance. Bone can be inconsistent, when
choosing a piece hold it to a light and look for even color.
The pickup will not function correctly if the tip is placed under the saddle, the tip must be inserted in the hole as illustrated above.
Removing the tip of the pickup or the use of solvents, super glue or lacquer on the pickup will compromise its operation and will void the warranty.
The consistent string balance achieved with this 'two hole' installation technique is due to the mechanical symmetry of having the same type of bend at
each end the pickup. This causes the mechanical forces such as sound vibrations that are acting on the pickup to be well balanced throughout the pickup.
The tip is a special electrically shielded
termination that helps to prevent hum and
interference even when the pickup is used
with an amplifier that is not grounded.
It also makes the pickup easier to handle.
Press the saddle down firmly on to the pickup and replace the strings. Start with the 'D' String. While tensioning it, press the
saddle back (away from the sound hole) and down to prevent the saddle from binding in the saddle slot.
Next, replace the 'G' String then the rest of the strings. Plug in and check the string balance and sound quality of the installation.
If the tip or the crimp comes into contact with
the brace they could vibrate and create an
unwanted sound. A soft pad between them and
the brace (like a piece of double stick foam on
the brace) can prevent any potential problems.
Tip
Crimp
We recommend that
strings be replaced
two at a time from
now on, it will help
maintain the stability
of the installation.
Maintain a small
gap between the
crimp and the top
of the guitar.
The information and graphics contained in this document are the property of Highlander Musical Audio Products. Copying of any kind is prohibited, except for personal use only.
©
Highlander Musical Audio Products 1991-2009
Install the Pickup in the Groove
5a
Trim and Install the Saddle
5b
Restringing
5c
Check the 'Saddle Fit': This is important information for the correct operation of all under saddle pickups.
5
Pickup
Saddle
 Loading...