The HighSecLabs Secure KVM Switch is a device designed to simplify and secure the user experience when working with multiple computers. It allows for the secure sharing of keyboard, video, mouse, audio, and USB peripherals between several computers while maintaining the highest isolation between them. This obviates the need for purchasing and installing dedicated peripheral sets for each computer.
Function Description:
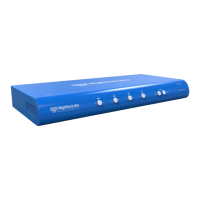
The KVM switch enables users to control multiple computers from a single set of peripherals. It supports various video interfaces including DVI-I, HDMI, and DisplayPort (DP), and offers models with 2, 4, or 8 ports. The device ensures secure isolation between connected computers, making it suitable for environments where data security is paramount.
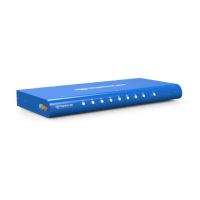
The KVM's back panel is divided into "Console Ports" for shared peripherals and "Computer/Source Ports" for connecting individual computers. Peripherals such as the keyboard, mouse, audio devices, and USB peripherals are connected to the Console Ports. Each computer is then connected to a separate Computer Port group, ensuring that every computer has its own dedicated connection.
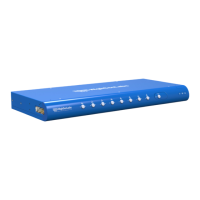
Switching between computers can be done by pressing the push buttons on the product's front panel, with the active channel indicated by an illuminated LED.
Important Technical Specifications (Based on Model Numbers):
The manual refers to a range of models, categorized by the number of ports and supported video interfaces:
-
2-Port Models (SK21x-3 / DK22x-3):
- SK21D-3: Secure 2-Port DVI-I Video KVM Switch, PP 3.0
- SK21H-3: Secure 2-Port 4K HDMI Video KVM Switch, PP 3.0
- SK21P-3: Secure 2-Port DP to HDMI Video KVM Switch, PP 3.0
- SK21PH-3: Secure 2-Port 4K DP/HDMI to DP/HDMI Video KVM Switch, PP 3.0
- SK21PP-3: Secure 2-Port DP to DP Video KVM Switch, PP 3.0
- DK22D-3: Secure 2-Port DVI-I Video DH KVM Switch, PP 3.0
- DK22H-3: Secure 2-Port 4K HDMI Video DH KVM Switch, PP 3.0
- DK22P-3: Secure 2-Port DP to HDMI Video DH KVM Switch, PP 3.0
- DK22PD-3: Secure 2-Port DVI and DP Video DH KVM Switch, PP 3.0
- DK22PH-3: Secure 2-Port 4K DP/HDMI to DP/HDMI Video DH KVM Switch, PP 3.0
- DK22PP-3: Secure 2-Port DP to DP Video DH KVM Switch, PP 3.0
- DK22PPD-3: Secure 2-Port DP to DP and DVI Video DH KVM Switch, PP 3.0
-
4-Port Models (SK41x-3 / DK42x-3):
- SK41D-3: Secure 4-Port DVI-I Video KVM Switch, PP 3.0
- SK41DU-3: Secure 4-Port DVI-I Video KVM Switch w/fUSB, PP 3.0
- SK41H-3: Secure 4-Port 4K HDMI Video KVM Switch, PP 3.0
- SK41HU-3: Secure 4-Port 4K HDMI Video KVM Switch w/fUSB, PP 3.0
- SK41P-3: Secure 4-Port DP to HDMI Video KVM Switch, PP 3.0
- SK41PU-3: Secure 4-Port DP to HDMI Video KVM Switch w/fUSB, PP 3.0
- SK41PH-3: Secure 4-Port 4K DP/HDMI to DP/HDMI Video KVM Switch, PP 3.0
- SK41PP-3: Secure 4-Port DP to DP Video KVM Switch, PP 3.0
- SK41PPU-3: Secure 4-Port DP to DP Video KVM Switch w/fUSB, PP 3.0
- DK42D-3: Secure 4-Port DVI-I Video DH KVM Switch, PP 3.0
- DK42DU-3: Secure 4-Port DVI-I Video DH KVM Switch w/fUSB, PP 3.0
- DK42H-3: Secure 4-Port 4K HDMI Video DH KVM Switch, PP 3.0
- DK42HU-3: Secure 4-Port 4K HDMI Video DH KVM Switch w/fUSB, PP 3.0
- DK42P-3: Secure 4-Port DP to HDMI Video DH KVM Switch, PP 3.0
- DK42PU-3: Secure 4-Port DP to HDMI Video DH KVM Switch w/fUSB, PP 3.0
- DK42PHU-3: Secure 4-Port DP/HDMI to DP/HDMI Video DH KVM Switch w/fUSB, PP 3.0
- DK42PP-3: Secure 4-Port DP to DP Video DH KVM Switch, PP 3.0
- DK42PPU-3: Secure 4-Port DP to DP Video DH KVM Switch w/fUSB, PP 3.0
-
8-Port Models (SK81x-3 / DK82x-3):
- SK81DU-3: Secure 8-Port DVI-I Video KVM Switch w/fUSB, PP 3.0
- SK81HU-3: Secure 8-Port 4K HDMI Video KVM Switch w/fUSB, PP 3.0
- SK81PPU-3: Secure 8-Port DP to DP Video KVM Switch w/fUSB, PP 3.0
- DK82DU-3: Secure 8-Port DVI-I Video DH KVM Switch w/fUSB, PP 3.0
- DK82HU-3: Secure 8-Port 4K HDMI Video DH KVM Switch w/fUSB, PP 3.0
- DK82PPU-3: Secure 8-Port DP to DP Video DH KVM Switch w/fUSB, PP 3.0
The "PP 3.0" designation indicates compliance with Protection Profile 3.0, a security standard. Models with "w/fUSB" include a filtered USB port. "DH" in the model name likely refers to Dual Head, indicating support for multiple video outputs per computer.
Usage Features:
- Installation:
- All peripherals and computers must be turned off before connecting them to the KVM.
- Peripherals to Console Ports:
- Keyboard: Connect a USB or PS/2 keyboard.
- Mouse: Connect a USB or PS/2 mouse.
- Audio: Connect headphones/speakers to the audio-out port.
- USB Peripherals: Connect USB peripherals to the fUSB port.
- Video: Connect the monitor cable to the KVM console video port.
- Computers to Computer Ports:
- Keyboard & Mouse: Connect each computer via a USB A to USB B cable.
- Video: Connect each computer via the appropriate video cable (VGA/HDMI/DVI/DP).
- Audio: Connect each computer's audio-out to the KVM audio-in port using a 1/8” (3.5mm) stereo plug.
- USB Peripherals: Connect each computer to the KVM fUSB computer port using a USB A to USB B cable.
- Power ON Sequence:
- Turn ON the monitor first.
- Connect all peripherals and computers to the KVM.
- Power ON the KVM by plugging it into an AC wall outlet.
- Upon power-up, computer #1 is the default active channel, indicated by its front panel LED.
- Filtered USB Port (fUSB) Operation:
- The fUSB port is designed to accept only USB authentication devices (smart card/biometric readers) by default.
- A steady GREEN LED indicates a legitimate USB device is connected.
- A steady RED LED indicates a non-legitimate USB device is connected.
- When switching channels, the fUSB device automatically switches to the selected channel (indicated by the channel's fUSB LED turning steady GREEN).
- If switching to a channel without an fUSB connection, the fUSB port remains mapped to the last channel that had an fUSB connection.
- Freeze USB: A dedicated button on the front panel allows assigning the fUSB port to a specific computer, preventing it from switching with other peripherals. This is useful for devices like smart card readers that need to remain connected to a particular computer.
- Smooth Switching (Virtual Display Technology - VDT):
- Allows automatic switching between computers by dragging the mouse cursor across the display border.
- Shared peripherals (Keyboard, Audio, USB) switch automatically with the mouse.
- Activation:
- Change mouse mode to Absolute:
L CTRL | L CTRL | F11 | c
- Enable Video Follow Mouse:
L CTRL | L CTRL | f
- Deactivation:
- Change mouse mode to Relative:
L CTRL | L CTRL | F11 | b
- Disable Video Follow Mouse:
L CTRL | L CTRL | f
- VDT is disabled by default and upon factory reset. Multi-monitor computers require specific driver installation for Windows.
- Interchangeable KVM-to-KM Functionality:
- KVM Mode (Default): One display, keyboard, mouse, USB, and audio peripheral set is shared among all computers.
- KM Mode: Each computer is connected to a separate display, while the keyboard and mouse are shared.
- To change from KVM to KM mode:
- Disconnect the display from the KVM Console Port.
- Connect each computer directly to a separate display.
- Keep keyboard, mouse, USB, and audio peripherals connected to the KVM.
- Change mouse mode to Absolute:
L CTRL | L CTRL | F11 | c
- Switching in KM Mode:
- Manually switch using front panel buttons.
- Use cursor navigation switching (VDT) by dragging the mouse cursor across the display border.
- To change from KM to KVM mode:
- Connect a display to the KVM Console Port.
- Connect each computer to its corresponding KVM Computer Video Port.
- Change mouse mode to Relative:
L CTRL | L CTRL | F11 | b
- Resetting to factory defaults disables KM mode.
- Keyboard Shortcut Options (QWERTY Layout):
- Toggle between mouse modes (Absolute/Relative):
L CTRL | L CTRL | F11 | c (Absolute) / L CTRL | L CTRL | F11 | b (Relative)
- System Reset to factory defaults:
L CTRL | L CTRL | F11 | r
- Enter Terminal-Mode:
L CTRL | R CTRL | t
- Video Follow Mouse (toggle ON/OFF):
L CTRL | L CTRL | f (Used with Absolute mouse mode for source switching).
- Always use the left control key (CTRL) unless specified. Shortcuts are pressed sequentially. Numeric keypad should not be used for toggling shortcuts.
Maintenance Features:
- Self-Test Procedure: The product performs a self-test upon power-up. In case of failure (e.g., jammed buttons), the product will be inoperable, and abnormal LED behavior will indicate the failure.
- Reset to Factory Defaults:
- System Reset: Clears behavioral characteristics like mouse settings and display presets. Shortcut:
L CTRL | L CTRL | F11 | r
- Complete Reset: Clears all device settings and resets to factory defaults. This option is available from the Terminal menu.
The device is designed for high security environments, as indicated by the "Highest Security Solutions" branding and "PP 3.0 CERTIFIED" label.