14
(5) Other functions
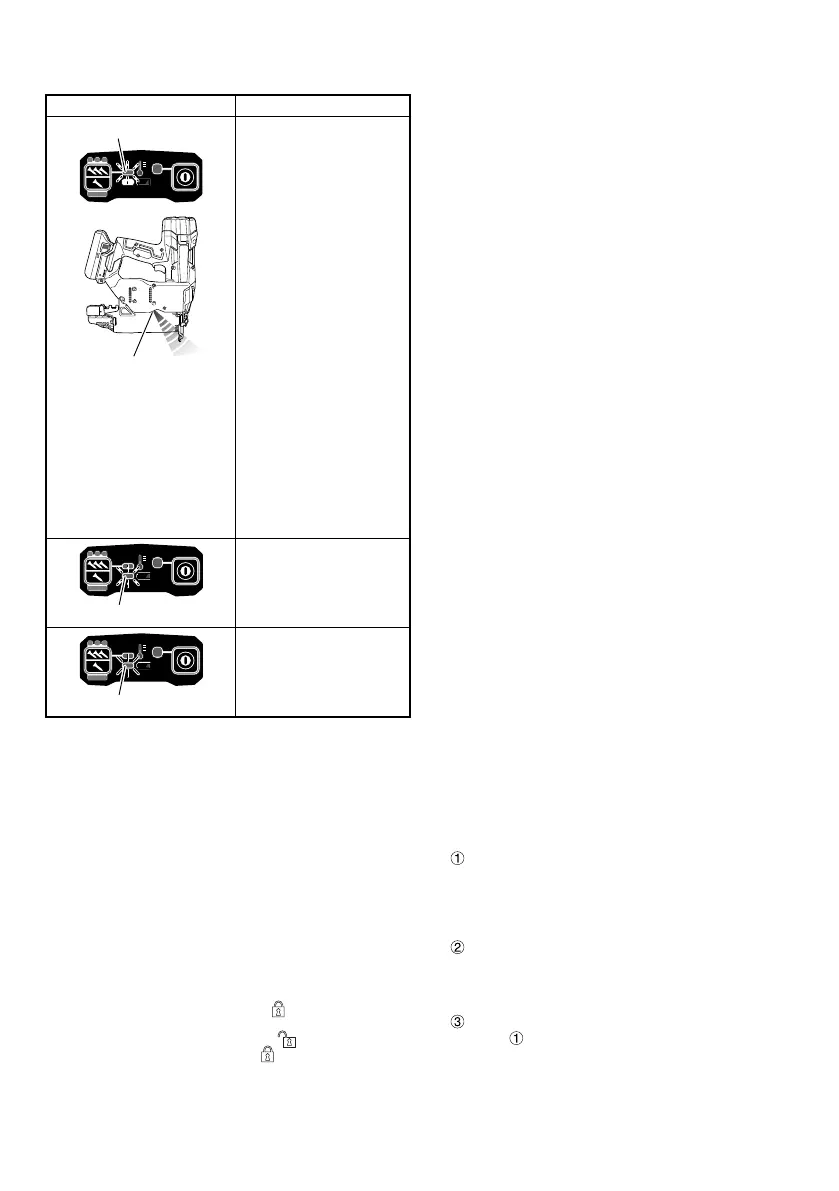
In case of operation error, LED lamps show as below.
Status of indicator
LED (Red) blinks
LED light
LED light blinks in an interval.
• In case of too hot
condition, blinks in
1 second interval.
• In case of too cold
condition, blinks in
0.5 second interval.
After 10 seconds,
automatically turns off LED
light and Power switch.
Machine is in too cold
(below -5°C) or too hot
condition.
Allow the nailer to cool
or warm-up thoroughly in
adequate condition.
LED (Orange) blinks
Error is occurred.
Once remove the battery.
Then attach the battery
and power ON again.
LED (Orange) lights
Contact HiKOKI for
inspection.
(6) How to use the LED light (See Fig. 7)
While the power switch on, the LED light will automatically
light up the tip portion of the tool.
CAUTION
○ Do not expose directly your eye to the light by looking
into the light.
If your eye is continuously exposed to the light, your eye
will be hurt.
○ Wipe off any dirt or grime attached to the lens of the LED
light with a soft cloth, being careful not to scratch the
lens.
Scratches on the lens of the LED light can result in
decreased brightness.
2. Trigger Lock Mechanism (See Fig. 8)
WARNING
Make sure the trigger is locked when not fi ring nails.
This Nailer has a lock mechanism to prevent the nails
from being fi red.
Set the switch lock lever at the
position to lock the
trigger.
Slide the switch lock lever to the
position when the
Nailer is to be used, and to the
position when it is not
in use.
3. Testing the nailer
WARNING
○ Make sure the trigger is locked when not fi ring nails.
(See Fig. 8)
○ Never use Nailer unless push lever is operating properly.
Before actually beginning the nailing work, test the Nailer by
using the checklist below. Conduct the tests in the following
order.
If abnormal operation occurs, stop using the Nailer and
contact a HiKOKI authorized service center immediately.
(1) REMOVE ALL NAILS AND BATTERY FROM NAILER.
□ ALL SCREWS MUST BE TIGHTENED.
□ THE PUSH LEVER AND TRIGGER MUST MOVE
SMOOTHLY.
(2) Installing the battery.
Do not operate the push lever or trigger while installing
the battery. (See Fig. 2)
(3) Turn on the Power switch. (See Fig. 1)
Turn on the Power switch by push and hold on Power
switch more than 1 second.
Make sure the power indicator is lighting in green, and
nailing operation indicator is lighting in blue. (SINGLE
SEQUENTIAL ACTUATION MECHANISM)
NOTE
Do not press the push lever and/or pull the trigger during
the process of turning the power switch ON.
Doing so will prevent the power switch from turning ON.
[Auto power off ]
When the power is turned on but the Nailer is not used
for 30 minutes, the Nailer is automatically turned off . To
turn on again, press the power switch.
WARNING
Never leave the Nailer with the power on. This could
result in an accident.
Nailing operation indicator
Lighting (Blue):
SINGLE SEQUENTIAL ACTUATION MECHANISM,
Blinking (Blue):
CONTACT ACTUATION MECHANISM
Make sure the battery indicator is not lighting or blinking.
If the battery indicator is lighting or blinking in red, the
battery doesn’t have enough power and it needs to be
charged.
(4) Remove the fi nger from the trigger and press the push
lever against the workpiece.
□ THE NAILER MUST NOT OPERATE.
(5) Separate the push lever from the workpiece.
Next, point the nailer downward, pull the trigger and then
wait in that position for 5 seconds or longer.
□ THE NAILER MUST NOT OPERATE.
(6)
Without touching the trigger, depress the push lever
against the workpiece.
Next, pull the trigger.
□ THE NAILER MUST OPERATE.
Hold the trigger back and depress the push lever
against the workpiece again.
□ THE NAILER MUST NOT OPERATE.
Separate the fi nger from the trigger.
Next,
is operated again.
□ THE NAILER MUST OPERATE.
0000BookNT1850DF.indb140000BookNT1850DF.indb14 2022/09/0710:41:552022/09/0710:41:55
 Loading...