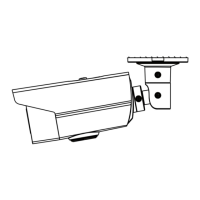
EasyManuals Logo
Home>HIKVISION>Security Camera>DS-2CE16COT-IRF

HIKVISION DS-2CE16COT-IRF User Manual

HIKVISION DS-2CE16COT-IRF
16 pages
To Next Page IconTo Next Page
To Previous Page IconTo Previous Page
Page #8 background imageLoading...
Page #8 background image
4. Route the cables through the cable hole, or the side
opening.
5. Secure the camera on the mounting base.
1) Pull out the clip plate, and then to combine
the camera with the mounting base.
2) Push the clip plate in, and secure the camera
by tightening the screw.
Figure 2-3 Secure the Camera
6. Connect the corresponding power cord, and video
cable.
7. Power on the camera to check whether the image
on the monitor is gotten from the optimum angle. If
not, adjust the camera according to the figure below
to get an optimum angle.
Pan Position
[0° to 360°]
Rotation Position
[0° to 360°]
Tilt Position
[0°to75°]
Figure 2-4 3-Axis Adjustment
2.2 Installation of Type II Camera
Before you start:
The installation of ceiling mounting and wall mounting
are similar. Following takes ceiling mounting as an
example.
Steps:
1. Drill the screw holes and the cable hole (optional)
on the ceiling.
Note:
Drill the cable hole, when adopting the ceiling outlet
to route the cable.
2. Loosen the trim ring to remove the mounting base.
3. Secure the mounting base on the ceiling with
screws.
Figure 2-5 Secure the Mounting Base
Note:
The supplied screw package contains self-tapping
screws, and expansion bolts.

Questions and Answers:

Question and Answer IconNeed help?

Do you have a question about the HIKVISION DS-2CE16COT-IRF and is the answer not in the manual?

HIKVISION DS-2CE16COT-IRF Specifications

General IconGeneral
BrandHIKVISION
ModelDS-2CE16COT-IRF
CategorySecurity Camera
LanguageEnglish

Related product manuals