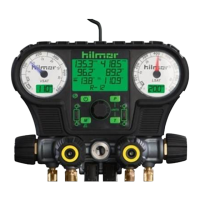
1839010 and 1839011 Electronic Gauge
Operating Instructions:
1. Install the complimentary batteries by removing the battery cover from
the backside of the manifold set with a screwdriver.
2. Press the power button to turn on. The gauges will self-calibrate to
ensure accuracy.
3. To change the units of measure, press the unit button for either Pressure
or Temperature .
4. Select the appropriate refrigerant by using the center knob. Press and
hold the center knob for two seconds to activate selection. Find the
appropriate refrigerant by turning the center knob. The top 10 most
common refrigerants are listed first, followed by all 43 in numerical order.
Press the knob to select the refrigerant. If the refrigerant selection is
blinking, the selection has not been made. The exterior gauges’ backlight
will change color to indicate the chosen refrigerant. The corresponding
VSAT and LSAT temperatures will display on the outside displays.
5. Insert hilmor K-style Thermocouple Clamp Probes (included) to measure T1
and T2 temperatures. Superheat and subcool will automatically calculate.
a. The smaller of the two blades is the positive end indicated by a plus
icon (+). This end should be inserted into the top position on the
Electronic Gauge indicated by a plus icon (+).
b. Subsequently, the larger of the two blades, indicated by a negative
icon (-), should be inserted into the bottom position on the Electronic
Gauge.
6. To turn o the button volume, depress the mute button .
7. The button will display the minimum, maximum and mean pressure
and temperature that has been recorded since the unit has been powered
on. To reset these levels, simply power o and immediately power back on
the manifold set. Note: The type of refrigerant cannot be changed when in the
MIN/MAX/MEAN mode. Cycle out of the mode before changing refrigerants.
8. To turn o the unit, press and hold the power button for two seconds.
9. Remember you did all that with one tool.
 Loading...