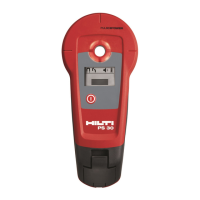
The Hilti PS 20 Detector is a handheld device designed for detecting various objects within concrete and other materials, and for localizing live electrical cables. It provides information on how to use the tool safely and effectively, with a strong emphasis on safety notices.
Function Description
The PS 20 Detector is primarily used for:
- Detecting and measuring the depth of steel reinforcement (rebar): It can identify ferrous metals and determine their depth of coverage.
- Detecting non-ferrous, electrically conductive metals: This includes objects like copper tubing and aluminum parts.
- Localizing live electrical cables: It can detect the presence of an electrical field, making it possible to pinpoint live electrical cables.
The tool features automatic object recognition and displays detected reinforcement. It can also adjust the detected depth for reinforcement containing impurities and detect unshielded, live electrical cables. The device cannot determine the depth of any material other than reinforcing bars.
Important Technical Specifications
- Reinforcement detection:
- Depth range for detection: 0-100mm (0-4in).
- Depth range for coverage depth measurement: 10-80mm.
- Accuracy of depth of coverage measurements:
- Metric: ±2mm for 10-30mm and 30-60mm, ±5mm for 60-80mm (all ±10% of depth).
- Imperial: ±0.08in for 0.4-1.18in and 1.18-2.36in, ±0.2in for 2.36-3.15in (all ±10% of depth).
- Separation of reinforcement: Minimum 42mm (1.7in) between bars or 1:1.12, whichever is greater.
- All figures are based on 12mm (0.5in) round reinforcing bars, magnetic permeability 85-105, smooth and flat concrete surface, and bars at right angles to the scan direction without interfering influences.
- Non-ferrous metal detection: 0-60mm with 10-30mm tube diameter (0-2.4in with 0.4-1.2in tube diameter).
- Localizing live electrical cable: Detects 100-240V 50/60Hz cables. Accuracy depends on factors like air humidity, material moisture, and elements near the cable.
- Smallest unit displayed: 1mm (1/32in).
- Power supply: 4 AA (LR6, AM3, Mignon) alkaline manganese cells (standard); rechargeable NiCd, NiMH (optional).
- Battery life: 40 hours continuous operation at 23°C (73°F). A warning symbol indicates low battery.
- Automatic switch-off: 3 minutes after no key press.
- Operating temperature: -10°C to +50°C (14°F to 122°F).
- Storage temperature: -20°C to +60°C (-4°F to 158°F).
- Proofing: Dust and splash proof, IP 54 in accordance with IEC 529 standards.
- Relative humidity: Max. 95% in accordance with IEC 68, DIN EN 60068. Note: Live electrical cable detection is adversely affected by high humidity.
- Weight: 600g (1.32lbs) not including batteries.
- Dimensions (LxWxH): 280 x 95 x 86 mm (11" x 3.7" x 3.4").
Usage Features
- Display and Keypad: The device features a display showing an indication light, acoustic beep indication, signal strength bar, live wire symbol, function menu, battery low symbol, unit of measure, depth of coverage, and non-ferrous metal detection (typically copper or aluminum). The keypad allows for easy navigation and setting adjustments.
- Battery Insertion: Batteries are inserted by pressing the sides of the cover, tilting it upwards, removing old batteries, inserting new ones as shown, and replacing the cover. Always replace the complete battery set, avoiding mixing old and new batteries or different types/brands. For rechargeable batteries, use the same brand, model, age, and charge level.
- Switching On/Off and Calibration:
- Press the "On" key. "CA" will blink, indicating a calibration request.
- Hold the tool at least 1m away from all metallic objects and strong electromagnetic fields.
- Press the "On" key again to perform calibration. A short beep confirms calibration (if active).
- The tool is ready for use when "4" is displayed.
- Calibration is automatically requested if the temperature changes by ±3°C or 6 minutes after the last calibration.
- To switch off, press the "On" and "Function" keys simultaneously.
- Detecting Reinforcement & Non-ferrous Metallic Objects:
- Place the tool on the surface and move it with a sweeping motion, avoiding jerky movements.
- As a reinforcing bar is approached, the signal strength bar increases, the center indication light illuminates, the acoustic beep sounds (if active), and depth of coverage is displayed.
- For non-ferrous metals, the non-ferrous metal symbol appears. Depth cannot be calculated for non-ferrous metals.
- The position can be marked through a hole in the sensor head using a marking pencil.
- To retain a measured depth value, press and hold the "On" key after detection.
- Menu Functions:
- Calibration: Ensures accuracy by accounting for temperature changes and magnetic influences. Can be manually initiated if recalibration is suspected.
- Setting Minimum Depth of Coverage: Allows setting a minimum depth. The tool will only alarm if reinforcement is detected closer than this defined depth. This is useful for quality control, assessing concrete cover, and checking before drilling. The setting is saved when the tool is switched off.
- Switching Backlight On/Off: For poorly lit areas. This setting is not saved when the tool is switched off.
- Setting the Offset: Addresses false depth readings due to impurities in reinforcement. A measured difference (from a test hole) can be entered, and the PS 20 will automatically adjust subsequent depth measurements. This setting is saved when the tool is switched off.
- Switching Acoustic Beep On/Off: Controls the audible alarm for detecting object centers. This setting is saved when the tool is switched off.
- Localizing Live Electrical Cable: Accessed through the Function menu. Involves reducing sensitivity until the indication light goes out, then increasing it by one level and scanning to narrow down the cable's location. Shielded cables or those in metal conduit cannot be detected directly, though the conduit itself will be detected as metal. Moist conditions or humid atmospheres can spread the electric field, making localization difficult.
- Settings Menu:
- Set Units (mm/in): Changes the units for displaying depth, minimum coverage depth, and offset. The smallest displayed unit is 1mm or 1/32 inch. Always reset minimum cover and offset functions to zero after changing units to avoid confusion.
- Test the Display: Activates all LCD segments to check for proper functioning.
Maintenance Features
- General Care: Clean with a soft, dry cloth. Dampen with pure alcohol or water if necessary. Avoid other liquids that may damage plastic components. Be mindful of temperature exposure, especially in summer.
- Sensor Head and Battery Covers: Remove and clean when dirty. Replace if worn or damaged (indicated by signal holes appearing), as delayed replacement can lead to irreparable damage and degradation of depth measurement accuracy.
- Storage: Clean and dry the tool. Do not repackage until completely dry. Store within -20°C to +60°C (-4°F to +140°F). Remove batteries for long-term storage. Perform a test measurement after long storage or transportation.
- Transportation: Use the Hilti case. Always ship without batteries inserted to prevent unintended activation and potential disturbance to vehicle or aircraft systems.
- Error Codes: The display shows error codes (E1, E2, E3) for sensor malfunction, temperature outside safety range, or calibration failure. Troubleshooting involves ensuring calibration conditions are met, allowing temperature adjustment, and contacting Hilti Service if errors persist.
- Warranty: Hilti warrants the tool against defects in material and workmanship for 12 months from the invoice date, provided it is operated, handled, cleaned, and serviced according to Hilti Operating Instructions, and only original Hilti consumables, components, and spare parts are used. The warranty covers free repair or replacement of defective parts, but not normal wear and tear.