When the air conditioner will not be used for a Iong period of time, turn on the “Strong fan speed” on a clear day and
run the unit for haIf a day so that the inside of the unit can be dried.
After the inside of the air conditioner is dried, unplug the power cord or disengage the knife switch or the circuit
breaker exclusively set up for the air conditioner for safety.
LOCK SETTING
After the lock setting is done, you can only use the button and the
button to change mode, the others are invalid.
(TEMP.)
OUTDOOR SIDE INSTALLATION DISTANCE
POWERFUL OPERATION
During the operation (DEHUMDIFYING, COOLING),
you should press the button to start the powerful operation
•
HOW TO SET THE TIMER
❷ When the machine runs-on, press button.
▪
You can set the time to stop.
▪
Press continuously to get rapid adjustment.
▪
If you want to stop the machine right away, you can press button to cancel all reservation of time setting.
HOW TO SET THE SLEEP TIMER
This function will change the fan speed and the room temperature setting automatically
during sleep and you also can use the OFF-TIMER function together too.
You can set the time in 1 to 24 hours for sleep mode.
as the top priority to turn-on,
The other timer setting are all invalid.
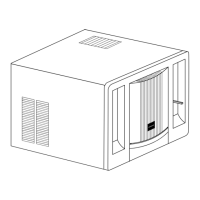
HOW TO ASSEMBLE THE INSTALLATION BRACKET
0
unit: mm
2. These are all normal indications:
It is easy for the front cover and the cabinet to get dirty. Wipe it regularly with dry cloth. If it is dirty, use a wet and
soft cloth to wipe.
When the air conditioner starts to operate, it may possibly blow out dusts. This is because there are dusts
accumulating on the discharge air plenum.
NOTICE :
Do not wash the front cover with water over 50°C to prevent it deformation.
To prevent the front cover from damage, never wash it with volatile oil, gasoline,
thinner, grinding powder or a chemical abrasive cloth.
To avoid poor insulation and current leakage, never wash the air conditioner
directly with water.
❶ Choose the operating mode, fan speed and setting temperature you want.
❷ In the power off state, press and hold the button first and press the lower
location of (TEMP.) button later.
(Meanwhile, the mark will be displayed on the remote controller.)
CANCEL: Repeat the ❷ procedure above to cancel the lock setting.
❶ Press the button to start the powerful operation.
Every time you press the button, it will increase the fan speed. If the
original fan speed is "Hi", the fan speed will not change.
CANCEL: Press the button again
CONTENT OF THE POWERFUL OPERATION
The timer may be used in two ways: (OFF-TIMER), (ON-TIMER). You can set only one kind of
timer. You can set the time in 1 to 24 hours for timer mode.
❶ When the machine runs-off, press the button.
▪ You can set the time of running.
▪ Press continuously to get rapid adjustment.
▪ If you want to start the machine right away, you can press button to cancel all
reservation of time setting.
❶ Press button. Display indicates
▪ Press continuously to get rapid adjustment.
▪ The SLEEP operation starts at beep sound, then the remote controller display will
show the reservation time and turn-off time.
CANCEL: Press the button to cancel.
For safety purposes, especially on high-rise buildings,
bracket installation can be done inside the room.
Insert the Drain Elbow into the Base Drain Hose.
Connect the Water Pipe Drain to the other end of
the Drain Elbow
ACCESSORY NAMES AND QUANTITIES
▪ Main bracket X1
▪ Fix plate X2
▪ Caulking Foam X1
▪ Water drainage elbow X1
Before cleaning, turn off the air conditioner first and unplug the power cord.
(Never unplug the cord with a wet hand to prevent electric shock.)
▪ If the air conditioner does not resume standard operation after checking any of the above items, please notify
the service center or the dealer where the air conditioner is purchased of the malfunction together with the air
conditioner model, manufacture number, and installation date recorded on the warranty.
▪ If the power cord/cord plug gets abnormally hot or the insulation sheath is stripped/melted, unplug the power
cord and immediately contact the service center and the dealer where the air conditioner is purchased. Do not
replace the power cord by yourself to prevent danger!
▪ The timer indicator light on the display flashes and the display screen shows a number.
▪ (The cause of the error can be determined by the number of flashes, and thus the problem can soon be
corrected. Therefore, before turning off the power switch, confirm the number of flashes and the displayed
number and then notify the service personnel.)
HOW TO ASSEMBLE THE WATER DRAINAGE
▪ Battery X2
▪ Remote Controller X1
▪ Parts bag X1
1. If an error is found, first check the following items.
2. CLEANING THE FRONT COVER AND THE CABINET
3. HOW TO HANDLE THE AIR CONDITIONER AFTER THE USAGE SEASON IS OVER
AFTER-SALE SERVICE AND WARRANTY
HOW TO ASSEMBLE THE INSTALLATION BRACKET AND THE WATER DRAINAGE
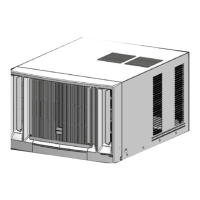
Use the screws
supplied together with
the unit to secure the
front cover.
Before pulling out the
unit body, first remove
the screws and the
parts for fixation.
 Loading...