EasyManua.ls Logo

HO HSING i70M Series - User Manual

HO HSING i70M Series
44 pages
Print Icon
To Next Page IconTo Next Page
Loading...
AC
AC SERVO MOTOR
使
OPERATION MANUAL
MODEL : i70M SERIES
賀欣全球售服網 /H. S. Global Service Network
服務專線 / SERVICE HOTLINE : +886-2-2676-5203
傳真 / FAX : +886-2-2689-6600, 2689-3657
電子郵件 / E-MAIL : service@hohsing.com.tw
網址 / WEBSITE : http: // www.hohsing.com
中國地區 (CHINA)
服務專線 : +86-21-64908325
傳真 : +86-21-54570064
網址 : http: // www.hohsing.com
HSVP7MU23-1
2022.08
ENGLISH

Table of Contents

Questions and Answers

  • T
    Tammy FergusonAug 6, 2025
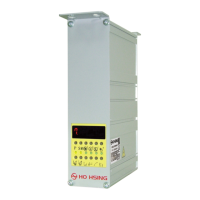
    Why is the motor rotation icon halting on my HO HSING Engine?
    • J
      Joshua MaldonadoAug 6, 2025
      If the motor rotation icon in the LCD is halting and not moving on your HO HSING Engine, it may be due to a faulty or poorly connected safety switch, especially in interlock or blind stitch machines. Inspect the safety switch. Also, verify that the parameter setting ?075. SFM? matches the machine head model and safety switch configuration.
  • S
    Steven ButlerAug 12, 2025
    What to do if HO HSING Engine displays error ER0. 7?
    • A
      Amber WilsonAug 12, 2025
      If your HO HSING Engine displays error code ER0. 7, it could be due to several reasons: * A bad connection at the motor connector. * A synchronizer (sensor) signal error. * The synchronizer is a single position type, and the parameter set wrong type. * The machine is locked, or an object is stuck in the motor pulley. * The sewing material is too thick. Check the motor and its connectors, the synchronizer and its signal, and inspect the machine head for obstructions. Ensure smooth rotation.
  • R
    rrhodesAug 18, 2025
    What does error ER0. 4 mean on a HO HSING Engine?
    • C
      Christina LeeAug 19, 2025
      If your HO HSING Engine displays error code ER0. 4, it indicates a high voltage issue. This could be due to detecting high voltage when powering on or connecting the wrong, excessively high voltage. Check the AC power supply. If the control box is designed for AC 220V, avoid using AC 380V, as it will trigger the ER0. 4 error. Continuing to supply 380V can damage the electrolytic capacitors (C3, C4) on the main board and cause the power input fuses (F1, F2) to open.
  • A
    autumnriveraAug 25, 2025
    What causes error ER0. 9 on my HO HSING Engine?
    • C
      Charles FieldsAug 25, 2025
      If your HO HSING Engine displays error code ER0. 9, it suggests either a shorted machine solenoid or a faulty power transistor on the main board. Inspect the machine's solenoids, ensuring the resistance value is not less than 2 ?. Also, examine all power transistors related to the solenoid.
  • B
    Brian FergusonAug 31, 2025
    What does error ER0. 8 mean on a HO HSING Engine?
    • D
      David BartlettAug 31, 2025
      If your HO HSING Engine displays error code ER0. 8, it indicates a communication error between the operation box and the CPU interface. Please check the Operation Box.

Summary

Safety Precautions

Work Environment Safety

Details operating conditions like temperature, power voltage, and atmosphere.

Installation Safety Guidelines

Covers safe practices for motor, control box, and power cord installation.

Operating Safety Procedures

Outlines precautions during machine operation, avoiding moving parts.

Maintenance and Repair Safety

Specifies safety steps before maintenance, like turning off power.

Maintenance Regulation and Procedures

Lists rules for maintenance, emphasizing trained personnel and approved parts.

Danger and Caution Sign Meanings

Explains symbols indicating personal injury or electrical risks.

Product Warranty Information

Provides details on the product warranty period and coverage.

Installation and Adjustment Procedures

Motor Installation Guide

Guides on mounting the motor, including different types like M1 and M5.

Control Box Mounting Instructions

Instructions for installing the control box on the working table.

Speed Control Unit Installation Steps

Steps for mounting the speed control unit.

Belt Cover Adjustment Components

Adjustment procedures for finger guard on the belt cover.

Belt Cover Installation

Steps to install the belt cover bracket and the cover itself.

Synchronizer Installation and Adjustment

Mounting and adjusting the synchronizer (sensor).

Speed Control Unit Adjustment

Details on adjusting toeing forward, heeling backward force, and treadle stroke.

Power Connection and Grounding

Single and Three Phase Power Connection

Explains wiring for single and three-phase power connections.

Connecting 220 V from 380 V Power Source

Wiring instructions for using 220V from a 380V source.

AC 220 V Lamp Connector Usage

Specifies the intended use for the AC 220V lamp connector.

Load Balancing for 1Φ;220 V on 3Φ;220 V Source

Guidance on load balancing when using 220V on a 3-phase 220V source.

Changing Solenoid Supply Voltage (DC 24 V;30 V)

Instructions on changing solenoid supply voltage via jumper settings.

Control Box Diagrams

Front Side Control Box Layout

Identifies components and functions on the front of the control box.

Rear Side Connector Panel Layout

Details the connectors and ports on the rear of the control box.

Programmable 7-Segment Display Operations

Normal Mode Functions (Interlock Machine)

Explains button functions in Normal Mode for interlock machines.

Accessing Parameter Mode A

Step-by-step guide to enter Parameter Mode A.

Accessing Parameter Mode B

Step-by-step guide to enter Parameter Mode B.

Parameter Mode A & B Key Functions

Describes the functions of keys within Parameter Modes A and B.

Adjusting Parameter Mode Values

Instructions on accessing and adjusting parameter values.

Parameter Key Value Settings (A, B, C, D)

Details how to set values using A, B, C, D keys in Parameter Value.

General Parameter Table

Basic Troubleshooting Guide

Error Code and Measurement Solutions

Lists error codes and their corresponding causes and measurements.

Fuse Replacement Instructions

Provides guidance on how to replace blown fuses safely.

i70 M Model Parts List

A list of parts for the i70M model.

HO HSING i70M Series Specifications

General IconGeneral
BrandHO HSING
Modeli70M Series
CategoryEngine
LanguageEnglish