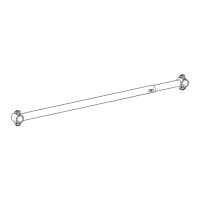
This document provides installation instructions for the Holman 31110 cross bar, designed for vehicle roof racks. The primary function of this device is to provide a sturdy, adjustable cross bar for a roof rack system, allowing users to secure payloads on their vehicle's roof.
Key Components and Their Functions:
The Holman 31110 system consists of several main components:
- 2" Bar Assembly, Quick Clamp (Part No. 13-00306): This is the larger, outer section of the cross bar. It features a quick clamp mechanism, which is integral to its attachment to the roof rack side rails. The "quick clamp" designation suggests an ease of installation and adjustment.
- 1 3/4" Bar Assembly, Quick Clamp (Part No. 13-00305): This is the smaller, inner section of the cross bar. It is designed to slide into the 2" bar assembly, allowing for adjustability in the overall length of the cross bar to fit various vehicle widths or desired positions on the roof rack. Like its larger counterpart, it also incorporates a quick clamp.
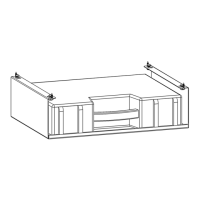
- Mounting Bracket Clamp (Part No. 11-00154): Two of these brackets are included. These are the primary components that secure the cross bar assembly to the existing side rails of a roof rack. They are designed to hold the cross bar firmly in place.
- Hardware Kit (Part No. 18-31110): This kit contains all the necessary fasteners for assembly and installation.
Technical Specifications and Hardware:
The hardware kit includes specific fasteners critical for the assembly and installation process:
- 3/8-16 x 1-1/4" Hex Head Bolt (Part No. 70107): Four of these bolts are used to secure the mounting bracket clamps to the cross bar and the roof rack. The "3/8-16" indicates a 3/8-inch diameter with 16 threads per inch, a standard coarse thread. The 1-1/4" length is appropriate for passing through the bracket and securing components.
- 3/8"-16 x 3/8" Set Screw (Part No. 0135144): One set screw is included. This screw is used to secure the inner 1 3/4" bar assembly within the outer 2" bar assembly. Its function is to prevent the inner bar from sliding once the desired length is achieved. The instruction notes to "snug tighten but allow for movement" initially, then "tighten this set screw once cross bar is installed," indicating its role in both adjustability and final locking.
- 3/8" Washer (Part No. 0159723): Eight washers are provided. Washers are typically used under the head of a bolt or a nut to distribute the load, prevent damage to the surface, and ensure a more secure fastening. Given there are four bolts, two washers per bolt (one under the head, one under the nut) would be a standard application.
- 3/8"-16 Lock Nut (Part No. 0169791): Four lock nuts are included. Lock nuts are designed to resist loosening under vibration, which is crucial for a vehicle-mounted accessory. They are used in conjunction with the hex head bolts to secure the mounting bracket clamps.
To assemble and install the Holman 31110 cross bar, the following tools are specified:
- 9/16" Socket and Wrench: These are needed for tightening the 3/8-16 hex head bolts and lock nuts. A 9/16" wrench or socket is the correct size for a 3/8" bolt head and nut.
- 3/16" Allen Wrench: This is required for tightening the 3/8"-16 x 3/8" set screw.
Usage Features and Installation Process:
The installation process is broken down into two main steps:
-
Assemble Cross Bar:
- The 1-3/4" bar assembly is inserted into the 2" bar assembly. This telescopic design allows for length adjustment.
- The 3/8" x 3/8" set screw is then screwed into the cross bar. Initially, it should be "snug tightened but allow for movement," indicating that the cross bar's length can still be adjusted at this stage. This feature is important for fine-tuning the fit on the vehicle.
- The instruction emphasizes that this set screw must be fully tightened after the cross bar is installed and positioned, ensuring the chosen length is locked in place.
-
Install Cross Bar:
- The assembled cross bar is placed onto the vehicle's roof rack.
- Each side is secured using a mounting bracket clamp, two 3/8" x 1-1/4" hex head bolts, four 3/8" washers, and two 3/8" lock nuts. The diagram shows the bolts passing through the clamp and the cross bar, with washers and lock nuts securing them from below.
- Similar to the set screw, the bolts and nuts for the mounting brackets should be "snug tightened but allow for movement" initially. This allows for sliding the cross bar into the desired location on the roof rack.
- Once the cross bar is in the correct position, all hardware (including the set screw and the mounting bracket bolts/nuts) must be fully tightened. The instruction "GO BACK AND TIGHTEN ALL HARDWARE" is a critical final step to ensure safety and stability.
Important Warnings and Safety Considerations:
The manual highlights several crucial warnings to ensure safe installation and use:
- "PLEASE READ ALL INSTRUCTIONS AND WARNINGS PRIOR TO ASSEMBLING, INSTALLING, AND USING THIS PRODUCT." This standard safety instruction emphasizes the importance of understanding the entire process before starting.
- "Always check for wires, fuel tanks and lines, brake lines and other important vehicle functionality items prior to drilling and installing all products." While this specific product (Holman 31110) does not appear to involve drilling, this general warning from Holman is important for other products they may offer and serves as a good practice reminder for any vehicle modification. It underscores the potential for damage to critical vehicle systems if proper precautions are not taken.
- "DO NOT EXCEED MANUFACTURERS WEIGHT CAPACITY FOR ROOF." This is a paramount safety warning. Every vehicle has a specified maximum weight capacity for its roof. Exceeding this limit can compromise vehicle handling, stability, and potentially damage the vehicle's structure or the roof rack itself. Users must consult their vehicle's owner's manual for this information. The warning is repeated in the hardware section, emphasizing its importance.
- "Secure all payloads properly for safe transportation." This warning pertains to the use of the cross bar once installed. The cross bar provides the platform, but the responsibility for properly securing items to it rests with the user. Improperly secured loads can shift, fall off, or create hazards during transit.
Maintenance Features:
While the manual does not explicitly detail "maintenance features," the design implies certain aspects:
- Durable Construction: The use of metal bars and robust fasteners (hex head bolts, lock nuts) suggests a durable product designed to withstand outdoor conditions and the stresses of carrying loads.
- Tightening Requirement: The instruction to "GO BACK AND TIGHTEN ALL HARDWARE" after installation implies that periodic checks of fastener tightness may be a good practice to ensure continued safety and stability, especially after initial use or rough terrain. This is a common maintenance recommendation for roof rack systems.
- Adjustability: The telescopic design and set screw for length adjustment, along with the ability to slide the cross bar into desired locations, offer flexibility for different loads or vehicle configurations. This adjustability could be considered a maintenance feature if the user frequently changes the type or position of their payload.
In summary, the Holman 31110 is an adjustable, quick-clamp cross bar system designed to enhance the cargo-carrying capabilities of vehicles equipped with roof racks. Its installation is straightforward, but adherence to the provided instructions and safety warnings, particularly regarding vehicle roof weight capacity and payload security, is critical for safe and effective use.