This document outlines the features, usage, and maintenance of a multi-function oven, specifically models 800-170V70 and 800-170V90.
Function Description
The device is a versatile oven designed for household use, capable of performing several cooking functions:
- Warm: Heats food to a desired temperature. The appliance begins warming when the 'Function' knob and temperature knob are set to 'Warm' and the 'Oven Timer' knob is set to the desired warming time. The power light illuminates, and the timer rings upon completion, automatically turning off the appliance. Warming can be stopped by turning the 'Oven Timer' knob to 'OFF'.
- Broil or Convection Broil: Grills food. To activate, turn the 'Function' knob to 'Broil' or 'Convection Broil', set the temperature knob to 230°C or less, and set the 'Oven Timer' knob for the desired cooking time. The power light will be on, and the appliance will turn off automatically when the timer rings. Broiling can be stopped by turning the 'Oven Timer' knob to 'OFF'.
- Toast: Toasts food. Select 'Toast' with the 'Function' knob, set the temperature knob to 230°C or less, and set the 'Oven Timer' knob for the desired toasting time. The power light will be on, and the appliance will turn off automatically when the timer rings. Toasting can be stopped by turning the 'Oven Timer' knob to 'OFF'.
- Bake or Convection Bake: Bakes food. Turn the 'Function' knob to 'Bake' or 'Convection Bake', set the temperature to 230°C or less, and set the 'Timer' knob for the desired cooking time. The oven will begin baking, and the power light will be on. For delicate ingredients like cakes and muffins, preheating the oven for five minutes is recommended. The appliance turns off automatically when the timer rings. Baking can be stopped by turning the 'Oven Timer' knob to 'OFF'.
- Air Fry: Fries food using hot air. Turn the 'Function' knob to 'Air Fry', set the 'Air Fry Temperature' knob to 230°C or less, and set the 'Oven Timer' to the desired cooking time. The appliance will begin air frying, and the light will turn on. The timer rings upon completion, and the appliance turns off automatically. Air frying can be stopped by turning the 'Oven Timer' to 'OFF'.
Important Technical Specifications
- Model Numbers: IN230800065V01_UK_DE, 800-170V70, 800-170V90
- Power Supply: AC220-240V 50Hz
- Power Consumption: 1400W
- Temperature Range: OFF to 230°C
- Timer Range: 0-60 minutes
Usage Features
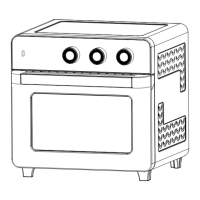
The oven features a user-friendly control panel with three main knobs:
- Temperature Knob (H): Used to set the desired cooking temperature from OFF to 230°C. Turn clockwise to increase temperature.
- Function Knob (I): Used to select the cooking mode (Warm, Broil, Convection Broil, Toast, Bake, Convection Bake, Air Fry).
- Timer Knob (J): Used to set the cooking duration, up to 60 minutes. The oven requires the timer to be set for operation. To set the time, turn the knob clockwise. The indicator light (C) illuminates when the time is set. A bell sound indicates the end of the cycle, and the appliance automatically turns off. To adjust the timer during cooking, simply turn the knob to the new desired time. For precise time selection, rotate the 'Timer' knob past the 10-minute mark, then switch it back to the required time.
Product Structure Components:
- A. Housing: The main body of the appliance.
- B. Front panel: The control interface.
- C. Indicator light: Illuminates when the appliance is in operation.
- D. Door handle: For opening and closing the oven door.
- E. Door frame: Frame around the glass door.
- F. Door glass: Transparent door for viewing food.
- G. Oven foot: Provides stability for the appliance.
- K. Cooling holes: For ventilation.
- L. Bake rack: A wire rack for baking.
- M. Frying basket: A basket for air frying.
- N. Baketray: A tray for baking.
- O. Crumb tray: Collects crumbs at the bottom of the oven.
- P. Tray handle: For safely removing hot trays.
- Q. Crumb tray: (Listed twice, likely referring to the same component or a separate removable crumb tray).
Before First Use:
- Remove all packaging labels and stickers.
- Clean all accessories (bake rack, frying basket, baketray, crumb tray) with water and washing-up liquid using a non-abrasive sponge, ensuring they are completely dry before use.
- Place the crumb tray at the bottom of the appliance. Do not place anything on top of the appliance.
- Position the appliance on a flat, heat-resistant surface, ensuring at least four inches of space on all sides (back, sides, and above) for proper air circulation.
- During cooking, water may be released from food and accumulate on the countertop.
- During initial use, the oven may emit smoke for up to five minutes; this is normal and will subside.
Important Safeguards:
- Read all instructions carefully before use.
- Unplug the appliance when not in use and before cleaning, allowing it to cool down.
- Do not touch hot surfaces; use handles or knobs.
- Do not submerge the appliance, cord, or plug in water or other liquids to prevent electric shock.
- Not suitable for small children.
- Do not use if the appliance, cord, or plug is damaged, or if it malfunctions. Return it for examination or repair.
- Only use manufacturer-recommended accessories.
- Do not use outdoors.
- Keep the cord away from hot surfaces and prevent it from hanging over edges where it could be tripped on.
- Keep the appliance away from hot gas, electric burners, heated ovens, and other heat sources.
- Use the appliance only for its intended purpose.
- Exercise extreme caution when using non-metal or non-glass containers.
- Be cautious when removing items and disposing of hot grease to prevent burns.
- Do not store non-manufacturer-recommended accessories or materials like paper, cardboard, or plastic in the appliance.
- Do not cover the appliance, crumb tray, or any part with metal foil, as this can cause overheating.
- Do not place oversized food, metal foil packages, or utensils inside to prevent fire or electric shock.
- Keep the appliance away from flammable materials (curtains, draperies, walls). Do not store items on top or operate under wall cabinets.
- Do not clean with metal scouring pads, as pieces can break off and cause electrical shock.
- Do not attempt to remove food while the appliance is plugged in.
- Never leave the appliance unattended during use.
- Do not place utensils, baking trays, or other items on the glass door.
- To disconnect, turn all controls to 'OFF' and remove the plug from the wall outlet.
- Keep out of reach of children when in use.
- The symbol indicates a hot surface.
Maintenance Features
Cleaning and Maintenance:
- Warning: Never immerse the appliance, its cord, or plug in water or other liquid. Do not touch, operate, or plug in the appliance with wet hands.
- For optimal performance, clean the appliance after each use to remove grease and ensure consistent operation.
- Before cleaning, unplug the appliance and allow it to cool down completely.
- Do not use abrasive cleaners or corrosive products, as they can damage the oven surface and cause rust.
- Clean the outside of the appliance with a soapy sponge, towel, or cloth. Do not apply cleaning agent directly onto the oven.
- Clean the inside of the appliance with a damp cloth and a mild liquid soap or spray solution on a sponge/towel. Remove all residue after each use. Never use steel wool pads or harsh abrasives/corrosive products for the interior.
- Hand-wash accessories in warm water, using a nylon scouring pad or brush if needed. Accessories are not suitable for dishwashers.
Troubleshooting:
- Appliance does not work:
- Ensure the oven is plugged into a dedicated power outlet.
- Turn the 'TIMER' knob to a set time.
- Food is not cooked:
- Use smaller batches for more even cooking.
- Raise the temperature and continue cooking.
- Food is not fried evenly:
- Turn food over halfway through the cooking process.
- Cook similar-sized foods together.
- White smoke is coming out of the appliance:
- Clean the appliance and its accessories after every use to remove greasy residue.
- Do not bake for too long.
- Use the baking tray to catch cooked oil during cooking.
- French fries are not cooked evenly:
- Fry fewer potatoes at a time.
- Blanch potatoes with boiling water before frying.
- Use firm and fresh potatoes and cut them into sticks.
- Fries are not crispy:
- Remove excess water from potatoes.
- Cut potatoes into narrower strips.
- Mix with a little oil.
- Food is burnt:
- Do not bake for too long. Preheat the appliance for 5-10 minutes.
- Ensure food does not touch the heating tubes.