Barbecue Hood or Lid
Use a non-abrasive cloth or pad and clean with hot soapy water. Do not use scouring pads or powders, as they can
permanently damage the finish.
Trolley
Wipe with a cloth wrung out in hot soapy water and dry.
Fixings
All screws and bolts, etc., should be checked and tightened on a regular basis.
Storage
Ensure the barbecue is properly cooled before covering or storing. Store your barbecue in a cool dry place. It must be
inspected on a regular basis, as damp or condensation can form, which may result in damage to the barbecue. It may
be necessary to dry the barbecue and the inside of the cover if used.
Mould can grow under these conditions and should be cleaned and treated, if required. Any rust that is found that
does not come into contact with the food should be treated with a rust inhibitor and painted with barbecue paint or a
heat-resistant paint.
Warming racks and cooking grills should be coated with cooking oil.
Cover the burners with aluminium foil in order to prevent insects or other debris from obstructing the burner holes.
If the barbecue is to be stored indoors, the gas bottle must be disconnected and left outside. The gas bottle should
always be stored outside, in a dry, well-ventilated area, away from any sources of heat or ignition. Do not let children
tamper with the bottle.
When using the barbecue after extended periods of storage, follow the cleaning procedures.
Carbon Monoxide Hazard
Danger of carbon monoxide
CARBON MONOXIDE
poisoning - NEVER light this
HAZARD
down in confined spaces.
product or let it smoulder or cool
WARNING
A stainless steel cleaner may be used on stainless steel parts if required.
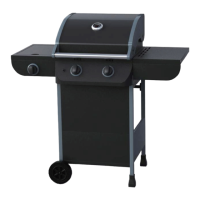
Whenever a barbecue is being assembled for the first time, or its burners are being cleaned, make sure each gas valve
tip goes into the burner venturi tube completely during the assemble or re-assemble process.
burner
venturi tube
gas
valve
8