EasyManua.ls Logo

Homebase NIMBUS - User Manual

Homebase NIMBUS
25 pages
Print Icon
To Next Page IconTo Next Page
Loading...
INSTRUCTION MANUAL
HHGL Limited, MK9 1BA
HHGL (ROI) Limited, D02 X576
IMPORTANT: Please read these instructions before
using the product and retain for future use.
V1_2023
NIMBUS 2 BURNER
GAS BBQ
Question and Answer IconNeed help?

Do you have a question about the Homebase NIMBUS and is the answer not in the manual?

Summary

GENERAL INFORMATION

Safety and Care Advice

Important safety instructions before starting assembly and using the appliance.

GAS & REGULATOR

Gas & Regulator

Information on gas types, regulators, hoses, and gas bottle size.

INSTALLATION

Selecting a Location

Guidelines for placing the barbecue in a safe, well-ventilated, and incombustible area.

Precautions

Warnings about ventilation, gas bottle placement, and ignition sources.

Fixing a Regulator to the Gas Bottle

Instructions for connecting the regulator to the gas bottle.

Leak Testing

Procedure for checking gas system for leaks using soapy water.

Operation Warnings

General warnings before proceeding with operation.

Preparation before Cooking

Advice on oiling the cooking surface and lining the drip pan.

Lighting the Main Burner

Step-by-step guide to lighting the main burner using the ignition system.

Manual Ignition Instruction for Main Burner

Instructions for lighting the main burner manually if ignition fails.

Lighting the Side Burner

Step-by-step guide to lighting the side burner using the ignition system.

Manual Ignition Instruction for Side Burner

Instructions for lighting the side burner manually if ignition fails.

Grill Cooking

Explanation of how grilling works and the role of vaporised juices.

Warming Rack

Advice on using the warming rack for keeping food warm.

Flare-up Control

Guidance on preventing and managing flare-ups during cooking.

Fat Fires

Instructions on cleaning the drip tray to prevent fat fires.

In the Event of a Fat Fire

Actions to take if a fat fire occurs.

End of Cooking Session

Procedure for burning off residue after cooking for easier cleaning.

Turning Off Your Barbecue

Steps to safely turn off the barbecue after use.

CARE AND MAINTENANCE

Cleaning Cooking Surfaces and Warming Rack

Specific instructions for cleaning cooking surfaces and warming racks.

Burner Maintenance

Guidance on cleaning and maintaining the burners.

Flame Tamer Cleaning

Instructions for cleaning the flame tamer.

Drip Tray Maintenance

Instructions for cleaning and maintaining the drip tray.

Barbecue Body Cleaning

How to clean the main body of the barbecue.

Barbecue Hood or Lid Cleaning

How to clean the barbecue hood or lid.

Trolley Cleaning

Instructions for cleaning the trolley.

Fixings Check

Advice on checking and tightening fixings.

Storage Guidelines

Guidelines for proper storage of the barbecue.

Carbon Monoxide Hazard Warning

Warning about carbon monoxide poisoning in confined spaces.

COMPONENT - PARTS

Component Parts List

List of parts with descriptions, illustrations, and quantities.

COMPONENT - FITTINGS

Component Fittings List

List of fittings with descriptions, illustrations, and quantities.

ASSEMBLY INSTRUCTIONS

Remove all packaging

Instruction to remove all packaging before assembly.

Step 1: Assemble Left Side Panel

Attaching the left side panel to the bottom shelf using bolts.

Step 2: Assemble Right Side Panel

Attaching the right side panel to the bottom shelf using bolts.

Step 3: Attach Front Panels

Attaching front panels between side panels using bolts and nuts.

Step 4: Attach Wheels

Attaching wheels to the cart assembly using axle and nuts.

Step 5: Attach Feet

Securing the feet to the cart assembly using bolts.

Step 6: Attach Back Brace

Attaching the back brace between side panels using bolts.

Step 7: Secure Grill Assembly

Securing the grill assembly to the cart assembly using bolts.

Step 8: Partially Attach Grill Assembly

Partially attaching the grill assembly to the sides using bolts.

Step 9: Attach Side Burner Assembly

Aligning and securing the side burner assembly to the grill assembly.

Step 10: Attach Side Table Assembly

Aligning and securing the side table assembly to the grill assembly.

Step 11: Secure Side Assemblies

Aligning and securing the side burner and side table assemblies.

Step 12: Side Burner Valve and Alignment

Loosening screws, fixing the valve, and aligning the side burner.

Step 12 (cont.): Venturi Alignment & Electrode Wire

Aligning the side burner venturi and installing the electrode wire.

Step 13: Attach Side Burner Knob

Attaching the side burner knob to the side burner assembly.

Step 14: Place Side Burner Grate

Placing the side burner grate on the side burner assembly.

Step 15: Install Cooking Components

Placing the heat tent, cooking grill, and warming rack on the grill assembly.

Step 16: Install Grease Cup

Placing the grease cup at the bottom of the grill assembly.

Step 17: Final Assembly & Leak Test

Final assembly check and reminder for leak testing.

TECHNICAL SPECIFICATION

Technical Specification Details

Details model number, gas category, heat input, consumption, and country.

TROUBLESHOOTING

Burner Ignition Issues

Lists common problems, possible causes, and solutions for burner ignition.

Low Flame or Flashback

Addresses issues with low flame or flashback, including possible causes and solutions.

Gas Valve Knob Difficulty

Troubleshooting for a gas valve knob that is difficult to turn.

Overview

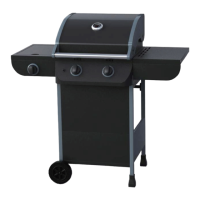
This document is an instruction manual for the HOMEBASE NIMBUS 2 BURNER GAS BBQ. It provides comprehensive information on safety, assembly, operation, care, maintenance, technical specifications, and troubleshooting for the gas barbecue.

Function Description

The Homebase Nimbus 2 Burner Gas BBQ is designed for outdoor cooking using bottled Liquid Petroleum Gas (LPG). It features two main burners and a side burner, allowing for versatile grilling and warming options. The barbecue is intended for domestic use and provides a convenient way to cook food outdoors.

Important Technical Specifications

  • Model Number: KS16032
  • Gas Category: I3+(28-30/37)
  • Type of Gas (pressure): Propane (37 mbar), Butane (28 - 30 mbar)
  • Pin Number: 0359BU1015/2575DM29973
  • Injector Size (Main Burner): 0.86mm
  • Injector Size (Side Burner): 0.94mm
  • Total Heat Input: 9.36 kW
  • 2 Burner Heat Input: 5.86 kW
  • Side Burner Heat Input: 3.5 kW
  • Gas Consumption: 667 g/h
  • Country of Destination: GB and IE
  • Gas Bottle Recommendation: 5-15kg gas bottle with a maximum diameter of 31.5cm and height of 58cm.
  • Hose Length: Should not exceed 1.5 metres and comply with EN16436-1.
  • Regulator: Suitable low-pressure regulator certified to EN16129 (28-30mbar for butane, 37mbar for propane).

Usage Features

The barbecue offers several features to enhance the cooking experience:

  • Two Main Burners and One Side Burner: Provides flexibility for cooking different types of food simultaneously or keeping items warm.
  • Ignition System: Features an igniter button for rapid lighting of the main burners. Manual ignition instructions are also provided for both main and side burners as a backup.
  • Preheating: Users are instructed to preheat the barbecue at a high position for 3-5 minutes before each cooking session, with the hood open.
  • Grill Cooking: The burners heat a flame tamer, which in turn heats the food on the grill. Vaporized food juices from the hot flame tamer baste the food, imparting a barbecued flavour.
  • Warming Rack: A convenient rack for keeping cooked food warm or warming items like bread rolls. Users are advised to place fatty foods at the front to prevent juices from running down the back of the barbecue.
  • Flare-up Control: Emphasizes trimming excess fat from meat, using marinades sparingly, and cooking on a 'LOW' setting to prevent excessive flare-ups. Baking soda or salt can be used to extinguish minor flare-ups.
  • Fat Fire Management: Clear instructions are provided for handling fat fires, including turning off gas, keeping distance, and never dousing with water.
  • End of Cooking Session: Recommends burning off cooking residue by turning burners to 'HIGH' for 5 minutes with the hood open.
  • Gas Bottle Placement: The gas bottle should always be placed at the side of the appliance, as far away as possible without straining the hose, and never underneath the barbecue or indoors.

Maintenance Features

Regular care and maintenance are crucial for the longevity and safe operation of the barbecue:

  • Regular Cleaning: Clean the barbecue between uses and after extended storage periods. Ensure components are cool before cleaning.
  • Storage: Store in a cool, dry place and cover when left outdoors, especially during winter months. Regular inspection for dampness or condensation is recommended.
  • Rust Treatment: Any rust not in contact with food should be treated with a rust inhibitor and barbecue paint. Chrome cleaner can be used for chrome parts, followed by cooking oil after rinsing and drying to prevent rusting.
  • Cooking Surfaces and Warming Rack: Clean with hot soapy water and a non-abrasive pad. Avoid scouring pads. Re-oil and cure if surface rust appears.
  • Burners: Normally self-cleaning by burning off residue. Annual removal and cleaning are recommended to check for blockages (debris, insects) in portholes and air inlet. Use a pipe cleaner for obstructions. Ensure the burner neck fits over the valve outlet when refitting.
  • Flame Tamer: Remove food residue with a plastic or wooden scraper or nylon-bristled brush. Clean with hot soapy water.
  • Drip Tray: Empty and clean after every use to prevent excessive fat build-up, which can lead to fat fires. Can be washed in hot soapy water.
  • Barbecue Body: Regularly remove excess grease/fat with a cloth wrung out in hot soapy water. Use a soft plastic or wooden scraper for stubborn debris. Avoid abrasives. Do not immerse gas controls or manifold in water.
  • Gas Valve Tip Alignment: Ensure the gas valve tip goes completely into the burner venturi tube during assembly or re-assembly after cleaning.
  • Hood/Lid and Trolley: Clean with a non-abrasive cloth and hot soapy water.
  • Fixings: Regularly check and tighten all screws and bolts.
  • Burner Protection: Cover burners with aluminium foil to prevent insects or debris from obstructing holes.
  • Gas Bottle Storage: If storing the barbecue indoors, disconnect the gas bottle and store it outside in a dry, well-ventilated area, away from heat or ignition sources.
  • Leak Testing: Perform a leak test annually and whenever the gas bottle is removed or replaced. Use a solution of 1/2 water and 1/2 liquid detergent/soap over all gas system joints. NEVER use an open flame for testing.

The manual also includes a detailed list of components and fittings with illustrations for assembly, ensuring users can correctly put together their barbecue. Troubleshooting tips are provided for common issues like burners failing to light, low flame, or difficult-to-turn gas valve knobs. A crucial warning about Carbon Monoxide Hazard emphasizes that the product should never be lit or allowed to smoulder/cool down in confined spaces.

Homebase NIMBUS Specifications

General IconGeneral
BrandHomebase
ModelNIMBUS
CategoryGrill
LanguageEnglish