Do you have a question about the Honda CIVIC 3D and is the answer not in the manual?
Details the audible symptoms of rear suspension noise when the vehicle is first driven.
Explains the mechanical friction leading to knock or squeak noise from dampers.
Describes production modifications and aftersales repair strategy for damper noise.
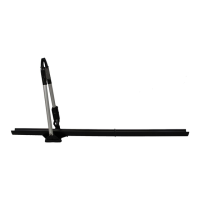
Guidance on preparing the jig, priming, and inserting it for lubricant application.
Details applying lubricant bursts and rotating the jig for treatment.
Covers repeating for the other damper, lowering vehicle, and road testing.
Instructions for cleaning the jig and notes on BG HCF grease usage.
Provides claim code, symptom code, and operation number for the repair.
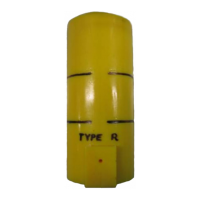
Lists part numbers for damper grease and applicator jig, and kit discontinuation.
Specifies application as normal warranty and causal part for VIN lookup.
This document outlines a service bulletin for Honda Civic 3 and 5 Door vehicles, addressing a common customer complaint regarding rear damper noise. The bulletin, numbered SJ-06-004-05 and issued on March 18, 2011, details a specific repair method for "Rear Damper Noise From Cold." The originator of this bulletin is David Peters from HUK (Honda UK).
The primary function of this service bulletin is to provide a comprehensive solution for a specific noise issue originating from the rear suspension dampers of certain Honda Civic models. The problem manifests as a "squeak and or knocking sound" from the rear suspension, particularly noticeable when the vehicle is first moved in the morning or after being parked overnight. This noise typically dissipates within five minutes of driving. The underlying cause is identified as a "stick slip friction action" between the piston rod and the main oil/wiper seals within the damper, leading to vibrations that produce the audible knock or squeak.
The countermeasure involves applying a specialized lubricant (grease) to the damper rod to reduce this friction. For production vehicles, the quantity of lubricating grease within the damper assembly has been increased. For aftersales service, a specific repair method is outlined, utilizing an application jig tool and a specified spray grease to lubricate the damper rod.
The bulletin applies to the following Honda Civic models and their respective model codes and year models:
The core of the repair involves the use of "BG HCF waterproof spray grease" and a "Grease Applicator Jig." The lubricant is applied in "short bursts" of approximately half a second each, equating to 1.75ml per burst. The repair is designed to be a permanent solution, and the BG HCF Grease is specifically chosen to prevent oil seal damage.
The bulletin also lists specific part numbers for the required materials:
The repair method is designed for "On Customer Complaint Only," meaning it should only be performed when a customer reports the specific noise issue. The process involves several key steps:
The bulletin emphasizes several critical maintenance and usage guidelines:
| Brand | Honda |
|---|---|
| Model | CIVIC 3D |
| Category | Automobile Accessories |
| Language | English |