Do you have a question about the Honeywell 5101 and is the answer not in the manual?
Instructions for opening the safe using the override key, including removing the cover and turning the knob.
Guide for installing 4 "AA" batteries in the battery compartment, ensuring correct polarity.
Procedure to test the digital lock by entering the preset passcode and checking bolt movement.
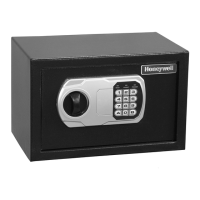
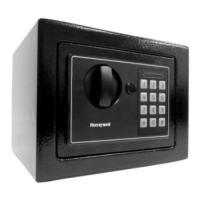
This document describes the Honeywell Steel Security Safe, a robust security solution designed to protect valuables, important documents, and digital media from theft, tampering, and fire damage. The safe is engineered with high manufacturing standards to ensure user satisfaction and provides "Peace of Mind" for many years when properly cared for.
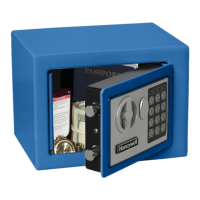
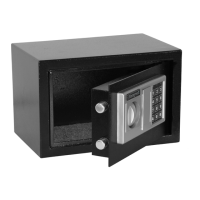
The Honeywell Steel Security Safe serves as a secure storage unit for personal items, offering both theft protection and resistance to fire exposure. Its primary function is to safeguard contents through a combination of physical security features and an electronic locking mechanism. The safe is equipped with a programmable digital lock, allowing users to set a personalized passcode for access. In cases where the digital lock is inaccessible due to dead batteries, a forgotten passcode, or malfunction, an override access key provides an alternative method of entry. For enhanced security, the safe can be bolted to a wall or floor, preventing unauthorized removal or tipping. Certain models also include a removable shelf, offering flexibility in organizing and storing items of various sizes.
The safe's operation is designed to be straightforward and user-friendly.
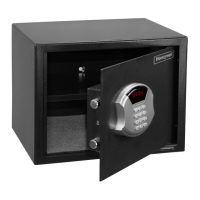
To initially open the safe or gain access when the digital lock is inoperable, the override key is used. First, a small screwdriver is needed to remove the override key cover. The override key is then inserted and turned to the left to unlock the safe. Finally, the door entry knob is turned to the right to open the safe door. It is crucial to store the override keys in a secure location, never inside the safe itself, to ensure access in emergencies.
The digital lock requires four "AA" batteries for power. The battery compartment is located on the inside of the safe door. To install, the cover is removed, and the batteries are inserted, ensuring correct polarity (observing the + and - indicators). After installation, the battery cover is replaced. It is important to test the digital lock before closing the safe door to confirm proper battery installation and functionality.
Before programming a new passcode, the digital lock should be tested. With the safe door open, the door entry knob is turned to the left to extend the locking door bolts into the locked position. The preset factory passcode, "1-5-9-B," is then entered. Within 5 seconds of entering the code, the door entry knob is turned to the right. If successful, the lock bolts will retract, indicating the safe is unlocked. This confirms the digital lock is functioning correctly.
To enhance security, users can program a new, personalized passcode. With the safe door open, the cap (if applicable) is removed, and the reset button (C) located inside the door is pressed. A yellow light will illuminate, signaling that the safe is ready to accept a new code. Within 30 seconds, a new passcode (3 to 8 digits) is entered, followed by either "A" or "B." The safe will emit a beep, and the yellow light will turn off, confirming the new passcode has been successfully programmed. Once a new passcode is set, the factory preset code will no longer work.
To unlock and open the safe, the programmed passcode is entered, followed by "A" or "B." The door entry knob is then turned to the right to open the door. To close and lock the safe, the door is closed and held in position. The door entry knob is then turned to the left to engage the lock bolts, securing the safe.
The safe incorporates a security feature to prevent unauthorized access through repeated incorrect passcode attempts. If the wrong user code is entered three consecutive times, the keypad will automatically enter a lockout mode for 20 seconds, during which digital entry is disabled. If three additional incorrect codes are entered after the initial lockout, the keypad will remain locked for 5 minutes. During these lockout periods, the override access key can still be used to open the safe.
For models equipped with a removable shelf (e.g., 5103SL/5103GSL, 5110/5110G, 5111/5111G), this feature allows for flexible storage. The shelf can be easily removed to accommodate taller or larger items. To remove it, all contents and any carpeting on the shelf are first cleared. The shelf is then lifted and tilted to the side to fit through the door opening. Users are advised not to discard the shelf, as it can be stored for future use.
To provide added theft protection and resistance to tipping, the safe can be bolted to a wall or floor. The safe has pre-drilled bolt-down holes in its back panel and floor. To secure the safe:
Proper maintenance is essential to ensure the safe operates optimally for many years.
To prevent damage or malfunction of the digital keypad, it is important to operate it only with clean hands. Avoid attempting to use the keypad if hands have excessive dirt, debris, or liquids on them.
For cleaning the safe's surface, a mild cleaner, such as window cleaner, is recommended. This helps prevent scratching or discoloring the finish. After cleaning, always wipe the surface dry. Abrasive cleansers should NEVER be used on the safe or its digital keypad, as they can cause damage.
Weak or dead batteries should be replaced immediately, and all four batteries should be changed simultaneously. If batteries are completely dead and the digital keypad cannot be used, the override access key can be used to open the safe and access the battery compartment. It is important to remember to remove batteries from the safe if it will not be used for an extended period. After replacing batteries, it is advisable to test the passcode to ensure it is still active. If the passcode has reset to the original factory passcode (159) due to battery removal or weakness, refer to the "Set-up" section to reprogram a new passcode.
If the user passcode is forgotten, the override access key can be used to open the safe. Once open, the cap (if applicable) is removed, and the reset button (C) inside the door is pressed. A yellow light will indicate readiness to accept a new code. Within 30 seconds, a new 3 to 8-digit passcode is entered, followed by "A" or "B." The safe will beep, and the yellow light will turn off, confirming the new passcode.
| Material | Steel |
|---|---|
| Fire Resistant | Yes |
| Burglary Rating | Not Rated |
| Fire Rating | 1 Hour |
| Lock Type | Electronic lock |
| Shelves | No Shelves |