Honeywell
HUS-NVR-1032-E 32 Channel Network Video Recorder
Quick Guide
Front and Rear View
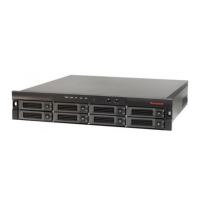
Figure 1 Front View
1: ON/OFF Switch
2: Panic Recording Key
3: System Status Indicator
4: Alarm Indicator
5: Recording Indicator
6: LAN 1 Indicator
7: LAN 2 Indicator
8: HDD Tray Button
9: HDD Active Indicator
10: HDD Connection Indicator
11: USB Port
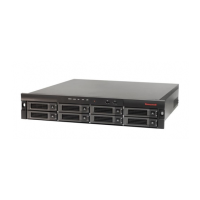
Figure 2 Rear View
1: Power Switch
2: Power Inlet
3: BNC Output
4: Audio Output
5: Intercom Output (Reserved)
6: Intercom Input (Reserved)
7: Alarm In
8: Alarm Out
9: USB Port
10: LAN1, LAN2
11: VGA Port
12: RS232 Port
13: HDMI Port
14: e-SATA Port
15: Grounding Screw
16, 17: Labels
Installation and Connections
HDD Installation
Connections
1. Connect the video output: use the VGA port or HDMI port
(Figure 2) to connect the monitor. Use a certified HDMI cable for
HDMI port.
2. Connect the Ethernet cable.
3. Connect the mouse and power supply.
Starting and Login
Figure 3 Login
Turn on the Power Switch (No.1 in Figure 2) of the NVR, and the backlight of the ON/OFF Switch (No.1 in Figure
1 ) is on. After a while, the login window is displayed as shown in Figure 3.
1. For the first time use, select “admin” and enter the password “123456”. Click Wizard.
2. Follow the prompts to complete the basic settings: Date &Time, Network, Hard Disk, Recording Scenario and
Devices.
3. When the settings are completed, the Live screen is displayed. To play the live video, drag the target camera
icon from the “Devices” list to the target video window, as shown in Figure 4.
Basic Operation
Scheduled Recording—after successfully logged in, all the connected cameras start scheduled recording by default. To stop or set the scheduled recording, refer to the “Record
Setup” section in the User Guide.
Start Manual Recording—In Figure 4, right click the icon of the target camera in the “Devices” list and select RecordManual Recording.
Stop Manual Recording—In Figure 4, right click the icon of the target camera in the “Devices” list and select RecordStop Recording.
Playback—In Figure 4, click Playback to enter the playback screen. Drag the icon of the target camera from the “Devices” list to the video window to play the recorded video as
shown in Figure 5. The default start time of playback is 12:00 am. The playback control is shown in Figure 6.
Stop Playback—In Figure 5, right click the target video window and select “Stop Playing” in the menu, or select “Stop Playing (All)”.
Panic Recording—In Figure 4, click Panic Recording to start the panic recording and click it again to stop recording; or press and hold the Panic Recording Key (No.2 in Figure 1)
for over one second on the front panel to start the panic recording and press and hold it again for over one second to stop recording.
Live Screen and Playback Screen
Figure 4 Live Screen
Figure 5 Playback Screen
Figure 6 Playback Control
NVR Internet Explorer (IE) Client
Figure 7 Security Warning
NVR can be accessed and controlled from the IE Client via the network. Before using the IE Client, refer to the “Internet
Explorer Configuration” section in the User Guide to configure the Internet Explorer. After the configuration, enter the IP
address (e.g.
http://192.168.1.90/) of the NVR in the address bar of Internet Explorer to access.
1. At first login, the window will pop up as shown in Figure 7. Click Install.
2. When the installation is completed, the login window is displayed. Select “admin” and enter the password “123456”.
Click Login.
3. After successfully logged in, the Live screen is displayed. To play the live video, drag the target camera icon from the
“Devices” list to the target video window, as shown in Figure 8.
Figure 8 Live Screen (IE Client)
For detailed information about IE Client, refer to the “System Operation and
Configuration” and “NVR Internet Explorer (IE) Client” section in the User
Guide.
Shutdown
In Figure 4, navigate to Shutdown or press and hold the ON/OFF Switch (No.1 in Figure 1 ) for over five seconds on the front panel.
Honeywell Security, Your Partner of Choice
Honeywell Security
Honeywell Security Asia Pacific
35F Tower A, City Center, 100 Zun Yi Road, Shanghai 200051, China
TEL: +86 21-22196888
FAX: +86 21-62370740
http://www.security.honeywell.com
©2014 Honeywell International Inc. All rights reserved.
Document 800-13325 Rev. B