Checking System or Zone Status/Bypassing Zones
Checking Zones: Before arming your system, all protected doors, windows and other detection
zones must be closed or bypassed; otherwise the keypad displays “Not Ready to Arm.”
Mode Press these icons… What happens
Check
System
Status
System
• Displays system status.
Check
Zones
Zones
• Displays all faulted zones.
Select the “Zones” icon key when you want to arm your system with one or more zones
intentionally unprotected. The system must be disarmed first.
Mode Press this icon… What happens
Bypass
Zones
Zones
• When finished, the zones screen will be displayed along
with zone status.
• Arm the system as usual. When armed, the arming
message is displayed with “Bypass.”
• Bypassed zones are unprotected and will not cause an
alarm if violated.
• The system will not allow fire zones to be bypassed.
• Zones are automatically unbypassed when the system
is disarmed.
• To display bypassed zones prior to arming, select the
“Zones icon.
Zone Status
The following icons will be displayed on the Zone Status screen along with zone status information
when a zone has been faulted, bypassed or is in alarm:
Display Definition Display Definition Display Definition
Alarm
Ready
Trouble (red)
Fault
(Yellow)
Bypass
Arming the System
Before arming, close all perimeter doors and windows and make sure the “Ready to Arm” message is
displayed. Select the specified icon or key and enter the 4-digit Security Code. The system will beep
three times to confirm the arming.
After arming, leave the premises through an entry/exit door during the exit delay period and be sure
the door is reclosed to avoid causing an alarm.
Mode
Press these keys or
icons…
When to use an arming mode and what happens
Stay
Arm Stay
• Used when you want to arm the system with persons
staying inside (or if you have pets that are moving
throughout the premises).
• Arms perimeter zones; interior zones left disarmed.
• An alarm sounds if any protected window or non-
entry/exit door is opened.
Instant
Stay
Instant tab +
Arm Stay
• Used when staying inside and you do not expect
anyone to use an entry/exit door.
• Same as Stay mode, except entry delay is off.
• An alarm sounds same as Stay mode, and sounds upon
opening entry/exit doors.
Away
Arm Away
• Used when nobody is staying inside (including pets).
• Arms the entire system (interior and perimeter).
• An alarm sounds if a protected window or any door is
opened, or if any movement is detected inside.
Quick
Arming
Arm Stay
OR
Arm Away
• If programmed, you can press the Quick Arm button
(when the keypad appears) in place of your security
code when arming the system.
Disarming the System and Silencing Alarms
The “Disarm” icon is used to disarm the system, silence alarm or trouble sounds, and clear memory
of alarm displays. Select the icon or key and enter the 4-digit Security Code.
Mode
Press these keys or
icons…
What happens
Disarm
and
Silence
Alarms
Disarm
• System is disarmed and alarm sounding is silenced.
• To clear the memory of alarm display (if present),
enter a second Off Sequence.
• To Silence a Fire Alarm or Carbon Monoxide , Simply
enter an “Off” sequence.
Panic Keys
Your system may have been programmed to use special keys/icons to manually activate
emergency (panic) functions as follows:
To activate a Panic Function:
Press and hold down the Panic key for at least 2 seconds, then select the
Desired Panic function icon as indicated below:
Panic Function Icon Sends this Signal* With this Sounding…
Police Alarm
Police
Silent Alarm OR
Audible Alarm
No audible alarm; displays, “Not Ready to
Arm,” indicating that a silent alarm has
been initiated. OR
A loud, steady alarm at panel at external
siren (if installed); displays “Alarm 99
Police”
Medical Alarm
Medical
Auxiliary Alarm
Steady alarm sound at panel, but not at
external siren (if installed); displays “Alarm
96 Medical”
Fire Alarm
Fire
Fire Alarm
emporal (pulsing) sound at panel and
external siren (if installed); displays “Fire
Alarm 95”
* All panic functions send signals to the Central Monitoring Station, if connected.
Testing the System
Using the Test mode allows each detection point to be checked for proper operation. Testing
should be conducted weekly to ensure proper operation.
• The keypad sounds a single beep about every 30 seconds as a reminder that the system is in the
Test mode. Alarm messages are not sent to your Central Station during testing.
If a problem is experienced with any detection point (no confirming sounds, no display), call for
service immediately.
1. Disarm the system and close all protected windows, doors, etc. The ready indicator LED should
be lit if all zones are intact.
2. At the Master Menu Screen Select the “Test” icon followed by the “Walk Test” icon.
3. Listen. The sounder should beep one time and “Walk Test-Off to Quit” should be displayed. The
control sounds a single beep every 30 seconds while the test is in progress. If the sounder
does not sound, CALL FOR SERVICE.
4. Fault zones. Open each protected door and window in turn and listen for three beeps from the
keypad followed by the zone’s voice descriptor. Each faulted detection point should appear on
the display. The display clears when the door or window is closed.
5. Walk in front of any interior motion detectors (if used) and listen for three beeps. Each detector
should appear on the display when it is activated. The display clears when no motion is detected.
Note that if wireless motion detectors are used, there is a 3-minute delay between activations to
conserve battery life.
6. Test all smoke detectors, following the manufacturer's instructions.
7. When all detection points have been checked and restored (closed), there should be no zone
numbers displayed.
8. Exit test mode by entering an Off Sequence.
System Settings
Your system settings including volume level (message playback, system announcements, and
status beeps) and display brightness and contrast can be adjusted if desired. Additionally, you can
turn On/Off the Chime, Telephone Ringer and/or System Voice Announcements. A cleaning icon is
also available via the system settings.
Note: To enable or disable the Chime mode the system must be disarmed.
Mode
Press this Key or
Icon…
What happens
Voice
OR
Chime
OR
Ringer
Mode
Settings
+
Voice
OR
Chime
OR
Ringer
Voice
• Enables or disables the Voice announcement of
system status.
Chime
• Alerts you to the opening of a perimeter door or
window while the system is disarmed.
• Open (faulted) zone information is displayed.
• Three tones sound at the keypad whenever a
perimeter door or window is opened (faulted
interior zones do not produce a tone).
Ringer
• Enables or disables the Telephone Ringer.
Adjust
Brightness,
Contrast or
Volume
Settings
+
Brightness
OR
Contrast
OR
Volume
• Slide the button to Adjust the display brightness,
contrast or system volume.
Clean the
Touchscreen
Settings
+
Clean
• The touchscreen becomes inactive for 15 seconds
then returns to the settings screen and becomes
active.
Security Codes
Your installer assigned a Master Code that is used to perform all system functions. Security codes
can be assigned for up to 32 users. Only the Master User can assign security codes to users.
Tools
To Add/Edit/Delete User Codes:
Select the “Tools” icon on the second page of the Security Home Screen, then enter
your Master Code and follow the steps below:
Function Press this Icon… Perform the following…
Change
Master User
Code
Users
• Select “Master”, then “Edit”
• Select “User Code”
• Enter a new 4-digit Master Code.
• Select “Done”, then “Save”.
Add Security
Code
Users
• Select “Add new”
• Select “Name”, then “Clear”
• Type a User Name, then “Done”
• Select “User Code”
• Enter a new 4-digit User Code.
• Select “Done”, then “Save”.
Edit/Delete
Security
Code
Users
• Select “Name”, then select “Edit” or “Delete”
• Select “Name” or “User Code”
• Enter a new User Name OR 4-digit User Code.
• Select “Done”, then “Save”.
5200-100-002-V0
2
7
6
3
1
5
4
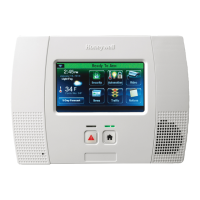
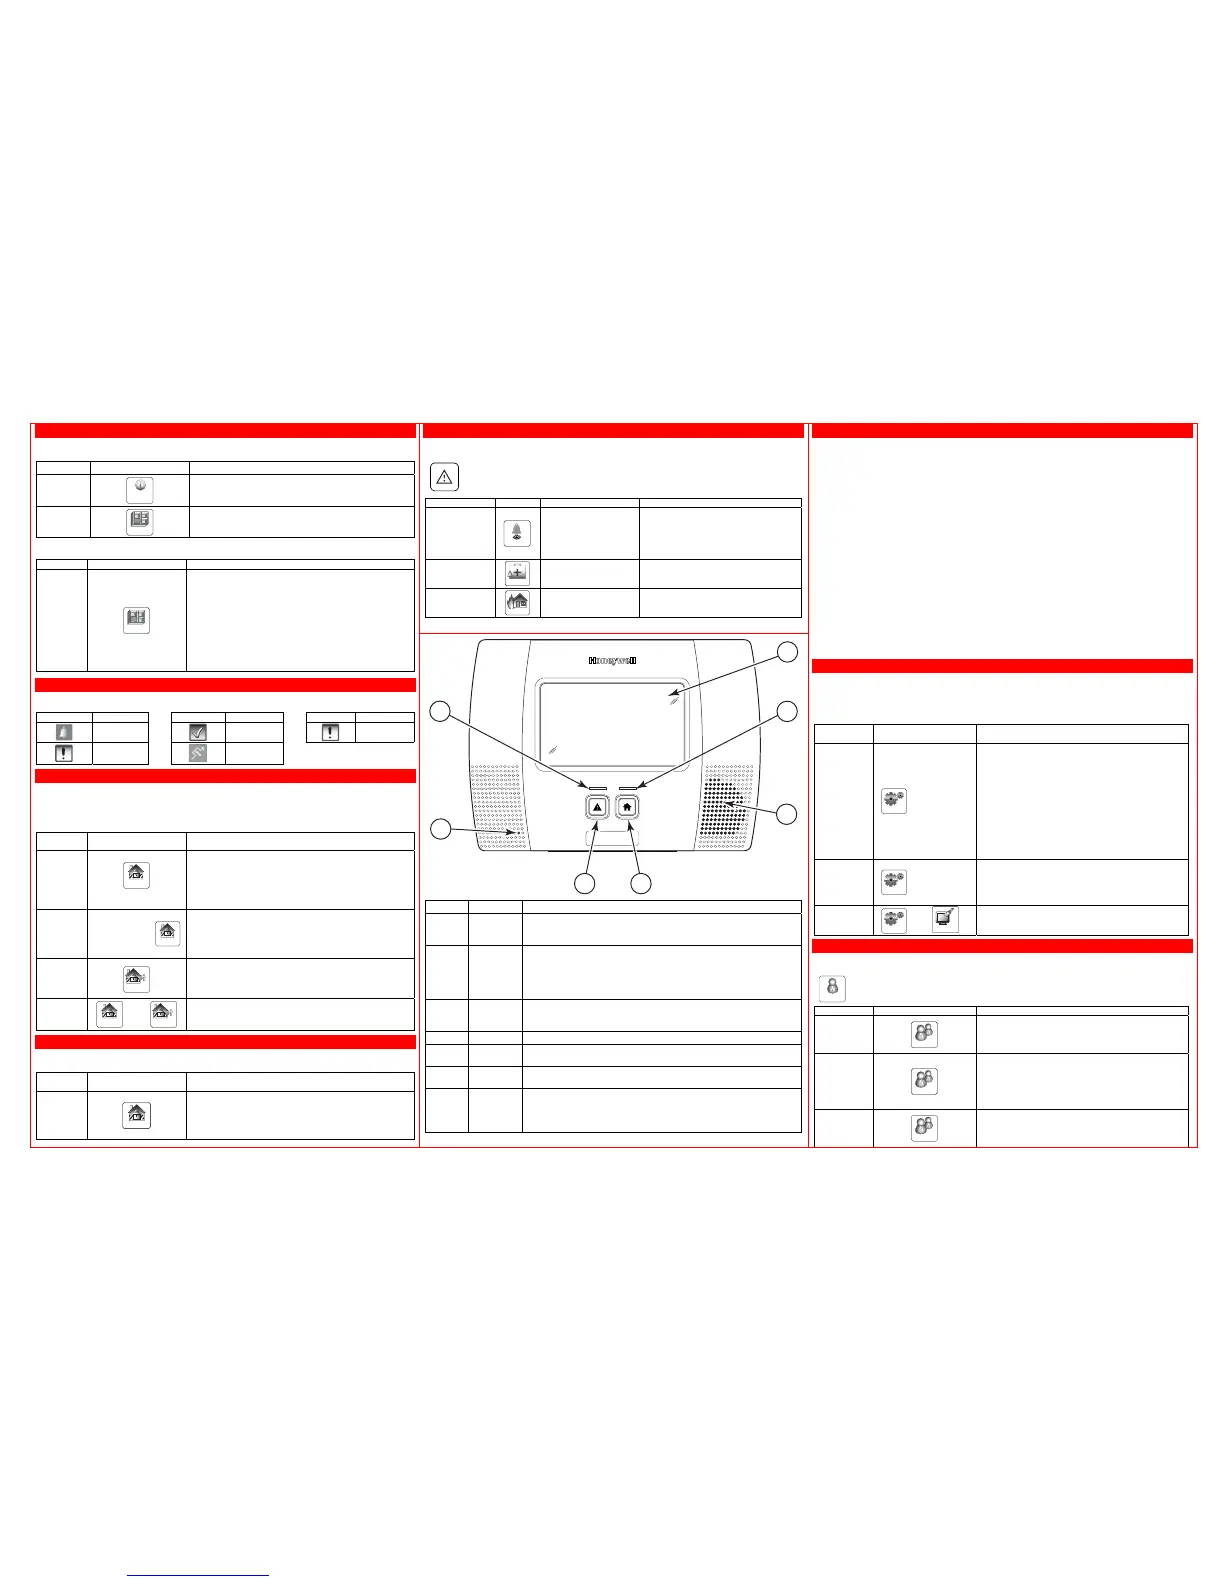
Index Item Description
1
Display
Window
Color Liquid Crystal Display (LCD) Touch screen. Displays system
status icons, time, system status information, user menus and the
virtual keypad.
2
Ready LED
Indicator
(Green)
ON = System is ready to be armed
OFF = System is armed
Blinking = System is disarmed, and not ready to be armed (a
fault exists)
Blinking alternately with Ready LED = Speaker phone mode active
3 Speaker
Source of audible internal warning and confirmation sounds,
status announcements, as well as alarms (Refer to the full User
Guide for details).
4 Home key
Used to exit from a screen or return to the home screen.
5 Panic key
When depressed for 4 seconds, the virtual panic icons are
displayed on the touch screen.
6 Microphone
Used to record personal messages via the Message Center, and
for two-way voice and speaker phone operation.
7
Armed LED
Indicator
(Red)
ON = System is armed (Stay or Away)
OFF = System is disarmed
Blinking = System armed, and an alarm or fault has occurred.
Blinking alternately with Ready LED = Speaker phone mode active
 Loading...