JASCO Products warrant s this product to be fr ee from manufactur ing defec ts for a
period of t wo years from the or iginal date of c onsumer purchase. T his warranty is limi ted
to the r epair or replac ement of this product only an d does not ex tend to consequential or
incidental damage to ot her products that may be used wi th this product. This warranty is
in lieu of all other warrant ies, expres sed or implied. S ome states do no t allow limitations
on how l ong an implie d warranty l asts or pe rmit the exclusion or limitation of incidental
or consequential dama ge, so the ab ove limit ations may not apply to you. This warranty
give s you speci fic rights and you may also have othe r rights which vary from state to st ate.
Please contact Custom er Serv ice at 855 6988324 bet ween 7AM – 8PM CS T or via our
website (w ww.byjasco.com) if t he unit should pro ve defective wit hin the warrant y period.
JASCO Products garantit que ce produit est exempt de tout déf aut de fabr ication p our une
période de deux ans à compter de la date de l ’achat original par l’achete ur. Cette garantie
se limite exclusi vement à la réparat ion ou au remplacemen t de ce produi t et n’est pas
applicable aux dommages indire cts ou acc essoire s survenus sur d’autres produits utilisés
avec c e produit . Cette garantie se substitue à toute aut re garantie expresse ou implicite .
Cer tains États ne permet tent pas de rest rictions quant à la dur ée d’une garantie implicite
ou per mettent l’exclu sion ou la limitation des dommage s indirects et a ccessoires ; il se
peut, par cons équent, que cette garantie ne s’applique pa s dans votre cas. Cet te garantie
vous confère des droits juridiques précis; vous pou vez jouir d’autres droits qui peu vent
varier d’un État à l ’autre. Veuillez communiquer avec le ser vice à la clientèle au 1855
698 8324, du l undi au vendr edi, de 7 h à 20 h (HNC) ou p ar l’intermédiaire de notre si te
Web (w ww.by jasco.com) si l ’appar eil s’avère défail lant au cour s de la période de garantie .
Jasco Product s garanti za que este p roducto no tendrá defec tos de fabricación durante dos años
a par tir de la fecha de compr a del consumidor or iginal. E sta garantía se l imita a la repar ación o
repo sición de es te producto y no cubre daños indirec tos o incide ntales a otros productos que se
pudieran utilizar con este pro ducto. E sta garan tía reemplaza cualquier otra garan tía explícita o
implícit a. Algunos est ados no per miten la aplicación de limitacione s respec to de la duración de
una gar antía implícit a o permite n la exclusión o limitación de la cláusul a sobre daños indirectos
o incidentales, por este moti vo las limi tacione s arriba mencionadas p ueden no apl icarse en su
caso. Es ta garantía le otorga derechos e specífic os y es posible que tenga otros dere chos que
pueden variar se gún el estado en el que vive. Póngase en c ontacto con Atención al Cl iente al 855
698 8324 ent re las 7:00 y las 2 0.00 C ST (hor a central e stándar) o a t ravés de nuest ro sitio we b
(ww w.byja sco.com) en cas o de que se produzca algún defecto durant e la vigencia de la garantía .
JASCO Products Comp any LLC, B uilding B
10 E. Memor ial Rd. Okl ahoma Cit y, OK 73114.
MULTISWITCH WIRING
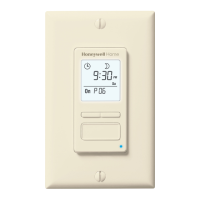
The Honeywell Add-on switch is required for MultiSwitch 3-way or 4-way
installations. Connecting the traveler terminal of this switch to a standard,
nonHoneywell switch will cause damage or result in improper function. If this
switch is a part of a 3-way or 4-way multi-switch installation, do not connect
the traveler wire or apply power until Honeywell Add-on switches are correctly
installed. For more information on 3Way or 4Way installations, view the
manual or quick-start guide that comes with the Honeywell Add-on switch.
SINGLESWITCH WIRING
Before you start; you may wish to change the paddle color to
match your wallplate or decor. Please proceed to Section 5.
1. Shut off power to the circuit at circuit breaker or fuse box.
IMPORTANT! Verify power is OFF to switch box before continuing.
2. Remove wallplate.
3. Remove the switch mounting screws.
4. Carefully remove the switch from the switch
box. DO NOT disconnect the wires.
5. There are up to five screw terminals on the switch;
these are marked
A. GROUND — Green/Bare
B. LOAD — Black (connected to lighting)
C. LINE (Hot) — Black (connected to power)
D. TRAVELER — Red/Other (only in 3-way installations)
E. NEUTRAL — White
Match these screw terminals to the wires
connected to the existing switch.
6. Disconnect the wires from the existing switch. Be careful to
label wires according to the previous terminal connection.
OBSERVE IMPORTANT WIRING INFORMATION
IMPORTANT! This switch is rated for and intended
to only be used with copper wire.
WIRE GAUGE REQUIREMENTS
Use 14 AWG or larger wires suitable for at least 80° C for supplying
Line (HOT), Load, Neutral, Ground and Traveler connections.
WIRE STRIP LENGTH
7. For attachment to screw terminals: strip insulation 1” (25mm)
For attachment using the enclosure’s holes:
strip insulation 5/8” (16mm)
UL specifies that the tightening torque for the
screws is 14 Kgf-cm (12 lbf-in).
8. Connect the green or bare copper ground wire to the GROUND terminal.
9. Connect the black wire that goes to the light
to the terminal marked LOAD.
10. Connect the black wire that comes from the electrical
service panel (Hot) to the terminal marked LINE.
11. Connect the white wire to the neutral terminal
(use a jumper wire if needed).
Note: The Traveler terminal is only used for 3-way or 4-way wiring
and should remain insulated if the switch is being installed
in a single pole installation (one switch & one load).
12. Insert switch into the switch box being careful
not to pinch or crush wires.
13. Secure the switch to the box using the supplied screws.
14. Mount the wallplate.
15. Reapply power to the circuit at fuse box or
circuit breaker and test the system.
BASIC OPERATION
The connected light can be turned ON/OFF in two ways:
• Manually from the front panel of the InWall Switch.
• Remotely with a ZWave Controller.
MANUAL CONTROL
The front panel rocker switch allows the user to
turn ON/OFF the connected fixture.
• To turn the connected fixture ON: press and release the top of the rocker.
• To turn the connected fixture OFF: press and
release the bottom of the rocker.
DISABLE / ENABLE LED
1. Press UP three (3) times then quickly press
and release DOWN one (1) time.
2. Repeat to disable/enable LED.
WARNING — SHOCK HAZARD
Turn OFF the power to the branch circuit for the switch and lighting fixture at the
service panel. All wiring connec tions must be made with the POWER OFF to avoid
personal injury and/or damage to the switch. This device is intended for installation in
accordance with the National Electric Code and local regul ations in the United States,
or the Canadian Electrical Code and local regulations in Canada. If you are unsure or
uncomfortable about performing this installation consult a qualified electrician.
SINGLE, DUAL AND TRIPLEGANG BOXES
When installing the InWall smart switch in multiple gang
boxes it may be necessary to break off one or both sides of the
scored tabs on the front yoke. This does not affect the electrical
rating of the smart switch (see specifications for details).
Scan to view installation guide
Balayez ce code pour consulter le guide d’installation
Explore para ver la guía de instalación
www.honeywellelectricalaccessories.com
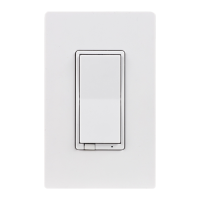
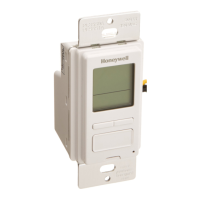
Z-Wave® Certified Wireless lighting Control
Z-Wave® Control de iluminaCión inalámbriCo CertifiCadoControl
inalámbriCo para iluminaCión CertifiCado por Z-Wave®
FCC / IC - EN
39348
Z W4005
A. Ground (Green/Bare)
B. Load (Black)
C. Line (Black)
D. Traveler (Red/Other)
E. Neutral (White)
F. Top Rocker — Press &
release to turn switch ON
G. Bottom Rocker — Press &
release to turn switch OFF
B
E
C
A
D
IMPORTANT!
The fixture controlled by the ZWave InWall Smar t Switch must not exceed
960 watts (Incandescent ); 1800 W (15A) Re sistive or ½ HP Motor. The
switch is designed only for use with permanently installed fixtures.
• Turn ON/OFF manually or remotely via the ZWave controller
• Can be added in multiple groups and scenes
• May be used in single pole installation or with up to two Honeywell
Add-on switches in 3-way or 4-way wiring configurations
• Compatible with all incandescent and CFL /LED bulbs
• Interchangeable paddle switch — white & light almond paddle in package
• Uses a standard, decorative-size wallplate for single gang installations
(wallplate not included)
• Blue LED indicates switch location in a dark room
• ZWave Certified for simple pairing and integrated home automation
• Screw Terminal Installation — requires wiring connections
for Line (Hot), Load, Neutral and Ground. Traveler
wire required for 3-way or 4-way installation
• This ZWave device has advanced features that allow you to
customize your experience. These features can only be adjusted
by a ZWave enabled controller that support the ZWave
Configuration command class. For a complete list of adjustable
configurations, visit: www.honeywellelectricalaccessories.com.
FE ATURES2
TOOLS INSTALLATION1 3
1.
2.
CONNECTING YOUR DEVICE TO A ZWAVE NETWORK
1. Follow the instructions for your ZWave certified
controller to add a device to the ZWave network.
2. Once the controller is ready to add your device, press and release the top
or bottom of the wireless smar t switch (rocker) to add it in the network.
Now you have complete control to turn your fixture ON/OFF
according to groups, scenes, schedules and interactive
automations programmed by your controller.
If your ZWave certified controller features remote access, you
can now control your fixture from your mobile devices.
REMOVING AND RESETTING THE DEVICE
1. Follow the instructions for your ZWave certified controller
to remove a device from the ZWave network.
2. Once the controller is ready to remove your device, press
and release the top or bottom of the wireless smart
switch (rocker) to remove it from the network.
RETURNING SWITCH TO FACTORY DEFAULTS
Quickly press ON (Top) button three (3) times then immediately
press the OFF (Bottom) button three (3) times. The LED will
flash ON/OFF 5 times when completed successfully.
Note: This should only be used in the event your network’s
primary controller is missing or otherwise inoperable.
CHANGING THE COLOR OF THE PADDLE
This step is optional. Before you start you may want to change
the color of the paddle to match your wallplate or decor.
1. Lift the air gap tab at the base of the paddle.
2. Push side tabs in on one side and then the other to
release paddle. Lift the cover up and off.
3. Simply put the new paddle onto the switch by inserting the
air gap and side tabs and snapping securely into place.
Once this step has been completed please return to Section 3.
5
CONNECTION
CUSTOMIZATION
4
This device suppor ts Asso ciation Command Cla ss (3 Groups)
• Association Group 1 supports Li feline, B inary Sw itch Report
• Association Group 2 supports Ba sic Set and is c ontroll ed
by pre ssing the On or Of f button with the local load
• Association Group 3 supports Ba sic Set and is c ontroll ed
by double pressing the On or Off button
• Each Ass ociation G roup support s 5 total nodes
13
C
E
B
D
A
out to light (load)
from breaKer boX
8
14
out to light (load)
from breaKer boX
B
D
A
E
C
1 1
2
5
3
7
F
G
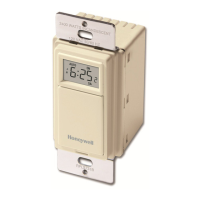
SMART SWITCH
IN-WALL
INTERRUPTOR INTELIGENTE
DE PARED
INTERRUPTEUR INTELLIGENT
MURAL
This product can be included and operated in any ZWave net work with ot her ZWave ce rtifie d
devices from o ther manuf acturers and/or other applic ations. All non-bat tery op erated no des
within the net work wil l act as repeate rs regardles s of vendor to incre ase reliability of the ne twork .
Ce produit peut être util isé dans un ré seau ZWave avec d’autres app areils
cer tifiés ZWave produits par d’aut res fabrican ts et d’autres applications . Tous les
nœuds fonctionnant sans pile au sein du ré seau joueront le rôle de rép étiteur s,
quel que soit l e fournisseur, afin de rehauss er la fiabilité du rése au.
Est e producto se pue de incluir y pu ede funcionar en cualquier red ZWav e con disposi tivos
de otr os fabric antes y otras aplicaciones que cuenten con la homologación ZWave. Todos
los no dos que formen parte de la red y que f uncionen sin pila s actuarán de repetidores
indep endiente mente del pr oveedor con el fin de aume ntar la fiabilidad de la red.
ZW4005
Power: 1 20 VAC, 60 Hz.
Signal (Fre quency): 90 8.4 / 916 MHz
Maximum Lo ads: 960W, incandesc ent, ½ HP Motor or 180 0W (15A) Resisti ve
Range: Up to 150 feet line of sight between t he Wirele ss
Cont roller and the closest ZWave re ceiver module.
Oper ating Temperature Ran ge: 32104° F (0 40 ° C)
For indoor use only.
Specific ations subject to change wi thout not ice due to continuing produc t improvement
ZW4005
Alim entation : 120 V c .a., 6 0 Hz
Signal (fréquence) : 908,4/ 916 MHz
Charges ma ximales : 9 60 wat ts (incandescent ), moteur de ½ HP ou ré sistanc e de 1 800 W (15 A).
Por tée : Distance à v ue maximale de 15 0 pi entre l a télécommande
et le mo dule de réception ZWave le plus pro che.
Plage de tempér atures de f onctionneme nt : de 32 à 104 ° F (de 0 à 40 °C)
Utilisation intérieure uniquement.
En raison d’amélioration s continue s du produit, le s spécifications
peuvent f aire l’objet de changement s sans préavis .
ZW4005
Alim entación: 120 VCA , 60 Hz.
Señal (fre cuencia) : 908. 4/916 MHz.
Cargas máximas: 96 0 W, para disp ositivos incande scentes ,
motor de ½ HP o 18 00 W (15 A) de carga resisti va
Alcance : hasta 15 0 pies, sin ob struccione s, entre el cont rolador
inalámbrico y el módulo receptor ZWave más cercano.
Rango de temperatur a de funcionamien to: 32104 °F (0 40 °C)
Para uso en interiores exclusivamente.
Las e specific aciones e stán sujetas a cambio s sin previo a viso por
las const antes mejoras a que se someten los productos.
SPECIFICATIONS
ZWAVE INTEROPERABILITY
SPÉCIFICATIONS
INTEROPÉRABILITÉ ENTRE LES DISPOSITIFS ZWAVE
ESPECIFICACIONES
INTEROPER ABILIDAD ZWAVE
WARRANTY
GARANTIE
GARANTÍA
Jasco Products Company LLC.
10 E. Memorial Rd.,
Oklahoma City, OK 73114
The Honeywell Trademark is used under license from Honey well International Inc.
Honeywell International Inc. makes no representation or warranties with
respect to this product.
This product is manufactured by Jasco Products Company LLC.
MADE IN CHINA/FABRIQUÉ EN CHINE / HECHO EN CHINA
©JASCO 2018 | 393 48 | ZW4005 | 11/30/17 v1
All br and nam es show n are tra demark s
of the ir resp ecti ve owner s.
Tous le s noms de ma rque ill ustr és
sont d es marq ues de co mmerce
de leurs propriétaires respectifs .
Todos lo s nombr es de mar ca
que aparecen son marcas
comerciales pertenecientes a
sus respecti vos propietarios.
This device complies with Part 15 of the F CC and Indus try Canada license- exempt
RS S standard(s). Operation is subject to the following tw o conditions: (1) this device
may not cause harmful inter ference, and ( 2) this dev ice must accept any interference
received, including interference t hat may cause unde sired oper ation.
FCC NOTE: The manufacturer is not resp onsible for any radio or T V
interference caused b y unauthor ized modifications to this equipment. Such
modification s could void t he user’s au thorit y to operate the equipment .
NOTE: This equip ment has been tested and found to comply wit h the limit s for a Clas s B
digit al device , pursuant t o Part 15 of the FC C Rules. T hese limits are designed t o provide
reasonable protec tion against har mful inter ference in a re sidential installatio n. This
equipment g enerate s, uses and can radiate radio fre quency energy and, i f not installed
and used in accordance w ith the instruct ions, may cause harmf ul interf erence to r adio
communications. Ho wever, there is no guarantee that inter ference wil l not occur in a
par ticular installation. If t his equipment does cause har mful inter ference to radio or
tele vision recept ion, which can be determined by turning the e quipment of f and on, the user
is encoura ged to tr y to correct the interferen ce by one or more of th e following measures:
— Reorient or relocate the receiving antenna.
— Incre ase the separation between the equipment and receiver.
— C onnect the equipment into an outlet on a circuit dif ferent
from that to which the receiver is connected.
— C onsult the dealer or an experienced r adio/TV technician for help.
Important note: To comply with the FC C RF exposure compliance requir ements, no change to
the antenna or the device is permitted. A ny change to t he antenna or the de vice coul d result in the
device exceeding the RF exposure re quirements and void user’s authority to oper ate the device .
FCC / IC - FR
Cet appareil es t conforme au par agraphe 15 des normes FCC e t au CNR pour les
appar eils exempts de licence d ’Indust rie Canada. Son utilisation e st sujette aux
deux c onditions suiv antes : 1) cet appareil ne doit pas occasionner de brouill age
préjudiciable et 2) cet appar eil doit acc epter toutes les inter férence s reçues , notamment
les interférences qui peuvent provoquer un fonctionnement non désiré.
REMARQUE DE LA F CC : Le fabricant n’est pas responsable des in terférences sur l es fréquence s
radioélect riques ou télévisuelles pouvant êtr e causées par de s modifications non autor isées de
ce matérie l. De telles modifi cations peuvent annuler le droit de l ’utilisateur à u tiliser c et appareil.
REMARQUE : Cet app areil a été te sté et cer tifié confor me aux limites relatives aux appar eils
numér iques de catégorie B définies dans le par agraphe 15 des norme s FCC. Ce s limites
ont été définies afin de fournir une protec tion raisonnable contre l e brouillage pr éjudiciabl e
en milieu ré sidentiel. Cet app areil produit , utilise e t peut émettre des ondes de fréque nce
radio et, s’il n’es t pas installé et utilisé c onformément aux ins tructions, il peu t provoquer un
brouillage préjudiciable aux communicat ions radio . Il n’existe toutefois aucune garantie que
des inter férences ne se p roduiront pas dans une installation donné e. Si cet app areil occasionne
un brouillage pr éjudiciabl e à la récep tion radiophonique ou télé visuelle, il su ffit d’allumer et
d’éteindre l ’appareil p our déterminer sa responsabil ité. Nous e ncourageons l ’utilisate ur à
essayer de corrige r ces inter férenc es en appliquant une ou plusieurs de s mesures suivantes :
— Réorienter ou déplacer l’antenne de réception.
— Augme nter la distance ent re l’appareil et le récepteur.
— Bran cher l’app areil à une prise se cteur dif férente de cel le du récepteur.
— Pour ob tenir de l’aide, c onsulter le revendeur ou un technicien
spécialisé en poste s radio ou téléviseurs.
Remarque importante : Pour se conformer aux ex igences de conf ormité de l a
FCC conce rnant l’exposition aux RF, aucune modi fication appor tée à l’antenne
ou au disp ositif n’es t autorisée. Toute modific ation appo rtée à l ’antenne ou au
dispositi f pourrai t faire en sor te que le dispositif dépas se les exigences d’exposition
aux RF et pourrait annuler le droit de l’util isateur à utiliser ce dispositif.
FCC / IC - ES
Est e dispositivo cumple c on las especifi cacione s del apartado 15 de las normas de
la FC C y con las especificaciones de l as normas r adioelé ctrica s (RSS) de l Minister io
de Industr ia de Canadá aplic ables a aparatos exentos de lice ncia. El funcionamiento
est á sujeto a las siguientes dos condiciones: (1) este dispositivo no debe provocar
interferencia perjudicial, y (2) este dispositivo debe aceptar toda interferencia
que reciba , incluso la que pudiera causar un funcionamiento no deseado.
NOTA DE L A FCC: E l fabricante no s e hace responsable de ninguna inter ferencia de radio
o TV ocasionada por modifi caciones no aut orizadas efectuadas a este equipo . Estas
modificaciones podrían anular la au toridad del usuar io para utilizar este equipo.
NOTA : Este equipo ha sido probado y cumple con lo s límites para dispositivos digitales de
Clase B, de conf ormidad con el apart ado 15 de la normat iva de la FCC. Estos límites est án
diseñados p ara prove er protección razonable cont ra inter ferencias per judiciale s en instal aciones
residenciales. Este equipo genera, usa y pue de irradiar ener gía de radiof recuencias y, si
no se ins tala y usa según l as instrucciones, pue de provoc ar interferencia p erjudicial a las
radiocomunicaciones. No obs tante, no hay gar antías de que no ocurrir á interf erencia en una
inst alación en par ticular. Si este equip o provoca interferencia perjudicial a l a recepción de
radio o tele visión, lo que puede de terminar se encendiendo y apagándolo, se re comienda que
el usuario intente corregir la interferencia aplic ando una o más de las siguientes medidas:
— Reor ientar o reubicar la antena receptora.
— Incrementar la separación entre el equip o y el receptor.
— Cone ctar el equipo a un t omacorriente de un cir cuito diferente
del cir cuito al que el receptor est á conect ado.
— Consultar al distrib uidor o a un técnico con exp eriencia e n
radio/televisión para solicitar asistencia.
Nota importante: Para cumplir con los r equisitos de cump limiento de exposición de
radiofrecuencia de la FC C, no se per miten cambios a l a antena o el disposi tivo. Cualquier
cambio a la antena o dispositi vo podría ha cer que el disp ositivo super e los requerimie ntos de
exposición de radiof recuencia y anul ar la autor idad del usuario para operar el disposit ivo.
FCC — U2Z ZW4 005A | IC: 6 924AZ W4005A
Jasco Product s Company | Model: Z W40 05 / 39348
CAN ICE S3(B) / NMB3(B)
9
10 11
RISK OF FIRE
RISK OF ELECTRICAL SHOCK
RISK OF BURNS
CONTROLLING APPLIANCES:
CAUTION:
• DO NOT E XCEED R ATINGS
• DO NOT U SE TO CONT ROL ANY DE VICE
WHERE UNINTENDED OPERATION
COULD CAUSE UNSAFE CONDITIONS
(HE AT LAMP, SUN LAMP, ETC. )
• DO NOT U SE TO CONTRO L RECEP TACLES
• FOR IN DOOR USE ONLY
RISQUE D’INCENDIE
RISQUE DE CHOC ÉLECTRIQUE
RISQUE DE BRÛLURES
COMMANDE DES APPAREILS :
ATTENTION :
• NE PAS DÉPA SSER LES
CARACTÉRISTIQUES NOMINALES
• NE PAS UTILISER P OUR COMM ANDER
DES APPAREILS POUR LESQUELS
UN FONCTIONNEMEN T IMPRÉVU
POURRAIT ENTRAÎNER DES
CONDITIONS DANGEREUSES (L AMPE
INFRA ROUGE , LAMPE SOLAIR E, ETC .)
• NE PAS UTILISER P OUR COMM ANDER
DES PRIS ES DE COURA NT
• POUR UTILISATION INTÉRIEURE
UNIQUEMENT
RIESGO DE INCENDIO
RIESGO DE DE SCARGA ELÉC TRICA
RIESGO DE QUEMADURAS
CONTROL DE APAR ATOS:
PRECAUCIÓN:
• NO SUP ERAR LOS VALORE S
NOMINALES ELÉCTRICOS.
• NO USAR PARA CONTROLAR
DISPOSITIVOS EN LOS QUE
EL FUNCIONAMIENTO NO
INTENCIONADO PODRÍA PROVOCAR
SITUACIONES PELIGROSAS
(LÁMPARAS DE CALEFACCIÓN,
LÁMPARAS SOLARES, ETC.)
• NO UT ILIZ AR EL DISPOS ITIVO PAR A
CONTROLAR TOMACORRIENTES
• PAR A USO EN IN TERIORES
EXCLUSIVAMENTE
WARNING
AVERTISSEMENT
ADVERTENCIA
NOT FOR USE WITH MEDICAL OR
LIFE SUPPORT EQUIPMEN T
ZWAVE ENABLED DEVICES SHOULD
NEVER BE USED TO SUPPLY
POW ER TO, OR CONTROL T HE ON/
OFF S TATUS O F MEDICAL AND/
OR LIFE SU PPORT EQUIPMEN T.
NE PAS UTILISER AVEC UN
ÉQUIPEMENT MÉDICAL
OU DE SURV IE
LES DISPOSITIFS COMPATIBLES
AVEC L A TECHNOLO GIE ZWAVE NE
DEVRAIENT JAMAIS ÊTRE UTILISÉS
POUR ALIMENTER OU COMMANDER
LA MISE E N MARCH E OU L’ARRÊ T DE
L’ÉQUIPEMENT MÉDICAL OU DE SURVIE.
SE PROHÍBE SU EMPLEO EN
EQUIPO MÉDICO O EQUIPO
PAR A EL MANTENIMIENTO DE
LA S FUNCIONE S VITALES
LOS DISPOSITIVOS ZWAVE NUNCA
SE DEBEN USA R PARA SU MINIST RAR
ENERGÍ A ELÉCTRICA , NI PAR A
CON TROL AR EL ESTADO DE ENC ENDIDO
O APAG ADO DEL EQUIPO MÉDICO Y/O
EL EQUIPO PARA EL MANTENIMIENTO
DE FUNCIONES VITALES.
If you have any problems or questions, contact our tech suppor t
team at 18556988324, MondayFriday, 7AM8PM CST.
For the most up-to-date product suppor t, accessories, electronic
(PDF) format manuals and more, visit w ww.byjasco.com/support.
• No user serviceable parts in this unit.
Si vous avez des problèmes ou des questions, communiquez avec notre équipe de
soutien technique au 18556988324, du lundi au vendredi, de 7 h à 20 h (HNC).
Pour un soutien technique d’avant-garde, les nouveaux accessoires,
les plus récents manuels en format électronique (PDF) et plus
encore, visitez le site www.byjasco.com/support.
• Aucune des pièces de ce dispositif ne peut être réparée par l’utilisateur.
Si tiene problemas o dudas, comuníquese con nuestro equipo
técnico al número: 18556988324, de lunes a viernes,
de 7.00 a 20.00, hora estándar del centro (CST).
Para recibir el sopor te técnico más actualizado sobre productos, accesorios,
manuales en formato digital (PDF), entre otros, visite w ww.byjasco.com/support
• Esta unidad no contiene piezas que el usuario pueda reparar.
DO NOT RETURN THIS
PRODUCT TO THE STORE
NE RETOURNEZ PAS CE
PRODUIT AU MAGASIN
NO DEVUELVA ESTE
PRODUCTO A LA TIENDA
STOP