Instruction Manual hoogo B3+
Prepare use
27
INFORMATION
Property damages!
Incorrect use of the nozzles may result in damaging
your flooring.
►
Before vacuuming, inform yourself regarding
the requirements of your flooring. Observe
the recommendations made by the flooring
manufacturers.
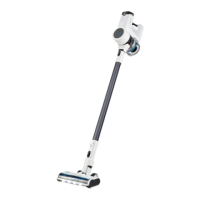
Assembling the floor nozzle
1. Insert the floor nozzle (Fig. 1, no. 15) onto the lower
end of the suction tube (Fig. 1, no. 3).
Toggle the floor nozzle
The floor nozzle (Fig. 1, no. 15) has two setting options
(Fig. 1, no. 16) and can be toggled in accordance with
the flooring:
• Position 1 (Fig. 1, no. 16): for carpets
• Position 2 (switch pressed down to the rear): for hard
floors
Assembling further nozzles
You can extend the functional scope of your appliance
by exchanging the floor nozzle (Fig. 1, no. 15).
In addition to the floor nozzle, the following nozzles are
included in the scope of delivery of your appliance.
• Crevice nozzle (Fig. 1, no. 12): Use the crevice nozzle
to vacuum dust out of locations which are dicult to
access.
• Upholstery nozzle (Fig. 1, no. 13): Use the upholstery
nozzle to clean upholstered furniture, upholstery and
mattresses.
• Furniture brush (Fig. 1, no. 14): Use the furniture brush
to clean furniture, skirting boards and similar gently.
• Parquet nozzle (Fig. 1, no. 17): Use the parquet nozzle
to clean hard floors. The nozzle must be fully flat
on the surface in order to clean cracks and joints
optimally. For the intake of coarse dirt, you can tilt
the parquet nozzle slightly.
Follow the action steps listed to assemble other nozzles.
1. Pull the floor nozzle (Fig. 1, no. 15) o the suction
tube.
2. Insert the desired nozzle onto the end of the suction
tube.
Ö The furniture brush, crevice nozzle and upholstery
nozzle can alternatively be attached to the handle.
 Loading...