20
EN
> Setting the anti-fall sensors
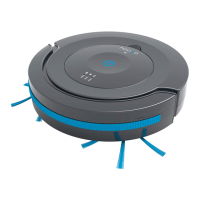
Your robot vacuum cleaner automatically de-
tects dropos in front of it by means of 3 anti-
fall sensors (Fig. 2). As a result, it changes its
direction of travel and continues to clean in the
opposite direction. Lower-level surfaces, such as
stairs are detected and thus omitted from the
cleaning. You can adjust the sensitivity of the
anti-fall sensors as follows:
To switch on the appliance, place it on the floor
and set the ON
/
OFF switch to position I (Fig. 11 / A).
Both external LEDs flash alternately.
After approx. 8 seconds the appliance will start to
move in “random mode” (Fig. 3 / A).
After approx. 1,5 minutes the appliance changes
to “gyro mode”, moving in ever increasing circles
(Fig. 3 / B). As soon as the appliance encounters an
obstacle in this mode, it changes to “edge mode”
(Fig. 4 / A), traversing the edges of the room to be
cleaned for approx. 2,5 minutes.
Then the cycle starts all over again with “random
mode” (Fig. 4 / B).
To switch o the appliance, set ON / OFF switch
to position 0 (Fig. 11 /
B).
→ The LEDs go out.
> Cleaning floors
1
Ensure that the ON
/
OFF switch is in position 0
(Fig. 11 / B).
2
Adjust the position of the slide controllers to
set the sensitivity of the anti-fall sensors at
the bottom of the appliance (Fig. 1 / 12):
· Position 0 (smallest opening) for
light floors and low steps
· Position 1 (Fig. 12 / B) for light floors
and slightly higher steps
· Position 2 for dark floors and even
higher steps
· Position 3 (largest opening, Fig. 12 / A)
for dark floors and high steps.
NOTE:
Recharge the appliance when the battery
indicator (Fig. 1 / 3) on the appliance lights
up with constant red light.
NOTE:
All 3 slide controllers have to be set to the
same setting. If your robot constantly travels
backward on dark floors, you must select
position 3 (largest opening).
NOTE:
To clean short pile carpets, remove the
round brooms first. To do so, grab the bristles
and firmly pull the round brooms upwards
(Fig. 13 / B). Do not use the appliance on long
pile carpets.
NOTE:
If the appliance has become stuck on an
obstacle, give it a gentle push with your hand.
NOTE:
When the performance of the battery pack
diminishes, the battery indicator (Fig. 1
/
3)
remains red and the appliance stops soon
afterwards. If this is the case, the appliance
will beep every 60 seconds to make it easier
to locate it. (If the battery pack is completely
flat, the beep function will stop.) Then switch
o the appliance and charge the battery
pack > “Charging the battery pack” on page
1 9.
NOTE:
If you lift the appliance while it is in operati-
on, the motors switch o automatically after
approximately 1 second without floor con
-
tact. However, the appliance is not switched
o (the blue LED is still lit) and starts up again
as soon as it makes contact with a surface.
WARNING!
Test the correct settings repeatedly while
you are present to avoid damage by incor-
rect settings.