7
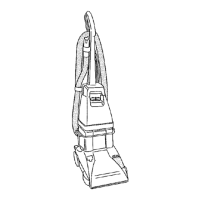
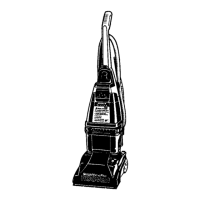
1. Hand grip
2
. Solution trigger:
p
ress to
release clean solution.
3. Clean Surge™ button
4. Cord clip: place cord in
clip to keep it out of the
way when using cleaner
5. Hose
6. Hose holder: wrap hose
around holder and hooks
for storage.
7. Hose hooks
8. Cord hooks:
wrap cord
around hooks for storage.
The top hook can be rotat-
ed right or left for quick
and easy cord release.
9. Stair/upholstery nozzle
10. Carrying handle
11. Clean solution tank
handle
12. Clean solution tank cap/
measuring cup
13. Clean solution tank:
holds cleaning solution.
14. Recovery tank lid
15. Recovery tank: holds
dirty solution.
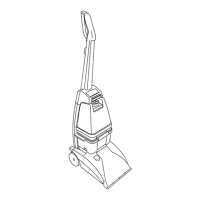
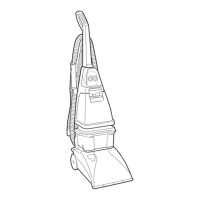
2. How to use
The assembled carpet cleaner will look like the drawing.
2-1
2-2
16. Recovery tank front
p
anel
17. Hood
18. Brush speed selector:
slide selector to set brush
speed on HI, LO, or OFF.
19. Brush Indicator: spins
when brushes are rotating.
20. Nozzle
21. Solution tube connection
22.Recovery tank latches
23. ON/OFF pedal
24. Handle release pedal:
step on pedal to lower
handle to operating (floor)
position.
This carpet cleaner is intend-
ed for household use.
Operate carpet cleaner only
at voltage specified on data
plate on back of cleaner.
Plug carpet cleaner Into a
properly grounded outlet.
ON/OFF pedal &
Handle release pedal
Step on pedal (A) to tur
n carpet
cleaner on. Step on pedal again to
turn carpet cleaner off.
Step on pedal (B) to lower handle to
operating position. Handle does not
lock into a single position but “floats”
to allow convenient operation.
A
B
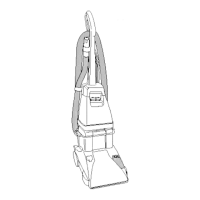
To transport
To move your carpet cleaner from
room to room put handle in upright
and locked position tilt carpet
cleaner back on wheels and push
forwar
d.
2-3
The carpet cleaner may also be lift-
ed by placing a hand under the
upper clean solution tank handle as
shown.
1
3
2
4
5
8
7
7
6
5
8
9
10
11
12
13
14
15
16
17
18
19
20
21
23
22
24
Carpet cleaner description
2-4
Continued
➔
 Loading...