Advanced CT Laser Collimator Manual (V9.0 =OH=) Page 4 of 20
The Advanced CT Laser Collimator samples the entire optical system (primary, secondary mirror, and the eyepiece axial
position) with a simulated large aperture flat-wavefront light source generated by three parallel lasers positioned behind the
target plate. The target plate provides a clear view of the optics’ alignment condition when the three lasers are reflected back on
the target (FIG. 1). It is extremely critical that the lasers are pointed square-on (co-aligned) to the primary mirror for an accurate
reading. It is just like looking at a distant star and centering the star in the eyepiece field of view during a star test, except –
regardless of the weather conditions – the star is only about one tube length in front of the telescope and it is stationary.
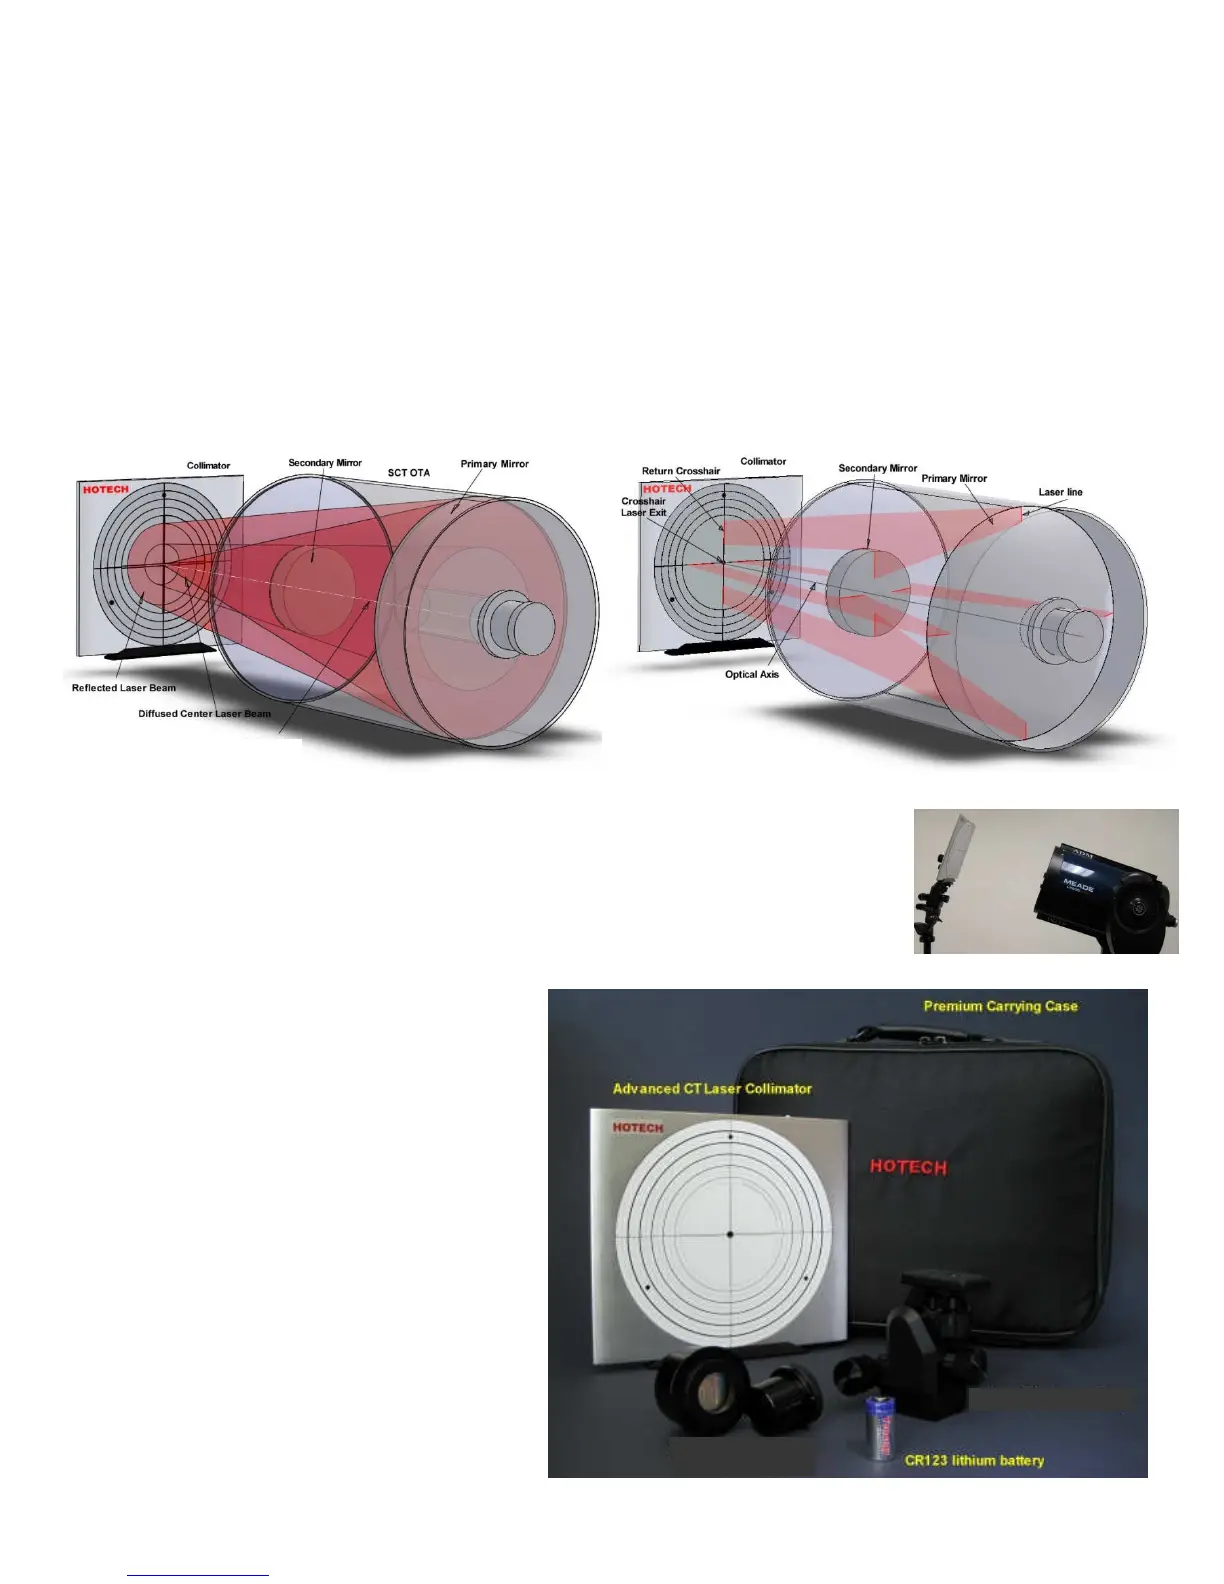
Basic Co-Alignment of the Telescope & Collimator – Basic Co-Alignment is achieved when the collimator and telescope are
centered and squared on the optical axis of the telescope’s primary objective mirror and each other. The diffused laser crosshair
(diffuser strip in place) is projected from the center of the collimator as a guide to optically aiming the primary mirror back to the
center of the collimator target plate. Diffusing the laser crosshair causes it to appear as a circular or donut shaped beam (the
crosshair pattern is no longer visible – just the outer crosshair dimension is preserved as a circle). Centering the donut beam,
centers the collimator on the telescope optical axis (FIG. 2A, Aim Telescope at Collimator, diffuser strip installed). Then, without
the diffuser (crosshair now seen crisp and sharp), center the return laser crosshair reflected from the telescope primary mirror in
order to adjust the collimator to be perpendicular (square) to the telescope’s optical axis (FIG. 2B, Aim Collimator at Telescope,
diffuser strip removed). Most of the time needed to achieve collimation is spent on the initial steps to achieve accurate Basic Co-
Alignment of the collimator and telescope. Be patient and careful; the results will be well worth it!
Overview of the
Basic Co-Alignment Process:
You can collimate your telescope at almost any position (e.g. telescope 20 deg. up) as long as
both the collimator and the telescope are Co-Aligned. Many users find that keeping the
telescope optical axis parallel to the floor (level) and keeping the collimator vertical makes it
easier to achieve squared-up, accurate Co-alignment. Once the collimator and telescope are
Basic Co-aligned, adjust the telescope's three secondary mirror alignment knobs (or screws)
carefully by small amounts to move the three projected laser dots to the same collimator target
plate ring.
Basic Co-Alignment Process:
1. Set Collimator distance
2. Install Reflector Mirror in the telescope's visual
back (2-inch or 1.25-inch as appropriate).
3. Aim Telescope at the Collimator (FIG. 2A)
4. Aim Collimator at the Telescope (FIG. 2B)
5. Adjust Secondary Mirror to move the three laser
dots onto the same circle on the target.
Package Content:
1 x Premium Soft Carrying Case
1 x Advanced CT Laser Collimator
1 x Reflector Mirror (1.25” or 2”)
2 x Diffuser strips
1 x Fine-Adjuster (Collimator to Tripod)
1 x 3V, CR123 Lithium Battery
1 x User Manual (in cover pocket)
FIG. 2B
Aim Collimator at Telescope,
Diffuser strip removed
FIG. 2A
Aim Telescope at Collimator,
Diffuser strip installed
(2” or 1.25”)



 To Next Page