EasyManua.ls Logo

Howard Miller 611319 - User Manual

Howard Miller 611319
4 pages
Print Icon
To Next Page IconTo Next Page
Loading...
1
FLOOR CLOCK SETUP
and OPERATING INSTRUCTIONS
CLOCK SETUP INSTRUCTIONS
1. Move the clock close to its nal location for assembly and setup. Make sure the clock is positioned rmly on the oor.
Levelers are provided on the bottom of the clock (Figure 1). Adjust levelers for maximum stability and proper alignment.
WARNING: ENSURE CLOCK IS POSITIONED SQUARE AND FIRM ON THE FLOOR SO THAT IT WILL NOT FALL OVER. KEEP
CHILDREN AWAY FROM THE CLOCK.
WARNING: KEEP PLASTIC BAGS AND SMALL PARTS AWAY FROM CHILDREN
Figure 1
Floor Leveler
Figure 2
Figure 3
2. Locate the Power Supply (Figure 2) and connect it to the Lamp Cord located at the back of the clock base (Figure 3).
3. Move the clock to the nal location and plug. See page 4 for Safety Strap installation instructions.
4. Plug the Power Supply into an electrical outlet. Turn the Lamp on by touching the Round Metal Touch Plate on the back of the clock base (gure 4).
There are four levels of lighting: low, medium, high, and off.
5. The direction of the light may be adjusted by pushing gently with your nger on the Lamp (gure 5).
Figure 4 Figure 5
Power
Supply
Lamp
Cord
Power
Supply
Cord
Round Metal
Touch Plate
Lamp
Appearance may vary.
Question and Answer IconNeed help?

Do you have a question about the Howard Miller 611319 and is the answer not in the manual?

Overview

This document describes the setup and operation of a Howard Miller floor clock.

Function Description

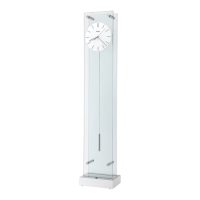
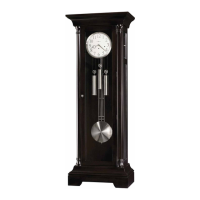
The Howard Miller floor clock is a decorative timepiece designed to be positioned on a level floor. It features a pendulum mechanism and a quartz movement for accurate timekeeping. The clock is equipped with adjustable levelers to ensure stability and proper alignment, which are crucial for the pendulum's operation. It also includes a safety strap for secure wall mounting, preventing accidental tipping. The clock's lighting system illuminates the dial, offering four levels of brightness: low, medium, high, and off, controlled by a round metal touch plate.

Important Technical Specifications

  • Power Source: The clock requires a power supply for its lighting system, which connects to a power cord.
  • Battery Type: The quartz movement operates on one "AA" size alkaline battery. The pendulum driver and head assembly also require two "C" size alkaline batteries.
  • Lighting Control: The lighting system is controlled by a round metal touch plate, offering four brightness levels.
  • Leveling: The clock features adjustable levelers at its base to ensure stability and proper alignment on uneven floors.
  • Safety Strap: A safety strap is included for wall mounting, attaching to a #8 screw (not included) in the wall stud. The length of the screw depends on the wall thickness.
  • Pendulum Mechanism: The clock utilizes a pendulum, which must be installed correctly to prevent wobbling and erratic movement.

Usage Features

Initial Setup:

  1. Unpacking and Placement: Carefully remove the clock from its final location packaging. Position the clock on a level floor, ensuring sufficient space for the pendulum to swing freely.
  2. Leveling: Adjust the levelers at the base of the clock to ensure it is perfectly level and stable. This is critical for the pendulum's proper operation. Use a level tool to verify alignment.
  3. Power Connection: Locate the power supply and connect it to the lamp cord located at the back of the clock base. Plug the power supply into an electrical outlet.
  4. Lighting Control: Turn the lamp on by touching the round metal touch plate on the back of the clock base. Cycle through the four levels of lighting (low, medium, high, off) to familiarize yourself with the control.
  5. Head Assembly Installation: The head assembly, which contains the clock's movement, needs to be installed. This involves aligning the flat edge of the head assembly over the metal bracket and carefully pulling the head assembly down until it rests completely level at the bottom of the metal bracket.
  6. Battery Installation (Quartz Movement): Locate the clock's quartz movement on the back of the dial. Install one new "AA" size alkaline battery according to the +/- symbols in the battery holder.
  7. Time Setting: Set the time by using the Time Setting Knob to rotate the hands to the correct time.
  8. Battery Installation (Pendulum Driver and Head Assembly): Locate the pendulum driver and battery housing inside the head assembly. Release the pendulum guide from the transport-locking pin by gently pushing it sideways, allowing the pendulum guide to hang freely. Install two new "C" size alkaline batteries according to the +/- symbols in the battery housing.
  9. Pendulum Installation: Hang the pendulum by the pendulum hook on the pendulum guide. The pendulum hook must fit snugly on the pendulum guide to prevent wobbling and erratic movement. If the pendulum fails to continue swinging or wobbles, the pendulum hook can be tightened to fit snug to the pendulum guide by squeezing the pendulum hook with pliers.
  10. Starting the Pendulum: Start the pendulum by moving it to the far left of center and releasing it to swing. The pendulum should swing freely.

Safety Strap Installation:

  1. Determine Location: A safety strap is included with your clock. Due to the variety of floor coverings (e.g., plush carpets, linoleum, etc.), it is important that the clock be positioned square and even on the floor. Adjustable levelers have been assembled to the bottom of the clock for this purpose. To help ensure the clock will not tip over, attach the wall safety strap.
  2. Mounting Options: The preferred option is to secure the Safety Strap to a wall stud by using a #8 screw (not included). The length of the screw depends on the wall thickness. A second option is to secure the Safety Strap to a wall anchor (not included) in the wall at the appropriate location. Follow the wall anchor's instructions for assembly.
  3. Installation Steps:
    • Remove one Metal Cap with Threaded Stud from the upper back side of the clock. Keep the large white spacer in place.
    • Remove the Clear Rubber Washer from the Threaded Stud.
    • Place the Large Eyelet of the Safety Strap over the Metal Cap with Threaded Stud.
    • Install the Clear Rubber Washer onto the Metal Cap with Threaded Stud. Thread the Metal Cap back into the clock and finger tighten.
    • Determine the location for the mounting screw or wall anchor and complete installation.
    • Move the clock to its final location and attach the Small Eyelet of the Safety Strap to the mounting screw or wall anchor.

Maintenance Features

  • Battery Replacement: If the clock begins to lose time or the pendulum does not swing, this is a sign of weak or exhausted batteries. Replace with new alkaline batteries.
  • Cleaning: The document does not specify cleaning instructions, but general clock maintenance would involve dusting the exterior and ensuring the internal mechanisms are free from debris.
  • Leveling Check: Periodically check the clock's levelness, especially if it has been moved or if the floor surface has changed. Re-adjust the levelers as needed to maintain proper alignment for the pendulum.
  • Pendulum Check: If the pendulum stops or swings erratically, ensure it is properly seated on the pendulum hook and that the hook is snug. Check battery levels if the issue persists.

Howard Miller 611319 Specifications

General IconGeneral
BrandHoward Miller
Model611319
CategoryClock
LanguageEnglish

Related product manuals