Page
4
I
In
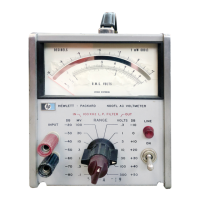
most 400L instruments the mechanical zero
is
pre-
set
during manufacture of the meter movement, The
adjustment screw
in
such meters
is
inoperative. Most
400L instruments will have no adjusting screw on the
front of the meter case.
The following procedure
is
for use only
with
those
instruments
in
which the mechanical adjustment screw
is
effective.
1) Connect a 1.0 volt rms, 400 cps signal from
the
Voltage Calibration Generator to the 400L INPUT
terminals.
Set the 400L to the 1-volt range and adjust
the feedback control (R29) for a
full
scale meter
reading of 1.0 volt.
Any convenient range could also
be used along
with
a corresponding change in input
signal level.
The input signal frequency
is
also not
critical.
2) Switch
the
Calibration Generator todeliver a signal
of 0.3 volt, or 0.3 of the signal level used
in
step
1.
Set the meter mechanical zero adjusting screw to ob-
tain a reading that
is
0.3 of the reference reading
in
step
1.
Use the same vtvm rangefor both
steps
1
and
2.
If
you overshoot, continue to rotate
the
screw
clockwise and again approach
the
0.3 point from the
high side of the scale, The screw should not be turned
counterclockwise during
this
procedure.
3) Repeat steps
1
and
2
until
no further improvement
can be noted.
Compromise adjustment of themechani-
cal zero can be made for optimum tracking.
After
final adjustment, cover the
screw
with a small piece
of black tape.
1
I
C. CHECK REGULATED POWER SUPPLY
1)
The
B+
voltage at the output of the regulated power
supply
should be 250 volts
i5
volts. Measure this
voltage between the chassis and the cathode of the
series regulator tube
with
the
line
voltage
set
to
115 volts.
2)
Vary the line voltage between 103 and 127 volts.
The regulated
B+
will
usually
change no more than
2 volts from one extreme to the other,
Ripple volt-
age
in
the
regulated
B+
is
usually 3millivolts or
less
under these same test conditions.
The dc
voltage at the plate of the
series
regulator
tube
or at the cathode of
the
rectifier tube should be
between
400 and 420 volts with a 115-volt line, Low
voltage at this point may be from adefective rectifier
tube,
filter
capacitor, or power transformer.
To
check the rectifier tube, connect a dc voltmeter be-
tween chassis and the rectifier cathode. Reduce
line
voltage from 115 to 103 volts.
The voltmeter reading
should drop as line voltage
is
reduced and then remain
steady.
If
the dc voltage continues to drop at a slow
rate, the rectifier tube
is
probably weak and should
be replaced.
If
the regulated
B+
voltage
is
not correct, replace-
ment of any or
all
four tubes in the power supply may
be
necessary.
If
tube replacement does not correct
the dc voltage, precision resistors R62 and/or
R64
may have changed value and should
be
replaced. Ab-
normal current drain caused by component failure
elsewhere in the vtvm can result in poor power sup-
k
\
ply regulation,
400D-2C
Excessive ac ripple may be from a defective tube in
the power supply other than
the
rectifier tube, Ca-
pacitor C36 may be open,
D.
SET DC HEATER VOLTAGE
1) Adjust control R66 to
set
the dc heater voltage for
tubes
V1
and
V2
to 6.3 volts rt0.2 volt.
The dc volt-
ages across
the
heaters of tubes V3 and
V4
must also
be 6.3 volts rt0.2 volt.
DO
NOT USE
A
VOLTMETER
THAT IS CONNECTED TO
A
COMMON
GROUND
WITH
THE VTVM UNDER TEST WHEN MEASURING THESE
HEATER VOLTAGES.
A
SHORT CIRCUIT WILL
RESULT. Slight readjustment of control R66 will
often bring these two voltages
within
tolerance.
2)
If
both voltages cannot be
set
to 6.3 volts,
f
0.2 volt,
adjust R66 to bring the lowest of the two voltages
within tolerance. Connect a resistor
in
arallel with
the two heaters with the highest voltage. )?he correct
resistor value
will
enable you to bring
bo*
heater
voltages within tolerance by readjusting control R66.
Use only one resistor
in
parallel
with
one pair of
tubes at a time.
A
resistor value below 220 ohms
1
watt should not be used.
3)
If
you are unable to obtain the correct heater
voltage after completing steps
1
and 2, checkelectro-
lytic capacitors
in
the heater circuit.
If
both heater
voltages are low, check selenium rectifier
SR1.
E.
INPUT DIVIDER CIRCUIT IDENTIFICATION
1)
An
identification of the type of input circuit
will
enable you to select the proper
test
required for your
instrument. Instruments are classified by type of
input circuit into two general groups:
a. Models 400D, serial 001-34370and below; Models
400H/L, serial 001-11226 and below
,
.
,
these
instruments may have either a “capacitive input
divider” or a
“resistive
input divider”. Com-
plete steps
2
through 6 to determine which one
is
present.
b. Models 400D/H/L with serials prefixed 017- and
048-
. .
,
all these instruments employ a
“re-
sistive divider”. Omit steps
2
through 6 and
proceed with Section IV-F.
2) Set the vtvm to the 1.0 volt range and connect a
1.0 volt rms, 400 cps signal from the Calibration
Generator to the INPUT terminals.
Any
convenient
range higher than the 1-volt range can
be
used.
The
signal frequency should be approximately 400 cps.
3)
Rotate capacitor C4 (on input circuit board) one
full turn while watching the vtvm meter reading. The
meter reading will vary only about
547,
in
some instru-
ments and approximately
5v0
in others.
4)
If
the meter indication varies approximately
5vo,
capacitor C4
is
a Voltage Calibration Adjustment,
This
will
be referred to as a “CAPACITIVE INPUT
DIVIDER” circuit in the balance of the procedures
in these Service Notes.
00665-3

 Loading...