400D-2C
Page 5
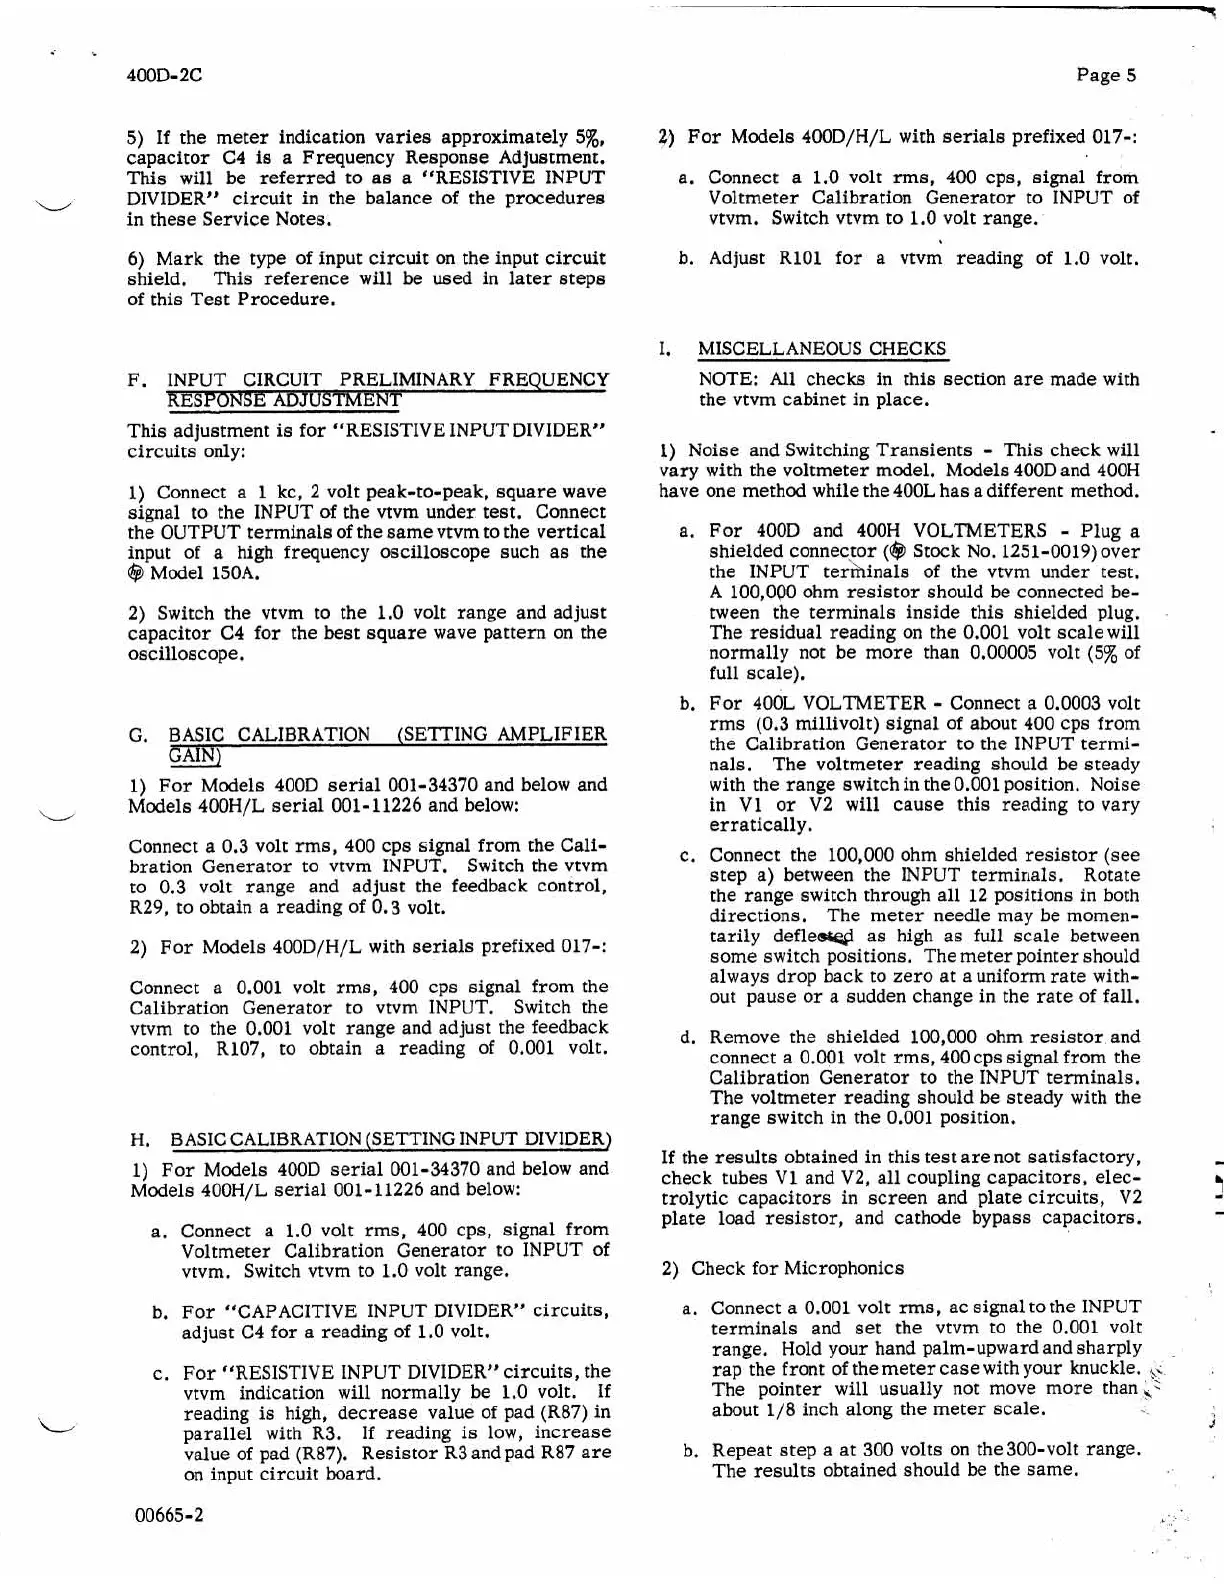
5)
If the meter indication varies approximately
547,,
capacitor C4
is
a Frequency Response Adjustment.
This
will
be referred to as a “RESISTIVE INPUT
DIVIDER” circuit in the balance of the procedures
in these Service Notes.
i/
6) Mark the type of input circuit on the input
circuit
shield, This reference
will
be used in later steps
of this Test Procedure.
F. INPUT CIRCUIT PRELIMINARY FREQUENCY
’RESPONSE
ADJ
USTMENT
2)
For Models 400D/H/L with serials prefixed 017-:
a. Connect a
1.0
volt rms, 400 cps, signal from
Voltmeter Calibration Generator to INPUT of
vtvm. Switch vtvm to
1.0
volt range.
b. Adjust
RlOl
for a vtvm reading of
1.0
volt.
I.
MISCELLANEOUS CHECKS
NOTE:
All
checks in this section are made with
the vtvm cabinet in place.
This adjustment
is
for “RESISTIVE INPUT DIVIDER”
circuits only:
1)
Connect a
1
kc, 2 volt peak-to-peak, square wave
signal to the INPUT
of
the vtvm under test. Connect
the OUTPUT terminals of the same vtvm to the vertical
input of a high frequency oscilloscope such as the
@
Model 150A.
2) Switch the vtvm to the
1.0
volt range and adjust
capacitor C4 for the best square wave pattern on the
oscilloscope.
G.
BASIC CALIBRATION (SETTING AMPLIFIER
GAIN)
1) For Models 400D serial 001-34370 and below and
Models 400H/L serial 001-11226 and below:
Connect a 0.3 volt rms, 400 cps signal from the Cali-
bration Generator to vtvm INPUT. Switch the vtvm
to 0.3 volt range and adjust the feedback control,
R29, to obtain a reading of
0.3
volt.
2) For Models 400D/H/L with serials prefixed 017-:
Connect a 0.001 volt rms, 400 cps signal from the
Calibration Generator to vtvm INPUT. Switch the
vtvm to the 0.001 volt range and adjust the feedback
control, R107, to obtain a reading of 0.001 volt.
i/
H.
BASIC CALIBRATION (SETTING INPUT DIVIDER)
1)
For Models 400D serial 001-34370 and below and
Models 400H/L serial 001-11226 and below:
a. Connect a 1.0 volt rms, 400 cps, signal from
Voltmeter Calibration Generator to INPUT of
vtvm. Switch vtvm to
1.0
volt range.
b. For “CAPACITIVE INPUT DIVIDER” circuits,
adjust C4 for a reading of 1.0 volt.
c. For “RESISTIVE INPUT DIVIDER” circuits, the
vtvm indication
will
normally be 1.0 volt.
If
reading
is
high, decrease value of pad (R87) in
L/
parallel with R3.
If
reading
is
low, increase
value of pad (R87). Resistor R3 and pad R87 are
on input circuit board.
00665-2
1) Noise and Switching Transients
-
This check
will
vary with the voltmeter model. Models 400Dand 400H
have one method while the 400L has a different method.
a. For 400D and 400H VOLTMETERS
-
Plug a
shielded connector
((8
Stock No. 1251-0019) over
the INPUT terhinals of the vtvm under
test,
A
lO0,OQO ohm resistor should be connected be-
tween the terminals inside this shielded plug.
The residual reading on the 0.001 volt scale
will
normally not be more than 0.00005 volt
(5%
of
full scale).
b. For
400L VOLTMETER
-
Connect a 0.0003 volt
rrns (0.3 millivolt) signal of about 400 cps from
the Calibration Generator
to
the INPUT termi-
nals, The voltmeter reading should be steady
with the range switch in the 0.001 position. Noise
in
V1
or V2
will
cause this reading to vary
erratically.
c.
Connect the 100,000 ohm shielded resistor
(see
step a) between the INPUT termirials.
Rotate
the range switch through all 12 positions in both
directions. The meter needle may be momen-
tarily deflew as high as
full
scale between
some switch positions. The meter pointer should
always drop back to zero at a uniform rate with-
out pause or a sudden change in the rate of fall.
d. Remove the shielded 100,000 ohm resistor and
connect a
0.001
volt rms, 400cps signal from the
Calibration Generator to the INPUT terminals,
The voltmeter reading should be steady with the
range switch in the 0.001 position.
If the results obtained in this
test
are not satisfactory,
check tubes
V1
and V2, all coupling capacitors,
elec-
trolytic capacitors
in
screen and plate circuits, V2
plate load resistor, and cathode bypass capacitors.
a. Connect a 0.001 volt rms, ac signal to the INPUT
terminals and set the vtvm to the 0,001 volt
range. Hold your hand palm-upward and sharply
rap the front of the meter case with your knuckle.
bJ
The pointer
will
usually not move more than,.
about 1/8 inch along the meter scale.
b. Repeat step a at 300 volts on the300-volt range.
The results obtained should be the same.
2) Check for Microphonics
 Loading...