17
3. Al 5554—5554 Alloy Aluminum
Al 4043—4043 Alloy Aluminum
SS308—308 Alloy Stainless Steel
SiBro—Silicon Bronze (brazing wire)
Flux-Cored Gasless—E71T-11 or E71TGS
Flux-Cored—E71T1
.025, .030, .035, 3/64—These numbers refer to the
wire diameter required for the selected program.
Ar 8-25%CO2—Indicates the welding gas
required. This program requires a mixed gas with
the majority being Argon and the balance being
CO2. Mixtures from 92% Argon and 8% CO2 to
75% Argon and 25% CO2 are acceptable.
11. Ar 8-10%CO2—Indicates that either a 92% Argon
and 8% CO2 or a 90% Argon and 10% CO2 gas
mixture is required.
12. Ar 2%CO2—Indicates that a 98% Argon and 2%
CO2 gas mixture is required.
13. Ar 25%CO2—Indicates that a 75% Argon and 25%
CO2 gas mixture is required.
14. 100%Ar—Indicates that 100% Argon is required.
All of the programs listed are synergic. PULSE means
that the program runs in single pulse mode. The sound
of the machine changes and the spray arc transfer is
used.
PAW means Precision Aluminum Welding. PAW is
a single pulse program and is a special process for very
thin aluminum (as it is commonly found in the
automotive industry). The weld-able material thickness
in this program is approximate—material thicknesses
range from .030” to .080”.
DOUBLE PULSE means that the pulse weld (the
pulse frequency changes with the material thickness) is
overlaid with a second lower pulse frequency (that
stays constant no matter the material thickness), which
reduces the heat input even further when welding and
produces MIG welds that look like TIG welds.
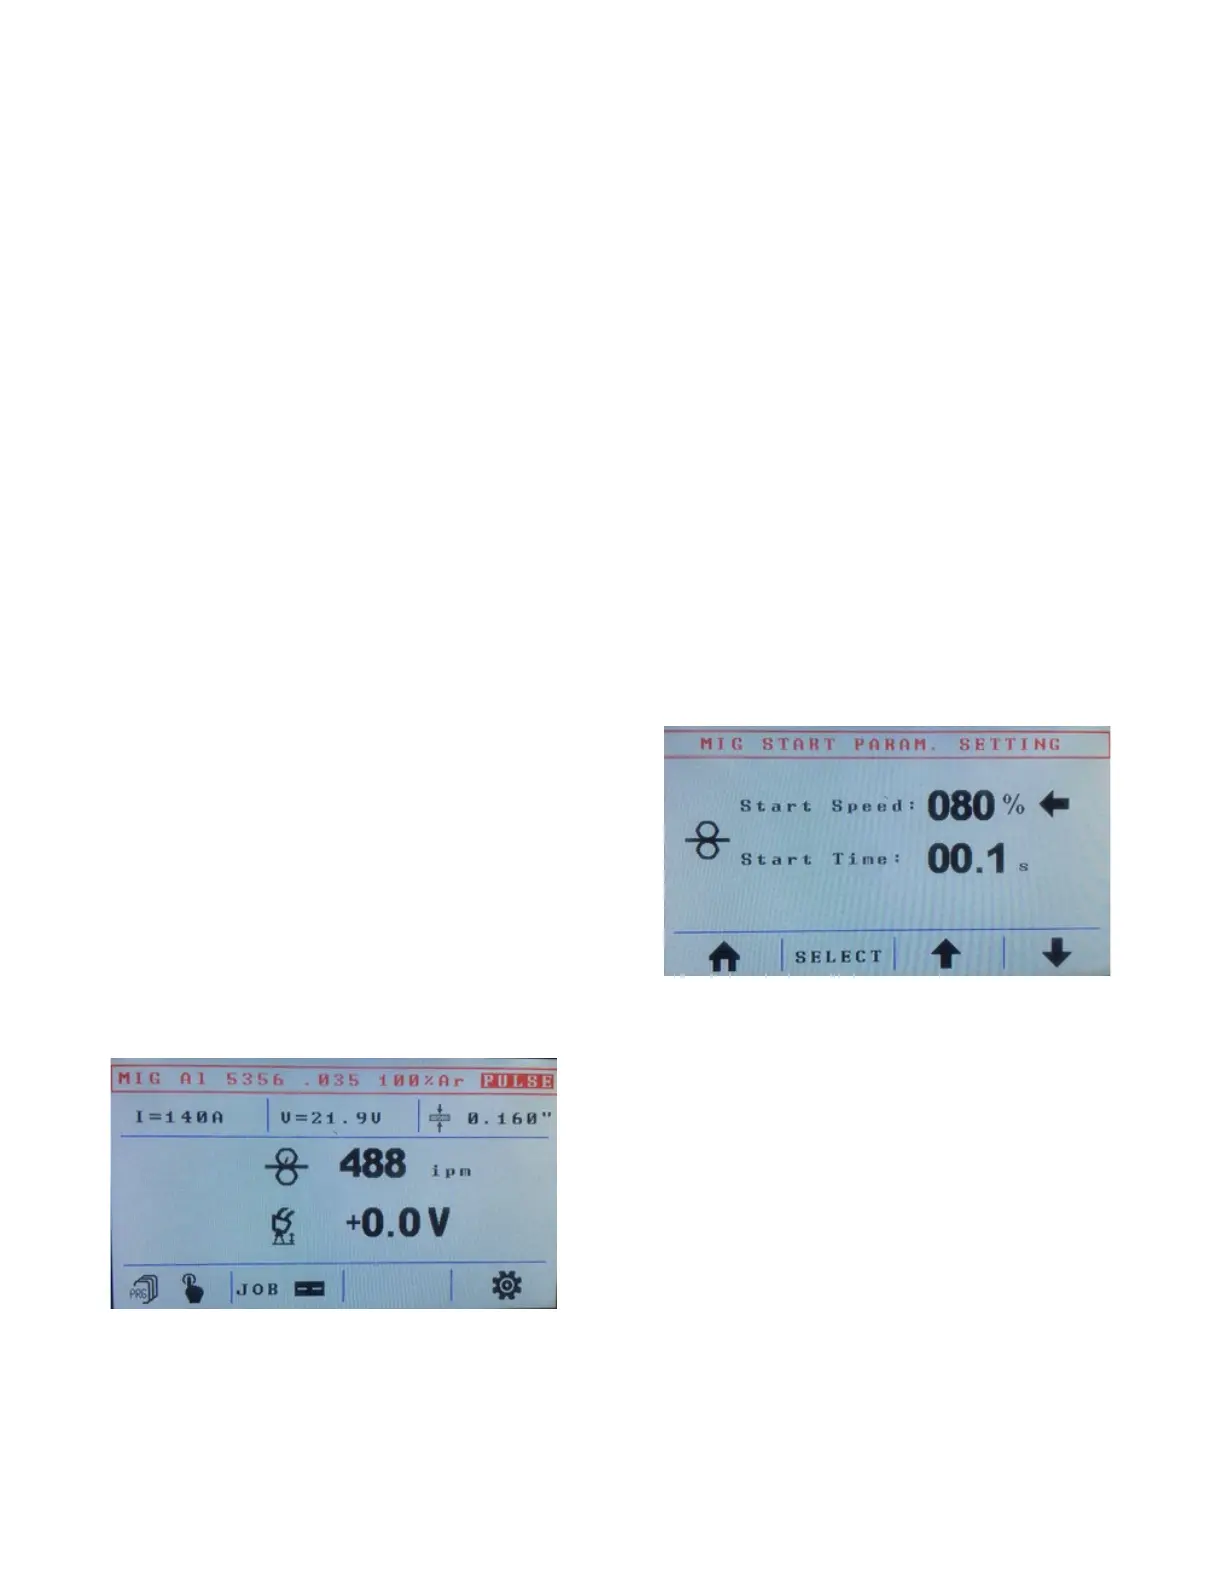
below displays, starting from the left, the approximate
amperage (calculated based on material, wire speed,
wire diameter, and other variables), arc voltage, and
material thickness. By turning encoder F, you can adjust
the material thickness; adjusting the material thickness
also adjusts, automatically, the wire speed and the
voltage. In the center of the LCD, the wire speed is
displayed in IPM. Below that, the voltage deviation of
the synergic curve is displayed. This value is supposed
to read 0.0V at most times, for most welding operations.
You can adjust this value by turning encoder G. If an
adjustment is made, the absolute arc voltage changes
and the color changes from black to red. A deviation of
the synergic arc does two things: it changes the arc
length and it makes the weld hotter or colder. However,
on a synergic machine, the main heat adjustment is made
with encoder F by setting material thickness. The
voltage deviation made with encoder G is considered
fine-tuning or a personal preference adjustment. You
will find the function buttons (B, C, D, and E) on the
bottom of the display. In this case (Fig. 14), button B, if
pressed and release once, brings up the program list, or,
if pressed and released twice quickly, switches the
machine into manual mode. Pressing button C accesses
the Job menu, button D has no function at this point, and
pressing button E accesses the advanced setup menu.
Fig. 14
Once you select a program, the program list disappears
and the program is displayed (Fig. 14). The top line in
the display shows the name of the program, the wire
diameter, and the required gas/gas mixture. It also
indicates if it is a synergic or a pulse program. The line
Fig. 15
By pressing and releasing button E once, you enter the
setup menu (Fig. 15). The first screen in the setup
menu gives you the option to adjust the start speed.
Typically, numbers between 70% and 100% are
suitable for the start speed.
For steel wire, start speeds between 50 and 80% can be
a good starting point. For .035” diameter aluminum
wire, start speeds of 100% are common and for 3/64”
diameter aluminum wire, start speeds between 40 and
60% are typical.
The start time determines how long the machine runs
at the selected wire speed until it switches to 100%
wire speed. Start times between 0.1 and 0.5 seconds
are common. Typically, 0.3 seconds is most common.
Correct adjustment of the start parameters allow for a
spatter-free and smooth arc initiation. To set the start
speed, turn encoder G; to set the start time, press and

 Loading...