9
45032-01 • 01/21/11 • Hunter Fan Company
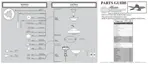
3 • Assembling and Hanging the Fan (Low Profile Only)
You can assemble your fan for standard or angled mounting as shown
in steps 3-1 – 3-3 on the previous page. For low profile mounting
(ceilings less than 9 feet high), see steps 3-6 – 3-10 on this page.
3-6. Remove the screws from the hanger ball bracket.
3-7. Place the low prole washer from the parts sack into the canopy.
3-8. Place the canopy trim ring and canopy with washer on top of the
fan assembly.
3-9. Align the screw holes in the washer with the holes in the adapter.
Assemble securely with three #8-32 x 3/4” screws.
3-10. Raise the fan and place the hook on the hanger bracket through
the round hole in the rim of the canopy.
WARNING: Fan may fall if not assembled as directed in these
installation instructions.
Step 3-10
Step 3-7 (Detail)
Low Prole Washer
(Not Actual Size)
Steps 3-8 – 3-9
Low Prole Washer
Canopy
Trim Ring
Adapter
#8-32 x 3/4” Screw
Step 3-6