EasyManua.ls Logo

Husky ACR4896B - User Manual

Husky ACR4896B
8 pages
Print Icon
To Next Page IconTo Next Page
Loading...
USE AND CARE GUIDE
Quesons, problems, missing parts?
Contact Huskys manufacturing partner for assistance:
7 a.m. - 5 p.m., CST, Monday-Friday:
Chat: www.edsal.com/chat or www.edsal.com/contact
Email: support@edsal.com
Phone: 1-773-475-3131
THANK YOU FOR YOUR PURCHASE
Adjustable Ceiling Storage Rack
Model Numbers:
ACR4896B
ACR4896W-P
WARNING: Excessive weight hazard! Use two or more people to move and install this rack to avoid injury.
Do not leave children unaended near overhead rack. High risk of injury if installed incorrectly. Follow instrucons
carefully and rounely inspect your system to ensure all components are fastened securely. DO NOT JUMP, CLIMB
OR HANG FROM THIS CEILING RACK. Never install more than one of these ceiling storage rack units on any two
overhead joist supports. Use care when working with metal parts, wear gloves. Do not use this unit for anything other
than the manufacture’s intended purpose.
600 lbs.
This unit has a total load capacity of 600 pounds of evenly
distributed weight (not to exceed 18.75 lbs. per square foot), using
all 8 lag bolts (included in package) anchored into solid wood
joists or supports capable of supporng such a load. Do not over
load. Do not aempt to mount to steel beams. Be sure overhead
joists and supports are structurally sound. Edsal is not liable for
structure failure, or damage or injury resulng from structure
failure.
Warranty
Important Safety Informaon
GUARANTEED FOREVER. If your Husky product ever fails bring it back and we will replace it for free. This full warranty gives you
specic rights which vary from state to state. If this product is defecve contact the manufacturer for repair or replacement
parts.
To obtain replacement parts please provide: Model Number, Part Number & Descripon, Store Locaon and Date Purchased
(48x96 assembly_V4)
Question and Answer IconNeed help?

Do you have a question about the Husky ACR4896B and is the answer not in the manual?

Summary

Product Overview and Safety

Important Safety Information

Crucial safety warnings including weight limits, installation precautions, and usage restrictions to prevent injury and damage.

Warranty Guarantee

Details the product's lifetime guarantee and the process for seeking repair or replacement for defects.

Parts and Tools

Parts List

Comprehensive list of all components and hardware included in the package for assembly.

Tools Required

List of necessary tools for successfully assembling and installing the ceiling storage rack.

Assembly Instructions

Plan the Installation

Determine rack orientation, locate ceiling joists, and check spacing for proper installation.

Install Ceiling Brackets

Locate, mark, and securely install ceiling angle brackets into solid wood joists using lag bolts.

Assemble and Install Posts

Join upper and lower posts, then attach post assemblies to ceiling brackets for parallel or perpendicular installation.

Install Side Braces

Connect side braces to the post assemblies using bolts, nuts, and washers for structural support.

Assemble and Install Beams

Assemble left and right beams and install them into the post slots, tapping to secure.

Install Center and Cross Supports

Attach the center support to beams and then install cross supports onto the beam ledges.

Install Wire Decking

Place end and center wire decks onto the assembled frame, ensuring correct orientation of notched ends.

Final Inspection

Check all connections, ensure beams and brackets are secure, and verify all bolts/nuts are tight.

Overview

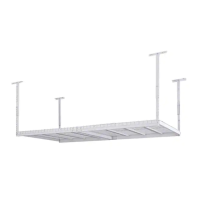
This document describes the Husky Adjustable Ceiling Storage Rack, model numbers ACR4896B and ACR4896W-P. This device is designed to provide overhead storage, helping to organize spaces by utilizing ceiling areas.

Function Description:

The Husky Adjustable Ceiling Storage Rack is a robust, ceiling-mounted storage solution. It allows users to store items overhead, freeing up floor space in garages, workshops, or other areas. The rack is designed for installation into solid wood joists and offers an adjustable height range to suit various ceiling heights and storage needs. Its primary function is to safely and securely hold a significant amount of weight, distributed evenly across its surface. The rack's modular design, comprising beams, posts, and wire decks, allows for a stable and durable structure once assembled correctly.

Important Technical Specifications:

  • Model Numbers: ACR4896B (likely black finish) and ACR4896W-P (likely white or powder-coated finish).
  • Dimensions: The assembly is 48 inches by 96 inches (48"x96").
  • Load Capacity: The unit has a total load capacity of 600 pounds of evenly distributed weight.
  • Weight Distribution Limit: The weight should not exceed 18.75 lbs. per square foot.
  • Mounting: Requires anchoring into solid wood joists or supports. It uses 8 lag bolts (included) for secure installation.
  • Adjustable Height: The rack offers an adjustable height range from 27 to 42 inches from the ceiling to the bottom of the overhead rack. This adjustability is achieved by selecting the appropriate overlap between the upper and lower posts during assembly.
  • Joist Spacing: The installation instructions are based on 16" joist spacing. For parallel installation, ceiling joists should be 48" apart. For perpendicular installation, ceiling joists should be 96" apart. If joist spacing does not match, additional joist supports (not included) may be required.
  • Components: The rack consists of various parts, including Ceiling Angle Brackets (A), Upper Posts (B), Lower Posts (C), Side Braces (D), Left Beams (E), Right Beams (F), Center Support (G), Cross Supports (H), End Wire Decks (I), and Center Wire Decks (J).
  • Hardware: Assembly requires Lag Bolts (K), Hex Bolts (L), Lock Nuts (M), Small Washers (N), and Large Washers (O).

Usage Features:

  • Overhead Storage: Maximizes storage space by utilizing the ceiling, keeping items off the floor.
  • Adjustable Height: The ability to adjust the rack's height (27-42 inches) allows users to customize it based on their ceiling height and the size of items they wish to store, providing flexibility in different environments.
  • Parallel or Perpendicular Installation: The rack can be installed either parallel or perpendicular to the ceiling joists, offering versatility in placement depending on the room layout and joist orientation.
  • Robust Construction: Designed with metal components for durability and strength, capable of holding heavy loads when installed correctly.
  • Wire Decking: The wire decks provide a flat, secure surface for storing various items, while also allowing for light and sprinkler penetration.
  • Clear Instructions: The manual provides detailed, step-by-step assembly instructions with illustrations, guiding users through the installation process from planning to final inspection.
  • Customer Support: Assistance is available via chat, email, or phone for questions, problems, or missing parts, ensuring support throughout the product's lifecycle.

Maintenance Features:

  • Routine Inspection: The manual emphasizes the importance of routinely inspecting the system to ensure all components are fastened securely. This proactive approach helps maintain safety and structural integrity over time.
  • Tightening Bolts and Nuts: Users are advised to periodically check and tighten all bolts and nuts to prevent loosening, which could compromise the rack's stability.
  • Load Management: Adhering strictly to the 600-pound evenly distributed weight limit and the 18.75 lbs./sq. ft. limit is crucial for preventing structural failure and ensuring longevity. Overloading is explicitly warned against.
  • Safety Warnings: The manual includes critical safety warnings, such as the "Excessive weight hazard" requiring two or more people for installation, prohibitions against jumping, climbing, or hanging from the rack, and the necessity of wearing gloves when handling metal parts. These warnings guide users on safe operation and maintenance practices.
  • Warranty: The product comes with a "GUARANTEED FOREVER" warranty, indicating a commitment to long-term quality and support. If the product fails, it can be replaced for free. This suggests that the manufacturer stands behind the durability and reliability of the rack, reducing the burden of potential future repairs or replacements for the user. Contacting the manufacturer for repair or replacement parts is the recommended procedure for warranty claims.
  • Retain Manual: Users are advised to retain the manual for future use, which is essential for referring back to assembly instructions, safety guidelines, and maintenance recommendations.

Husky ACR4896B Specifications

General IconGeneral
BrandHusky
ModelACR4896B
CategoryRacks & Stands
LanguageEnglish

Related product manuals