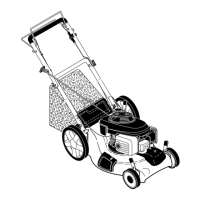
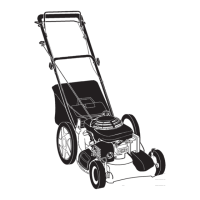
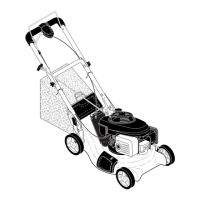
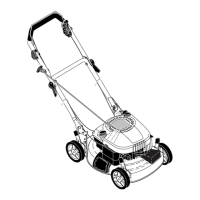
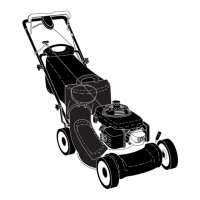
This document is an owner's manual for a Husqvarna 5521CHV (5521CHVB) rotary walk-behind lawn mower, product number 954 22 38-83. It provides essential information for safe operation, assembly, maintenance, and troubleshooting of the device.
The lawn mower is designed for cutting grass and can be configured for mulching, rear bagging, or side discharging. It features a self-propelled mechanism for forward motion, controlled by a drive control bar. The engine speed is factory-set for optimum performance and is not adjustable. An operator presence control bar must be held down to the handle to start and operate the engine, and releasing it stops the engine.
Important Technical Specifications:
- Gasoline Capacity and Type: 1.0 Quarts (Unleaded Regular Only).
- Oil Type (API-SF-SJ): SAE 10W-30.
- Oil Capacity: 18.5 Ounces.
- Spark Plug: NGK BPR6ES (Gap: .030").
- Valve Clearance (± 0.04 mm): Intake: 0.015 mm, Exhaust: 0.020 mm.
- Blade Bolt Torque: 35-40 ft. lbs.
- Engine: Honda, Model Number GCV160 (For engine service and replacement parts, call Honda at 1-800-426-7701).
Safety Rules:
The manual emphasizes safe operation practices, warning that the machine can amputate hands and feet and throw objects. Key safety rules include:
- Reading and understanding all instructions before starting.
- Keeping hands and feet away from rotating parts and the discharge opening.
- Only allowing responsible, familiar individuals to operate the machine.
- Clearing the mowing area of objects like rocks, toys, wire, bones, and sticks.
- Ensuring the area is clear of other people, especially children, before mowing.
- Wearing substantial footwear; never operate barefoot or with open sandals.
- Avoiding pulling the mower backward unless absolutely necessary, and looking behind while doing so.
- Operating the mower only with proper guards, plates, grass catcher, or other safety protective devices in place.
- Stopping the blade(s) when crossing gravel drives, walks, or roads.
- Stopping the engine (motor) before cleaning, unclogging the chute, or removing the grass catcher.
- Mowing only in daylight or good artificial light.
- Never operating the machine under the influence of alcohol or drugs.
- Avoiding mowing on wet grass; ensuring firm footing and walking, not running.
- Disengaging the self-propelled mechanism before starting the engine.
- Stopping the engine and checking for cause if abnormal vibration occurs.
- Always wearing safety goggles or glasses with side shields.
Slope Operation:
Slopes require extra caution. Users are advised to mow across the face of slopes, never up and down, and to exercise extreme caution when changing direction. Obstacles like rocks and tree limbs should be removed, and holes, ruts, or bumps should be watched for. Do not trim near drop-offs, ditches, or embankments, or on excessively steep or wet slopes.
Children Safety:
Tragic accidents can occur if children are present. Keep children out of the trimming area and under the watchful care of another responsible adult. Turn off the machine if children enter the area. Look behind and down for small children when walking backward. Never allow children to operate the machine. Use extra care near blind corners, shrubs, trees, or other objects that may obscure vision.
Service Safety:
- Handle gasoline and other fuels with extreme care due to flammability and explosive vapors. Use only approved containers, never refuel with the engine running or indoors, and do not smoke. Allow the engine to cool before refueling.
- Never store the machine or fuel container near an open flame.
- Never run the machine inside a closed area.
- Disconnect the spark plug wire before making adjustments or repairs to prevent accidental starting.
- Keep nuts and bolts, especially blade attachment bolts, tight and maintain equipment in good condition.
- Never tamper with safety devices and check their operation regularly.
- Keep the machine free of grass, leaves, or other debris. Clean oil or fuel spillage. Allow the machine to cool before storing.
- Stop and inspect the equipment if an object is struck, repairing if necessary before restarting.
- Never attempt wheel height adjustments while the engine is running.
- Frequently check grass catcher components for wear, damage, and deterioration, replacing with manufacturer's recommended parts when necessary.
- Mower blades are sharp; wrap them or wear gloves when servicing.
- Do not change the engine governor setting or overspeed the engine.
Assembly:
The lawn mower is shipped without oil or gasoline. The manual provides instructions for:
- Removing the lawn mower from the carton.
- Unfolding the handle, ensuring not to pinch or damage control cables. The handle can be adjusted for mowing comfort.
- Assembling the grass catcher by placing the frame into the bag and slipping vinyl bindings over the frame.
- Installing attachments for bagging or discharging.
Usage Features:
- Engine Zone Control: Federal regulations require an engine control to minimize blade contact injury. The operator presence control bar must be held down to the handle to start and operate the engine.
- Drive Control: Self-propelling is engaged by holding the operator presence control bar down and pulling the drive control bar up. The closer the bar is pulled, the faster the unit travels. Releasing either bar stops forward motion. The drive control system can be adjusted if it becomes "loose" by rotating a thumbscrew counter-clockwise to tighten the drive cable.
- Cutting Height Adjustment: Wheels can be raised for a low cut or lowered for a high cut. Squeeze the adjuster lever toward the wheel and move it up or down. All wheels should be set to the same height.
- Mower Conversion: The mower is shipped as a mulcher. To convert to rear bagging, lift the rear door and place grass catcher frame hooks onto the door pivot pins. To convert to side discharging, close the rear door, open the mulcher door, and install the discharge deflector.
- Emptying Grass Catcher: Lift the grass catcher using the frame handle, remove it, and empty clippings using both frame and bag handles. Avoid dragging the bag.
Before Starting Engine:
- Add Oil: The lawn mower is shipped without oil. Ensure the mower is level, remove the oil dipstick, and slowly pour 18.5 oz of SAE 10W-30 oil into the engine. Do not overfill. Check oil level before each use and fill to the full line.
- Add Gasoline: Fill the fuel tank to the bottom of the filler neck with fresh, clean, regular unleaded gasoline (minimum 87 octane). Do not overfill or mix oil with gasoline. Purchase fuel in quantities that can be used within 30 days. Alcohol-blended fuels can attract moisture and damage the fuel system during storage; empty the fuel system before storage of 30 days or longer, or use a fuel stabilizer.
- Stop Engine: Release the operator presence control bar. Wait for the blade and all moving parts to stop, then turn the fuel valve to OFF.
- Start Engine: Ensure the fuel valve is ON. Move the choke lever to ON. Hold the operator presence control bar down and pull the starter handle quickly. The choke lever automatically moves to OFF when the control bar is held down.
Mowing Tips:
- For very tall grass, raise the height of cut, reduce ground speed, or mow the area a second time.
- For heavy cutting, reduce the width of cut by overlapping paths and mow slowly.
- For best bagging, set engine speed to fast.
- Regularly hose off cloth grass catchers and let them dry to prevent dirt and dust buildup.
- Keep the top of the engine around the starter clear of grass clippings and chaff to ensure proper airflow.
Mulching Mowing Tips:
- Keep the mower housing free of built-up grass and trash.
- The special mulching blade recuts clippings multiple times, dispersing them into the lawn to biodegrade and provide nutrients.
- Mulch at the highest engine speed for best recutting action.
- Avoid mowing wet grass, as it forms clumps. The best time to mow is early afternoon when grass is dry.
- Adjust cutting height to cut only the top one-third of the grass blades. For overgrown lawns, raise the height of cut.
- For heavy mulching, reduce the width of cut by overlapping paths.
- For completely hidden clippings, mulch an area a second time, mowing across (perpendicular) to the first cut path.
- Change cutting patterns weekly (e.g., north to south one week, east to west the next) to prevent matting and graining.
Maintenance Schedule:
The manual provides a detailed maintenance schedule, including tasks to perform before each use, after each use, every 10 hours, every 25 hours or season, every 100 hours, and before storage.
- Before Each Use: Check engine oil level and for loose fasteners.
- Regularly: Clean/inspect grass catcher, check tires, check drive wheels, clean lawn mower, clean under drive cover, check drive belt/pulleys, check/sharpen/replace blade, lubricate, clean and recharge battery (electric-start mowers), check engine oil level, inspect muffler.
- Periodically: Change engine oil, clean air filter, replace spark plug, replace air filter paper cartridge.
- Before Storage: Empty fuel system or add stabilizer.
General Recommendations:
- Maintain the mower as instructed to ensure warranty validity.
- Perform periodic adjustments as described in the Service and Adjustments section.
- Annually replace the spark plug, clean or replace the air filter element, and check the blade for wear.
- Follow the maintenance schedule.
Lubrication:
Keep the unit well lubricated according to the lubrication chart. Do not oil or grease plastic wheel bearings; use only dry, powdered graphite sparingly if lubrication is necessary. Lubrication points include wheel adjusters, engine oil, mulcher door hinge pin, rear door hinge, and handle bracket mounting pins.
Lawn Mower Maintenance:
- Tires: Keep tires free of gasoline, oil, or insect control chemicals. Avoid stumps, stones, deep ruts, sharp objects, and other hazards.
- Drive Wheels: Check front drive wheels before each mow for free movement. Clean trash, grass cuttings, etc., from the drive wheel area if they are not turning freely.
- Blade Care: Keep the mower blade sharp and replace bent or damaged blades. Instructions are provided for removing and replacing the blade, including using a wood block to prevent turning and ensuring proper alignment of the blade adapter and blade. The blade bolt is heat-treated and should only be replaced with an approved bolt.
- Sharpening Blade: Sharpening is not recommended, but if done, ensure the blade is balanced. An unbalanced blade can damage the mower or engine. Check balance by hanging the blade on a nail; it should remain horizontal.
- Grass Catcher: Hose with water and dry when used. Check for damage or deterioration and replace with approved parts if needed.
- Gear Case: Keep the gear case and surrounding area clean. The gear case is factory-filled with lubricant; if lubricant is required, use only ELF Multis EP00.
Engine Maintenance:
- Lubrication: Use high-quality detergent oil (API SF-SJ) with the correct SAE viscosity grade for the operating temperature. Change oil every 25 hours or annually. Check oil level before each use and every 5 hours of continuous use.
- Changing Engine Oil: Empty the fuel tank. Disconnect the spark plug wire. Remove the engine oil cap. Tip the mower on its side to drain oil into a container, rocking it to remove trapped oil. Fill with 18.5 oz of oil, waiting one minute for it to settle, and recheck the level. Do not overfill.
- Air Filter: Replace every 100 hours or annually, or more often in dusty conditions. A dirty air filter can damage the engine.
- Muffler: Inspect and replace corroded mufflers to prevent fire hazards or damage.
- Spark Plug: Replace at the beginning of each mowing season or every 100 hours. Refer to "PRODUCT SPECIFICATIONS" for type and gap.
Cleaning:
- Keep the mower housing free of built-up grass and trash. Clean the underside after each use by scraping.
- Clean the engine often to prevent trash accumulation, which can cause overheating and shorten engine life.
- Keep finished surfaces and wheels free of gasoline and oil.
- Avoid using a garden hose to clean the mower unless electrical systems, muffler, air filter, and carburetor are covered to prevent water damage.
- Clean under the drive cover at least twice a season.
Service and Adjustments:
- Safety Precaution: Release the control bar, stop the engine, ensure all moving parts have stopped, and disconnect the spark plug wire before any service or adjustments.
- Rear Deflector: Replace if damaged to minimize thrown objects.
- Remove/Replace Drive Belt: Instructions involve removing the drive cover, belt keeper, blade, and debris shield, then reinstalling a new factory-approved belt.
- Adjust Handle: The handle can be mounted in a high or low position by removing hairpin cotters, squeezing the lower handle, and repositioning it on the mounting pins.
- Engine Speed: Factory set and not adjustable. Do not tamper with the engine governor. If adjustment is needed, contact an authorized service center.
- Carburetor: Not adjustable. If problems occur, contact an authorized service center.
Storage:
Prepare the lawn mower for storage at the end of the season or if unused for 30 days or more.
- Lawn Mower: Clean thoroughly, lubricate, ensure all fasteners are secure, and touch up rusted or chipped paint. Store in a clean, dry area.
- Handle: Fold the handle for storage by squeezing the bottom ends of the lower handle and moving it forward, then loosening upper handle mounting bolts and folding the upper handle back. Ensure not to damage control cables.
- Engine Fuel System: Empty the fuel tank by running the engine until fuel lines and carburetor are empty, or use a fuel stabilizer. Do not use engine or carburetor cleaner products in the fuel tank. Use fresh fuel next season.
- Engine Oil: Drain warm oil and replace with clean engine oil.
- Cylinder: Remove the spark plug, pour one ounce of oil into the cylinder, pull the starter handle a few times, and replace with a new spark plug.
- Other: Do not store gasoline from one season to another. Replace rusted gasoline cans. Store the unit indoors, covered with a suitable protective cover that does not retain moisture (avoid plastic). Never cover the mower while the engine and exhaust areas are still warm. Never store the mower with gasoline in the tank inside a building where fumes may reach an open flame or spark.
Troubleshooting:
A table lists common problems, their causes, and corresponding corrections, such as:
- Does not start: Dirty air filter, out of fuel, stale fuel, water in fuel, disconnected spark plug wire, bad spark plug, loose blade, control bar in released position or defective, fuel valve in OFF position, weak battery, disconnected battery connector.
- Loss of power: Dragging in heavy grass, cutting too much grass, dirty air filter, grass buildup, too much oil, walking too fast.
- Poor cut - uneven: Worn/bent/loose blade, uneven wheel heights, grass buildup.
- Excessive vibration: Worn/bent/loose blade, bent engine crankshaft.
- Starter rope hard to pull: Engine flywheel brake on, bent engine crankshaft, broken blade adapter, blade dragging.
- Grass catcher not filling: Cutting height too low, worn blade lift, catcher not venting air.
- Hard to push: Grass too high/wheel height too low, mower housing dragging, full grass catcher, incorrect handle height.
- Loss of drive (or slowing of drive speed): Belt wear, belt off pulley, worn/broken drive cable, loose drive control system.
Husqvarna provides a limited warranty for its products against defects in material and workmanship from the date of purchase.
- Lifetime Warranty: Tiller tines, trimmer shafts, ignition coils, and modules on handheld products.
- 3 Year Warranty: Spindles on Zero Turn Riders and Commercial Walk-Behinds.
- 2 Year Commercial-Warranty: Husqvarna Commercial Turf Equipment (zero turn riders, wide area walks, ground engaging commercial equipment).
- 2 Year Non-Commercial Warranty: Automatic Mower, Riding lawn mowers, yard and garden tractors, walk-behind mowers, tillers, chain saws, trimmers, brushcutters, clearing saws, snow blowers, handheld blowers, backpack blowers, hedge trimmers, electrical products, and power-assist collection systems for noncommercial use. Emission control system components necessary to comply with CARB-TIER-II and EPA regulations (except for third-party engine systems).
- 1 Year Warranty: Power cutters, stump grinders, pole pruners, pole saws for non-commercial use. All trimmers, brushcutters, clearing saws, hovering trimmers, stick edgers, backpack blowers, handheld blowers, hedge trimmers, power-assist collection systems used for commercial, institutional, professional, or income-producing purposes.
- Batteries: One-year prorated limited warranty with 100% replacement during the first 6 months.
- 90 Day Warranty: Automatic Mower, Chain saws, power cutters, stump grinders, pole saws, pole pruners, snow throwers, model series 580 & 600 walk-behind mowers, and commercial turf equipment or any Husqvarna product used for commercial, institutional, professional, or income-producing purposes (except as otherwise provided herein). Husqvarna Safety Apparel (normal wear, tear, or abuse not covered).
- 30 Day Warranty: Replacement parts, accessories including bars and chains, tools, and display items.
Warranty Exclusions and Limitations:
The warranty does not cover defects resulting from accident, abuse, misuse, negligence, neglect (including stale fuel, dirt, abrasives, moisture, rust, corrosion, or incorrect storage/use), failure to operate or maintain according to the manual, alterations or modifications, or additional damage due to continued use after any of the above. Normal customer maintenance items (belts, blades, filters, spark plugs, etc.), natural discoloration, engine and drive systems not manufactured by Husqvarna, lawn and garden attachments covered by third parties, and emission control system components manufactured by third-party engine manufacturers are also excluded.
Customer Responsibilities:
The product must exhibit reasonable care, maintenance, operation, storage, and general upkeep. If a problem occurs, the product should be delivered to an authorized Husqvarna dealer for evaluation. Proof of purchase is required.
Procedure to Obtain Warranty Consideration:
The Warranty Registration Card should be properly filled out and mailed within ten days of purchase. Proof of purchase (date, model number, serial number, and selling dealer information) must be presented to an authorized Husqvarna dealer. The defective product must be delivered to an authorized Husqvarna dealer within thirty days of the problem at the owner's expense.