EasyManua.ls Logo

Husqvarna AUTOMOWER FlexiFence - User Manual

Husqvarna AUTOMOWER FlexiFence
376 pages
Print Icon
To Next Page IconTo Next Page
Loading...
AUTOMOWER
®
FlexiFence
EN Operator's manual 4-19
SV Bruksanvisning 20-33
DA Brugsanvisning 34-47
FI Käyttöohje 48-61
NO Bruksanvisning 62-75
FR Manuel d'utilisation 76-91
NL Gebruiksaanwijzing 92-106
IT Manuale dell'operatore 107-121
ES Manual de usuario 122-136
DE Bedienungsanweisung 137-151
UK Посібник користувача 152-167
HU Használati utasítás 168-182
PT Manual do utilizador 183-197
BG Ръководство за експлоатация 198-213
PL Instrukcja obsługi 214-229
RO Instrucţiuni de utilizare 230-244
ET Kasutusjuhend 245-258
LV Lietošanas pamācība 259-273
LT Operatoriaus vadovas 274-287
SK Návod na obsluhu 288-302
EL Οδηγίες χρήσης 303-318
TR Kullanım kılavuzu 319-332
HR Priručnik za korištenje 333-346
SL Navodila za uporabo 347-360
CS Návod k použití 361-375

Table of Contents

Question and Answer IconNeed help?

Do you have a question about the Husqvarna AUTOMOWER FlexiFence and is the answer not in the manual?

Overview

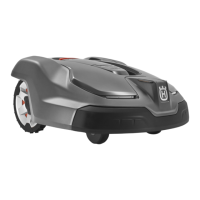
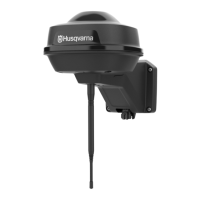
The Husqvarna Automower® FlexiFence is an accessory designed to create a "stay-out zone" within the working area of a robotic lawn mower, preventing the mower from entering and cutting grass in specified areas. This allows for greater flexibility in managing the robotic lawn mower's operational boundaries.

Function Description:

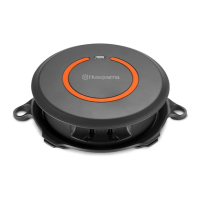
The primary function of the Automower® FlexiFence is to establish a temporary or permanent exclusion zone for a robotic lawn mower. This is achieved by laying a zone boundary wire around the desired stay-out area. The FlexiFence unit then generates a signal along this wire, which is detected by compatible Automower® robotic lawn mowers, instructing them to avoid the enclosed space. For the FlexiFence to function correctly with an Automower® robotic lawn mower, a firmware update for the mower may be necessary. It is important to note that the Automower® FlexiFence is intended for private use and must not be used in public areas, parks, sports arenas, or in agriculture or forestry.

Product Overview (Fig. 1):

  1. Cover: Protects the internal components of the FlexiFence unit.
  2. Charging socket: A USB-C port for charging the internal battery.
  3. Connections: Two connection points for the zone boundary wire.
  4. Sealing cap: Provides protection for the charging socket.
  5. ON/OFF button: Used to power the unit on and off, and to check battery status.
  6. LED indicator: Provides visual feedback on the unit's status, including battery charge and operational state.
  7. Connectors: Used to attach the ends of the zone boundary wire to the FlexiFence unit.
  8. Stakes: Used to secure the zone boundary wire and the FlexiFence unit to the ground.
  9. Wire for the zone boundary wire: The physical wire that defines the stay-out zone.
  10. USB-C charging cable: Included for charging the FlexiFence unit.

Important Symbols:

  • CE Mark (Fig. 2): Indicates compliance with applicable EU Directives.
  • UKCA Mark (Fig. 3): Indicates compliance with applicable UK Directives.
  • Waste Bin with Cross (Fig. 4): Signifies that the product must not be disposed of as ordinary domestic waste. Users must follow national regulations and utilize local recycling systems.
  • Snowflake (Fig. 5): Warns against using the product in temperatures below 0°C (32°F).
  • Exclamation Mark (Fig. 6): A general warning to read the operator instructions before operating the product.
  • Battery Waste Bin with Cross (Fig. 7): Indicates that the battery should not be disposed of with regular domestic waste, as it contains lithium-ion cells.

Safety Instructions:

  • The product can be used by individuals with reduced physical, sensory, or mental capabilities, or lack of experience and knowledge, if they are supervised or have been instructed on safe use and understand the associated hazards. Children must not play with the product.
  • Children must not be left unsupervised in the stay-out zone. The zone is no longer protected if the battery is empty or if the FlexiFence overheats.
  • The product generates an electromagnetic field during operation, which may interfere with active or passive medical implants under certain conditions. Individuals with medical implants should consult their physician and implant manufacturer before use.
  • Small parts can be swallowed, and the polybag can cause suffocation. Keep small children away during assembly.
  • Flammable liquid may be ejected from damaged batteries. Avoid contact with this liquid; rinse with water if contact occurs, and seek medical attention if it gets into eyes.
  • Charge the product only in dry indoor areas.
  • Do not remove the battery from the product.
  • A USB power supply unit is not included. A third-party power supply unit meeting specified technical data is recommended. Ensure any third-party USB adapter complies with national and international safety standards for Safety Extra Low Voltage (SELV).
  • Do not use the product or its peripherals in adverse weather conditions, especially during lightning risk.
  • Follow maintenance instructions.
  • Refer to disposal instructions for safe battery disposal.
  • Operating and storage temperature range is 0-40°C (32-104°F). High temperatures can damage the product.
  • Charge the battery at ambient temperatures of 4-30°C (39-86°F). Full charging power is available from 15°C (59°F).

Installation Features:

  • Preparation:
    • Charge the product's battery fully.
    • Install the stay-out zone within the robotic lawn mower's work area, ensuring it does not cross a guide wire.
    • Maintain a minimum distance of 35 cm (14 in) between the FlexiFence unit/objects in its area and the zone boundary wire (A) (Fig. 8).
    • Ensure a minimum distance of 60 cm (24 in) between the zone boundary wire and the work area's boundary wire (B), and between the zone boundary wire and the guide wire (C).
    • If using multiple FlexiFence units, maintain a minimum distance of 60 cm (24 in) between their zone boundary wires.
    • Slopes in the FlexiFence area should not exceed 10%.
    • The zone boundary wire length should not exceed 15 m (50 ft).
    • Avoid crossing the zone boundary wire over itself or another zone boundary wire installation to prevent interference (Fig. 9).
    • Refer to the robotic lawn mower's operator manual for guidance on placing the boundary wire at a distance from objects.
  • Installation Steps:
    1. Lay the zone boundary wire around the stay-out zone.
    2. Cut the ends of the wire.
    3. Attach one connector to each end of the wire.
    4. Connect the two connectors (A) to the two connections on the product (B) (Fig. 10).
    5. Secure the zone boundary wire to the ground with stakes, spaced a maximum of 75 cm (30 in) apart.
    6. Place the FlexiFence unit in the stay-out zone and secure it to the ground with stakes.
    7. Enable the "Zone Generator" function on your robotic lawn mower (refer to its operator manual). A firmware update may be required if this menu is not available.
  • Installation Test:
    1. Turn the FlexiFence ON; the LED indicator should be green.
    2. Ensure the robotic lawn mower's ECO mode is disabled.
    3. Place the robotic lawn mower 1-2 m in front of the stay-out zone, facing it.
    4. Start the robotic lawn mower and verify it stops at the zone boundary wire.

Usage Features:

  • Battery Charging:
    • Charge the battery fully before first use. The LED indicator will be solid orange when fully charged. The unit does not operate while charging.
    • Remove the cover and sealing cap, connect the USB-C charging cable to the socket, and the USB-A cable to a 5V USB power supply unit (not included), then plug it into a power outlet.
    • The LED indicator will flash orange during charging.
    • For long-term storage, charge the battery to at least 60% every 3 months.
  • LED Indicator for Battery Capacity:
    • LED lights up when battery charge is below 10%. Press ON/OFF for 5 seconds to show status when above 10%.
    • Green solid: ON, battery > 30%.
    • Green slow flash: ON, battery 10-30%.
    • Green fast flash: ON, battery < 10%.
    • Orange solid: Battery fully charged.
    • Orange flash: Battery charging.
  • Starting/Stopping the Product:
    • Press ON/OFF for 2 seconds to start (LED turns green) or stop (LED flashes white, then turns off).

Maintenance Features:

  • Cleaning:
    • Do not use a high-pressure washer or running water. Do not use solvents.
    • Clean the product with a moist cloth.

Troubleshooting (LED Indicator and Symptoms):

  • LED Indicator:
    • White flash (5 times): Empty battery or error. Press ON/OFF for 5 seconds to check status.
    • Blue LED: Zone boundary wire defective or disconnected. Replace or connect the wire.
    • Purple LED: Product cannot find work area boundary wire, ECO mode enabled, or incorrect zone range. Check/replace boundary wire, ensure correct installation, check charging station connection, disable ECO mode.
    • Red LED: Product temperature too high. Place in shade, allow to cool before starting. If persistent, contact Husqvarna representative.
  • Symptoms:
    • Robotic lawn mower stops with "Zone generator problem" message: Low FlexiFence battery or FlexiFence overheated. Charge FlexiFence battery or place in shade to cool.
    • Robotic lawn mower enters FlexiFence zone: Software transfer problem. Press ON/OFF for 15 seconds to restart.

Technical Specifications:

  • Battery Operation Time: Approximately 30 days.
  • Battery Charging Voltage: 5 V.
  • Battery Charging Current: 1 A.
  • Battery Charging Time: 6 hours.
  • IP Code: IPX4 (splash-proof).
  • Boundary Wire Antenna Operating Frequency Band: 100-80000 Hz.
  • Maximum Magnetic Field: 82 dBuA/m (measured according to EN 303 447).
  • Maximum Radio-frequency Power (@60m): <25 mW.
  • Power Supply Unit Specification (recommended third-party):
    • Frequency: 50-60 Hz (single phase).
    • Mains Voltage: 100-240 V AC.
    • Output Voltage: 5 V DC.
    • Output Current: 1 A.
    • Minimum Output Power: 5 W.
    • Output Connector: USB-C.

Accessories:

  • Boundary wire: 50 m and 150 m options.
  • Stakes: 100 pcs.
  • Connectors: 5 pcs.

Storage and Disposal:

  • Storage: Charge the battery, clean the product, and store it in a dry, closed, frost-free area, out of reach of children.
  • Disposal: Follow national regulations and use local recycling systems. Do not dispose of the battery with domestic waste; it contains lithium-ion cells. Only qualified personnel should remove the battery.

Husqvarna AUTOMOWER FlexiFence Specifications

General IconGeneral
BrandHusqvarna
ModelAUTOMOWER FlexiFence
CategoryLawn Mower Accessories
LanguageEnglish

Related product manuals