EasyManua.ls Logo

Husqvarna ST 427 - User Manual

Husqvarna ST 427
84 pages
Print Icon
To Next Page IconTo Next Page
Loading...
ST 424, ST 427, ST 430, ST 424T, ST 427T,
ST 430T
EN Operator's manual 11-31
ES-MX Manual del usuario 32-55
FR-CA Manuel d’utilisation 56-79

Questions and Answers

  • S
    Suzanne RichardsSep 14, 2025
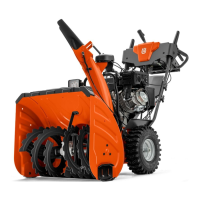
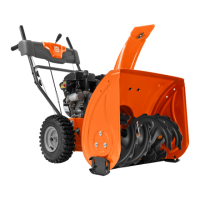
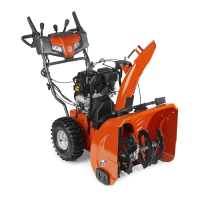
    What causes excessive vibration or handle movement in my Husqvarna ST 427 Snow Blower?
    • L
      Laura WilcoxSep 14, 2025
      Excessive vibration or handle movement in your Husqvarna Snow Blower can be caused by: * Loose parts or damaged augers. Tighten all fasteners and replace any damaged parts. * Incorrectly positioned handles. Ensure the handles are locked into position. * Loose adjustment lever nuts. Tighten the nuts until the handle feels safe.
  • D
    Dr. Melvin LewisAug 27, 2025
    Why does my Husqvarna ST 427 Snow Blower engine idle or run roughly?
    • B
      Brandon TurnerAug 27, 2025
      If your Husqvarna Snow Blower engine idles or runs roughly, it could be due to: * A blocked fuel line; clean the fuel line. * Water in the fuel or fuel that is too old; empty the fuel tank and carburetor, then fill the fuel tank with fresh, clean gasoline. * The carburetor needs to be replaced - No answer. * The fuel injector does not trigger - No answer.
  • N
    Nicole HaydenAug 28, 2025
    What causes excessive vibration in a Husqvarna Snow Blower?
    • G
      Gregory LloydAug 28, 2025
      Excessive vibration or handle movement in your Husqvarna Snow Blower can be caused by: * Loose parts or damaged augers; tighten all fasteners and replace any damaged parts. If vibration persists, no answer. * Improperly positioned handles; make sure that the handles are locked into position. * Loose adjustment lever nuts; tighten the nuts until the handle feels safe.
  • J
    Jodi CooperNov 25, 2025
    Why won't my Husqvarna Snow Blower start?
    • T
      Tiffany MillerNov 25, 2025
      There are several reasons why your Husqvarna Snow Blower might not start: * The safety ignition key may not be inserted. Insert the safety ignition key. * The product could be out of fuel. Fill the fuel tank with fresh, clean gasoline. * The ON/OFF key might be in the OFF position. Move the ON/OFF key to the ON position. * The engine may not be primed; prime the engine. * The engine could be flooded. Wait a few minutes before restarting, DO NOT prime. Restart the engine while full throttle and the choke in OFF (CLOSE) position. * The spark plug cable may not be connected; connect the cable to the spark plug. * The spark plug could be bad; replace the spark plug. * There might be water in the fuel or the fuel could be too old. Empty the fuel tank and carburetor. Fill the fu...
  • J
    James BaxterSep 15, 2025
    What causes loss of traction or snow discharge in my Husqvarna Snow Blower?
    • J
      Jessica HendersonSep 15, 2025
      Loss of traction drive, slowing of drive speed, loss of snow discharge, or slowing of snow discharge in your Husqvarna Snow Blower can occur due to several reasons: * The belt may be slipping. Adjust the cable and the belt. * The belt could be worn. Check and/or replace the belt, and adjust the pulley. * The belt might be off the pulley. Check and reinstall the belt, and adjust the pulley. * The chute deflector could be clogged. Clean the chute deflector. * Foreign objects may be clogging the augers. Remove any debris or foreign objects from the augers. * The shear pin might be broken. Replace the broken shear pin. * Excessive snow and ice build-up between continuous track components. Remove any snow and ice build-up.
  • D
    Darren JamesSep 23, 2025
    How to fix excessive vibration in my Husqvarna ST 427?
    • J
      Jennifer HarrisSep 23, 2025
      To address excessive vibration or handle movement in your Husqvarna Snow Blower: * Tighten all fasteners and replace any damaged parts. * Ensure the handles are locked into position. * Tighten the adjustment lever nuts until the handle feels secure.
  • B
    Bradley JohnstonSep 8, 2025
    What to do if the lights are not on Husqvarna Snow Blower?
    • A
      Ashley CarrSep 8, 2025
      If the lights on your Husqvarna Snow Blower are not working, check the following: * Ensure the engine is running; start the engine. * Check for loose cable connections at the engine and the lights; secure any loose connections. * The LED is burnt out; replace the LED light module. Individual LEDs cannot be replaced. * A blown fuse; replace the fuse, ensuring there is no short circuit.
  • R
    robert93Sep 9, 2025
    How to fix a Husqvarna ST 427 chute rotator that is difficult to move?
    • A
      amyblackSep 9, 2025
      If the chute rotator on your Husqvarna Snow Blower is difficult to move: * There might be debris in the chute rotator mechanism; clean the internal parts of the chute rotator mechanism. * The cables might be kinked or damaged; ensure the cables are not kinked and replace any damaged cables. * The release cable may need adjustment; adjust the release cable.
  • M
    Manuel LindseySep 23, 2025
    Why are the lights not working on my Husqvarna ST 427?
    • R
      Rebecca BarnettSep 23, 2025
      If the lights are not working on your Husqvarna Snow Blower, first, start the engine. Then, check the cable connections at the engine and the lights to ensure they are secure. If the LED is burnt out, replace the LED light module. Finally, if the fuse is blown, replace it, ensuring there is no short circuit.
  • J
    Joseph KellySep 2, 2025
    How to fix a Husqvarna ST 427 chute rotator that is hard to move?
    • M
      Michelle YoungSep 2, 2025
      If the chute rotator on your Husqvarna Snow Blower is difficult to move, first, clean any debris from the chute rotator mechanism. Ensure that the cables are not kinked and replace any damaged cables. If needed, adjust the release cable.

Summary

Introduction

USA Requirements

Safety warnings specific to California regarding chemicals.

Product Overview (Fig. 1)

Lists and identifies components of the snow thrower as shown in Figure 1.

Product Overview (Fig. 2)

Lists and identifies components of the snow thrower as shown in Figure 2.

Product Description

Intended Use

Describes the intended applications and limitations of the snow thrower.

Symbols on the Product

Notes about decals and their replacement.

Safety

Safety Definitions

Explains severity levels for safety signal words like WARNING and CAUTION.

General Safety Instructions

Provides essential safety guidelines for operating the product correctly and safely.

Safety Instructions for Operation

Detailed safety guidelines for operating the snow thrower safely and effectively.

Work Area Safety

Precautions to take regarding the environment and objects in the work area.

Personal Protective Equipment

Guidelines on essential protective gear for safe operation and maintenance.

Safety Devices on the Product

Importance of ensuring safety features are functional and maintained.

Muffler Safety

Warnings regarding the hot muffler and fire prevention.

Fuel Safety

Crucial safety instructions for handling and using fuel.

California Proposition 65

Warning about chemicals known to cause cancer or birth defects.

Safety Instructions for Maintenance

Safety precautions to be followed during product maintenance and repair.

Assembly

To Remove the Product from the Carton

Steps for safely unpacking the snow thrower from its packaging.

Loose Parts

Lists specific loose parts included with the product.

Tools Required

Lists the necessary tools for assembly tasks.

To Install the Handle

Instructions for attaching and securing the product's handle assembly.

To Install the Discharge Chute

Steps for mounting the discharge chute assembly onto the snow thrower.

To Install the Remote Control for the Discharge Chute Deflector

Guide for connecting the remote control for the deflector.

To Install the Speed Control Cable

Instructions for connecting the speed control cable.

To Install the Battery Ground Cable

Steps for connecting the battery ground cable.

Operation

Before You Start the Product

Pre-operation checks and requirements before starting the engine.

To Fill the Engine with Oil

Detailed steps for checking and adding engine oil to the snow thrower.

To Fill Fuel

Instructions for safely adding gasoline to the fuel tank.

To Start the Engine (Manual Start)

Procedure for starting the engine using the manual pull-start method.

To Start the Engine (Electric Start)

Procedure for starting the engine using the electric starter.

To Operate the Product

Guidance on the basic operation of the snow thrower.

Throttle Control

Explanation of the throttle control and its modes for engine speed adjustment.

To Use the Heated Handles

Instructions on how to activate and use the heated handle feature.

To Stop the Product

Steps to safely shut down the snow thrower's engine.

To Adjust the Neutral Position

Procedure for ensuring the drive system is in neutral when controls are disengaged.

To Adjust the Discharge Chute and Deflector

Steps for adjusting the direction and distance of snow discharge.

To Adjust the Skid Plates

Instructions for setting the height of the skid plates for optimal ground clearance.

To Use the Drift Cutters

How to use the drift cutters for deeper snowdrifts.

To Adjust Auger Bucket Height

Instructions for adjusting the auger bucket height for specific models.

To Prevent Freeze-Up After Use

Steps to take to prevent ice buildup in controls after operation.

Maintenance

Introduction to Maintenance

Explains the importance of regular maintenance to prevent malfunctions.

Maintenance Schedule

A table outlining recommended maintenance tasks and their frequency.

General Inspection

Guidance on performing a general inspection of the product.

Oil Change Reminder

Explanation of the oil change reminder function and its display.

To Reset the Oil Change Reminder

Steps to reset the oil change reminder indicator.

To Check the Oil Level

Procedure for checking the engine oil level before operation.

To Replace the Engine Oil

Instructions for draining and replacing the engine oil.

To Lubricate the Product

Instructions for lubricating various pivot points and connections.

To Examine the Spark Plug

Procedure for checking the spark plug's condition and function.

To Inspect Augers and Scraper Bar

Guidance on inspecting the augers and scraper bar for wear and damage.

To Replace Auger Shear Pins

Steps for replacing shear pins that protect the auger mechanism.

To Replace Impeller Shear Pins

Steps for replacing shear pins that protect the impeller mechanism.

To Replace the Fuse

Instructions for identifying and replacing blown fuses.

To Examine the Tires

Advice on checking tire condition and pressure.

To Clear a Clogged Discharge Chute Deflector

Steps to safely remove blockages from the discharge chute deflector.

To Replace the Scraper Bar

Instructions for reversing or replacing the scraper bar.

Battery

To Start with a Dead Battery

Steps to take if the battery power is insufficient.

Battery Maintenance

Information on the maintenance-free nature of the product's battery.

To Charge the Battery

Procedure for charging the battery, especially for long-term storage.

To Replace the Battery

Step-by-step guide for replacing the battery.

To Clean the Battery and Terminals

Instructions for cleaning the battery and its terminals.

Muffler

Drive Belts

To Prepare for Belt Replacement

Steps to take before replacing drive belts, including fuel removal.

To Remove the Drive Belt

Procedure for removing the drive belt from the pulleys.

To Install the Drive Belt

Procedure for installing a new drive belt.

To Adjust Drive Belt Tension

Steps for correctly adjusting the tension of the drive belts.

To Remove Auger Belt (ST 424;427;430)

Instructions for removing the auger belt on specific models.

To Remove Auger Belt (ST 424 T;427 T;430 T)

Instructions for removing the auger belt on specific track models.

To Install Auger Belt (ST 424;427;430)

Instructions for installing the auger belt on specific models.

To Adjust Auger Belt Tension

Steps to correctly adjust the tension of the auger belt.

To Adjust Auger Control Cable

Procedure for adjusting the auger control cable for proper engagement.

To Adjust Discharge Chute Release Cable

Steps for adjusting the cable that controls the discharge chute release.

To Adjust Discharge Chute Cables

Instructions for adjusting the cables that control the discharge chute direction.

To Remove the Wheels

Steps for removing the wheels from the product.

To Adjust Continuous Track Tension

Procedure for adjusting the tension of the continuous tracks on specific models.

Troubleshooting

EFI Error Codes

Lists and explains error codes for the Electronic Fuel Injection system.

Transportation, Storage and Disposal

Technical Data

Accessories

Lists approved accessories available for the snow thrower.

EU Declaration of Conformity

UK Declaration of Conformity

Husqvarna ST 427 Specifications

General IconGeneral
Engine ManufacturerBriggs & Stratton
Drive SystemFriction Disc
Number of Forward Speeds6
Remote Chute RotationYes
Chute Rotation Angle200 degrees
Remote Chute DeflectorYes
Electric StartYes
HeadlightYes
Engine Type4-Cycle
Clearing Width27 inches
StagesTwo-Stage
Auger TypeMetal

Related product manuals