EasyManua.ls Logo

HWH 210 SERIES User Manual

HWH 210 SERIES
15 pages
To Next Page IconTo Next Page
Page #1 background imageLoading...
Page #1 background image
OPERATOR’S MANUAL
ML23419/MP05.2007
26FEB04
Joystick BI-AXIS Control
Hydraulic Leveling
FEATURING:
HWH CORPORATION
(On I-80, Exit 267 South)
2096 Moscow Road | Moscow, Iowa 52760
Ph: 800/321-3494 (or) 563/724-3396 | Fax: 563/724-3408
www.hwh.com
210 SERIES LEVELING SYSTEM
HWH JOYSTICK-CONTROLLED
R
Kick-Down Jacks
Integrated Control Console
AP23364 - U.S.
AP23724 - Europe
W
CORPORATION
H
H
R
RIGHT
EXTEND
HYDRAULIC LEVELING
NOT IN
ON
HWH
FRONT
EXTEND
EXTEND
BRAKE
PARK/
REAR
EXTEND
LEFT
ON
OFF
OPERATE
STORE
FRONT
5 AMP
FUSE
REAR
STORE
REMOVING TIRES OR CRAWLING UNDER VEHICLE.
BLOCK FRAME AND TIRES SECURELY BEFORE
UNDERSTAND OPERATOR’S MANUAL BEFORE USING.
CAUTION!
OPERATE
R
Question and Answer IconNeed help?

Do you have a question about the HWH 210 SERIES and is the answer not in the manual?

HWH 210 SERIES Specifications

General IconGeneral
BrandHWH
Model210 SERIES
CategoryJacks
LanguageEnglish

Summary

General Safety Precautions

General Operation Safety

Read manual, keep clear, be aware of jack movement, and avoid hydraulic leaks.

Specific Jack & Extension Safety

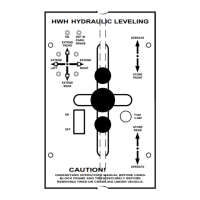
Caution with kick-down jacks, room extensions, and store lever positioning.

Warranty Service Procedures

Warranty Claim Process

Steps for reporting and resolving warranty issues via dealership or HWH Customer Service.

Control Panel Identification

Control Panel Layout

Overview of the HWH Hydraulic Leveling control console, including buttons and levers.

Indicator Light Functions

Explanation of ON, PARK/BRAKE, LEVELING, and WARNING indicator lights.

Control Lever Operations

Details on the ON/OFF switch, STORE levers, and JACK CONTROL LEVER.

Operating Procedures

Site Selection Guidelines

Ensure adequate clearance; block wheels on soft ground; park downhill if possible.

Room Extension Precautions

Block wheels if kick-down jacks used; do not operate extensions until leveling is complete.

Step-by-Step Leveling

Detailed instructions for leveling the vehicle using the system.

Retract Procedures

Retracting the Jacks

Move STORE LEVERS to STORE/TRAVEL to allow jacks to retract.

Visual Check After Retraction

Check that all jacks are in STORE/TRAVEL position and warning lights are off.

System Shutdown

Turn ON/OFF switch to OFF, then turn ignition off or proceed to travel.

Maintenance

Fluid Level and Type

Check oil level with jacks retracted and use recommended hydraulic fluid.

Jack and Roller Care

Maintain roller assemblies and clean jacks affected by mud or ice.

Electrical System Care

Ensure battery is charged and all electrical connections are clean and tight.

System Adjustment

6,000 lb. Jacks Adjustment

Adjust vertical position first, then horizontal stop for clearance.

9,000 lb. Jacks Adjustment

Ensure verticality; adjust horizontal stop for clearance.

16,000 lb. Jacks Adjustment

Adjust verticality via cap; adjust horizontal stop with washers.

Sensing Unit Adjustment

Side-to-Side Adjustment

Adjust hex head clockwise/counter-clockwise until side yellow lights are off.

Front-to-Rear Adjustment

Adjust phillips head screw until front/rear yellow lights are off.

Final Check and Settling

Repeat adjustments until all yellow lights are off; tap hex head to settle.

Troubleshooting Guide

Jack Retraction Issues

Troubleshoot jacks retracting after leveling or failing to retract completely.

Extension & Power Problems

Address units not vertical, no power, or pump activating without extension.

Indicator Light Malfunctions

Diagnose issues with yellow leveling or red warning lights not functioning properly.

Related product manuals