This document is a user manual for the iGO Elite 3D HD electric bicycle. It provides comprehensive information on the bike's functions, technical specifications, usage, and maintenance.
Function Description
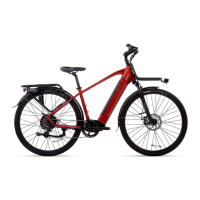
The iGO Elite 3D HD is an electric bicycle designed to provide pedal assistance and on-demand throttle for an enhanced riding experience. It features a display unit that shows speed, assistance level, battery indicator, odometer, trip odometer, timer, light indicator, and error codes. The bike is equipped with a lighting system for front and rear visibility, powered by the lithium-ion battery. A "Walk Assist" mode is available to facilitate walking with the bike at a steady pace of 6 km/h, useful for ramps or light slopes. The bike also includes a USB charging port on the display unit for charging mobile devices.
Important Technical Specifications
- Frame: 6061 Aluminum Hybrid 44.5cm (17.5")
- Color: Race Red/Silver
- Fork: SUNTOUR NEX suspension
- Shifters: SHIMANO 8-speed Rapidfire
- Chainrings: 42T with Narrow Wide teeth
- Chain: KMC X8 EPT
- Rear Derailleur: SHIMANO ALTUS 8-speed
- Cassette: 8-speed 11-34T
- Handlebar: Alloy ERGOFIT touring bar
- Grips: VELO
- Stem: PROMAX toolless adjustable threadless
- Seat Post: Alloy 30.4mm with quick release (350mm)
- Saddle: SELLE ROYAL Nuvola - black
- Brake Levers: TEKTRO HD-E350
- Brake Calipers: TEKTRO hydraulic disc
- Rotors: 180mm
- Tires: 700x47C, 28"x1.75" MAXXIS Overdrive
- Rims: iGO 700C dual wall alloy
- Motor: 500W geared brushless hi-torque rear hub motor
- Torque: up to 48Nm
- Controller: 48V, 18A
- Battery: 3000mAh Cell Lithium-Ion 48V / 12Ah / 576Wh
- Range: 75km (47mi)* (Actual range may vary depending on Ah of battery rider weight and other riding conditions.)
- PAS (Pedal Assistance System): 9 Levels of power assisted pedaling
- Throttle: Any time on demand thumb throttle
- Sensor: Electronic 32 pulse Cadence Sensor
- Charger: 110/220V Smart charger, LED status, CUL, 2A
- Charging Time: 4 to 6 hours
- Class: Class2** (Electric bike class regulation: Class 1 - Pedal assist motor with maximum assisted speed 32km/h (20mph); Class 2 - Pedal assist motor and throttle with maximum assisted speed 32km/h (20mph); Class 3 - Throttle and/or pedal assist motor with maximum assisted speed 45km/h (28mph); all classes allow a maximum motor power of 750W(US) or 500W(Canada))
- Bike Weight: 23.7kg (52.2 lbs)
- Battery Weight: 3.3kg (7.3 lbs)
- Weight Capacity: 100 kg (220 lbs)
Usage Features
- Turning ON/OFF: Press and hold the 'POWER' button for 2 seconds. The system automatically shuts off after 5 minutes of inactivity to conserve battery.
- Display Modes: Short press the 'MODE' button to cycle through Speed/Avg. Speed/Max. Speed/Trip Distance/ODO/Time.
- Pedal Assistance Levels: Use 'PLUS' and 'MINUS' buttons to select levels from 0 to 9. Level 9 provides the strongest assistance. Level 0 allows riding without motor assistance while still using lights and display functions.
- Lighting System: Hold the 'PLUS' button for 2 seconds to turn on/off the lighting system and display backlight.
- Walk Assist: Hold the 'MINUS' button to activate walk assist mode (6 km/h).
- Throttle: Located on the left grip, it can be used with pedal assist levels 1-9 or independently to reach top speed.
- USB Charging Port: A 5V/500mA port on the display unit for charging electrical devices when the display is powered on.
- Battery Locking/Unlocking: The battery is secured by a lock on the downtube. Insert the key and turn 1/4 turn clockwise to unlock. Ensure the battery is fully secure and locked when riding. Always remove the key while riding.
- Charging: Connect the charger to the battery, then plug into a 110-volt wall outlet. The charger LED indicates charging status (green for charging, red for full).
- Battery Status Indicator: Press the button on the battery to check its charge level (Red: Needs Charge, Green: 50%, Blue: 100%).
- Stem Adjustment: The stem angle and handlebar position can be adjusted without tools for an ergonomic riding position. Slide the lock button down, lift the lever, adjust handlebars, then push the lever back down until it clicks.
- Brake Alignment: Loosen hex bolts on the brake caliper, maneuver the brake so the disc passes freely between pads, then retighten bolts while maintaining alignment.
- Brake Bed-in Procedure: Perform this before the first ride to condition pads and rotors. Accelerate to 20 km/h, firmly apply brakes to reduce speed to walking pace (repeat 20 times). Accelerate to 32 km/h, firmly and quickly apply brakes to reduce speed to walking pace (repeat 10 times). Allow brakes to cool.
- Gear Shifting: Use the Shimano Altus 8-speed derailleur to select appropriate gears for the riding terrain.
- Saddle Position Adjustment: Loosen the nut located underneath the saddle with an Allen key (figure 22.2) to adjust the tilt and fore/aft position.
- Seat Height Adjustment: Loosen the seat tube clamp lever (figure 22.4) to adjust seat height. Ensure safety marks on the seat post are not visible when retightening.
- Front LED Light Installation: Attach the LED light to the front rack using the provided screw and Allen key. Connect the light cable to the male connector from the bike frame, ensuring pins are correctly aligned and the cable is not twisted. Secure the cable with zip ties.
Maintenance Features
- Regular Servicing: Important for avoiding unnecessary damage.
- Tire Pressure: Check regularly.
- Brake Wear: Check and adjust monthly.
- Chain: Clean and lubricate occasionally.
- Rain Exposure: If caught in rain, wipe bike and electrical components dry, remove battery, and allow to dry overnight.
- Professional Evaluation: Recommended every 3 months by a professional bicycle technician.
- Before Every Ride:
- Ensure battery is charged and locked into position.
- Check tire pressure.
- Check brakes for proper braking.
- Always wear an approved bicycle helmet.
- Cleaning: Regular cleaning prolongs life and reduces rust and corrosion. Remove battery before cleaning. Use mild soap solution, degreaser, chain lube, and a chain cleaning device.
- Storage: Store in a dry, temperate environment when not in use. Avoid prolonged exposure to UV rays, rain, and elements.
- Battery Storage (for periods exceeding one month):
- Charge battery to no more than 50% before storage.
- Once every month, attach the charger for no more than 15 minutes.
- Repeat monthly until more frequent riding. This prevents the battery from staying at a specific charge rate for long periods.
- Battery Recycling: Recycle at an authorized recycling company.
- Charger Usage: Use ONLY the supplied charger. Unplug when battery is fully charged or charger is not in use. Charge in a dry, well-ventilated area.
- Derailleur Check: Check derailleur functions at least once a month. Seek professional help if unable to adjust.