GB-4
Technical Specications
Model KLS 2000
Rated voltage V~ 230-240
Rated frequency Hz 50
Rated power consumption W 2.000
Mains fuse (delayed action) A 16
Speed rpm 13000
Max. blower air output m
3
/ min 52 - 64
Max. suction capacity m
3
/ min 21
Bag volume
l 35
Weigth without cable kg 10,5
Sound pressure level L
pA
(EN 60335) dB(A) 81 [K = 3 dB(A)]
Vibration (EN 60335) m/s² < 2,5 (K = 1,5 m/s²)
Protection class II/VDE 0700
This device has a radio interference suppression according to: EN 55014-1, EN55014-2
Please wear ear protectors!
Noise emission information in accordance with the German Equipment and Product Safety Act (GPSG) and the
EC Machine Directive: the noise pressure level at the place of work can exceed 80 dB(A). In such cases the
operator will require noise protection (e.g. wearing of ear protectors).
• The machine produces an electromagnetic eld of very low intensity. This eld could interfere with certain pace-
makers. To reduce the risk of serious or fatal injury, persons with pacemakers should consult their doctor or the
manufacturer of the pacemaker before using this machine.
- The specied vibration emission value was measured by a standardized test methods and can compare with other
power tools are used.
- The specied vibration emission value can also be necessary for the assessment of work breaks are used.
- The specied vibration emission value can vary during the actual use of the electric tool by specifying the value,
depending on the way how to use the power tool.
- Note: You create the privilege against vascular pulsations of the hands in time breaks
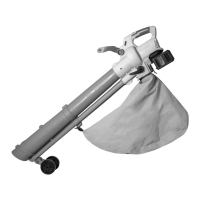
Leaf Blower-Vac / Patio Cleaner
Operative range
This wheeled vacuum/blower device mainly serves to
clean hard surfaces as paved paths, courtyards and
terraces. It is only suitable for vacuuming or blowing
dry, light materials as, e.g., grass, leaves, small twigs
and pieces of paper. The vacuuming of heavy materials
as, e.g., metal, stones, branches, broken glass, and wet
leaves is expressly excluded.
MOUNTING THE HANDLE (Fig. 1)
1 To mount the handle use a screwdriver to remove
the two screws (A) from the chassis.
Attention: Do not loose the nuts!
2 Lead the handle tube and mains cable into the
chassis.
MAKE SURE NOT TO DAMAGE THE MAINS
CABLE.
3 Fix the handle by inserting the two screws (A) into
the provided holes and fasten them with a screw-
driver.
NOTE: DO NOT TIGHTEN THE SCREWS TOO
FIRMLY.
ATTACHING THE COLLECTING BAG (Fig. 2 + 3)
1 Insert the lower part of the bag’s frame into the
supports at the rear end of the chassis.
2 Push the locking lever (B) of the bag in the handle
down, and hold it in this position.
3 Turn the bag’s frame into the correct position.
4 Let go of the locking lever to have the holding bracket
of the bag lock in place.
5 Loosen the locking ring (C) from the lower part of the
main handle, and slide it along the handle tube. At-
tach the locking ring (C) to the upper part of the bag’s
frame to lock the same.