Do you have a question about the ILVE ILD60B and is the answer not in the manual?
Essential safety measures to follow before operating the appliance.
Guidelines for safe operation and common hazards during cooking.
Steps to prevent damage to the hob and actions for appliance failure.
Key technical characteristics and performance data of the hob.
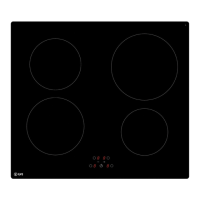
Identification and function of all control panel elements.
How to operate the hob and the underlying induction technology.
Procedures for initial setup and managing the appliance.
How the hob detects pans and indicates residual heat.
Activating the booster function and using the integrated timer.
Detailed timer functions, including egg timer.
How to lock and unlock the control panel for safety.
Guidance on suitable cookware and optimal pan placement.
Instructions on how to safely clean the hob surface.
Interpretation and solutions for specific error displays (E4, U, E).
Reasons why the hob or individual cooking zones may fail to start.
Advice on environmentally responsible disposal of the appliance.
Requirements for fitting the hob, including cut-outs and clearances.
Instructions for safe and compliant electrical hook-up to the mains.
Process for warranty registration and ILVE's privacy policy.
Details of warranty coverage, what is not covered, and claim procedures.
How warranty aligns with consumer law and claim process.
This document is an instruction manual for the ILVE Induction Hob, model ILD60B.
The ILVE Induction Hob is a domestic appliance designed exclusively for cooking food. It utilizes induction technology, where an induction coil under each heating zone generates a variable electromagnetic field. This field produces inductive currents in the ferromagnetic bottom plate of a pan, causing the pan to heat up. The hob is equipped with electronic controls with sensitive touch keys for operation.
The ILD60B model has a total power of 7100 W. It features four heating zones with varying dimensions and power outputs:
The power output may vary depending on the dimensions and material of the pan.
Electrical Connection: The appliance should be connected to a 230 V~ 50/60 Hz network and must always be earthed.
Installation Requirements:
Sensitive Touch Controls: The hob uses sensitive touch keys for activation, confirmed by a control light, a letter/number on the display, or a "beep" sound. Only one key should be pressed at a time for general use.
Display Indications:
0: Heating zone activated.1...9: Power level selection.U: Pan detection (no pan or inadequate pan).E: Error message (electronic failure).H: Residual heat (heating zone is hot).P: Booster function activated.L: Control panel locking.Ventilation: The cooling system is fully automatic. The fan starts at low speed when electronic system calories reach a certain level, increasing to high speed during intensive use. It automatically stops when the circuit cools sufficiently.
Starting-Up and Switching Off:
① key to start.O key, then use + to increase power (1-9) or - to decrease power (9-1). To stop, press - and O simultaneously. If no action for 20 seconds, electronics return to waiting position.Pan Detection: The hob ensures safety by not working if there is no pan or an unsuitable pan on the heating zone, displaying U. If a pan is removed, operation stops and U is displayed until the pan is returned.
Residual Heat Indication: After a heating zone or the hob is switched off, H is displayed if the zone is still hot. This symbol disappears when it's safe to touch. Do not touch hot zones or place heat-sensitive objects on them while H is displayed.
Booster Function (P): Provides a temporary power boost for 5 minutes, ideal for rapidly heating large quantities of water.
+ to increase power, then press + again. P is displayed for 5 minutes.-.9 and then show the allowed maximum power (e.g., 6 or 8).Timer Function: Can be used simultaneously for all heating zones, with settings from 0 to 99 minutes.
O, use + to increase power, then press - and + simultaneously to select "Timer". Use - and + to adjust time.O, then press - and + simultaneously to select "Timer", then press -.00 blinks and a sound rings. Press any key to stop.- and + simultaneously, then adjust time with - and +.Control Panel Locking (L): Prevents accidental changes to cooking zone settings, useful for cleaning.
① to start, then press - and O (front right) simultaneously. L is displayed.① to start, then within 5 seconds, press - and O (front right) simultaneously, then repress -. 0 is displayed.Cooking Advice:
9. If the water heats quickly, it's compatible. A magnet sticking to the pan bottom also indicates compatibility.Cleaning:
Troubleshooting:
E4 error: Indicates a configuration issue. Requires a specific reconfiguration procedure:
- and hold, then quickly press each O key in a counter-clockwise sequence (front right -> rear right -> rear left -> front left). A double beep indicates an error; restart. Release fingers, press + and - simultaneously until E blinks. Wait for E to stop blinking, then E transforms to C.O. Wait for C to become -. Repeat for all zones. Use the same pot for all zones.U on control panel: No pan, incompatible pan, or pan bottom too small.E on control panel: Call After-sales Service.L on control panel: Control panel is locked.① or Er03 on control panel: Object or liquid covering control keys. Disappears when cleared.E2 on control panel: Hob overheated; let it cool, then restart.E3 or E7 on control panel: Pan not adapted; change pan.E6 on control panel: Defective network; check frequency and voltage.E8 on control panel: Ventilator air inlet obstructed; clear it.EC on control panel: Configuration error; re-set the table as per E4 instructions.Environment Preservation: