7RVWRSWKHFRQFUHWHPL[HUIURPZRUNLQJXVHVROHO\WKHVSH-
FL¿FVZLWFKUHI¿J
(/(&75,&$/6$)(7<
The IMER concrete mixer is manufactured according to standard EN
60204-1. It is protected against water sprays (IP 55) and is equipped
with overload protection and a minimum voltage coil.
,I WKHSURWHFWLRQ JXDUGV DUH UHPRYHG GXULQJUHSDLU RSHUD-
WLRQVWKH\PXVWEHFRUUHFWO\UHSODFHGZKHQUHSDLUVDUHFRPSOHWHG
UHIDQGUHI¿J
The risk of deterioration of the power cable to the electric motor due to
WZLVWLQJLVSUHYHQWHGE\DVWRSUHI¿JZKLFKSUHYHQWVWKHFRPSOH-
te rotation of the mixing drum.
&KHFNSHULRGLFDOO\WKHFRQGLWLRQRIFDEOHVZKLFKFRPHRXW
IRUHOHFWULFSDQHO
0(&+$1,&$/6$)(7<
All dangerous areas on the IMER concrete mixer have protective casing
which must be kept installed at all times and maintained in perfect con-
GLWLRQHJWKHGULYHEHOWJXDUGUHI¿J
7KHPL[LQJGUXPWLOWLQJKDVDVWRSSHUUHI¿JWRSUHYHQW
FRPSOHWHURWDWLRQDQGWKXVGDPDJHWRWKHHOHFWULFDOPRWRUFRQQHF-
WLRQFDEOH1HYHUDSSURDFKWKLVDUHDZLWKSDUWVRIWKHERG\GXULQJ
WLOWLQJ
:KHQWLSSLQJWKHERZOQHYHUURWDWHWKHFUDQNLQVXFKDZD\
DVWRIRUFHLWEH\RQGWKHVWRSGHYLFH
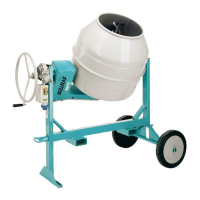
75$163257
7KHFRQFUHWHPL[HUPXVWQRWEHWRZHGRQWKHURDGE\DYHKL-
FOHVLQFHLWVZKHHOVDUHRQO\VXLWDEOHIRUWUDQVSRUWLQJWKHPL[HURQ
WKHEXLOGLQJVLWHZLWKWKHPL[LQJGUXPHPSW\
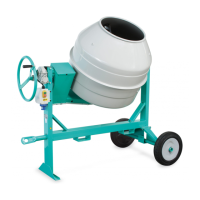
To move the machine manually, extract the drawbar and use it as a lever
for lifting (ref.A; Fig.3).
To carry the machine with a fork-lift truck, engage the forks in the special
seats (ref.B; Fig.3).
For lifting with the aid of a hoist or similar equipment, it is necessary to
turn the mouth of the drum downwards and, using a stay with two arms,
KRRNRQWRWKHVSHFLDOKROHVRQWKHDUPUHI&¿J
$OZD\VGLVFRQQHFW WKH SOXJ IURPWKHSRZHUVXSSO\EHIRUH
PRYLQJWKHFHPHQWPL[HU
,167$//$7,21
The concrete mixer is delivered ready for use.
,QVWDOOPDFKLQHRQÀDWDQGVROLGJURXQGPD[LPXPDGPLV-
VLEOHJUDGLHQWVHH¿JWRSUHYHQWWKHPL[HUIHHWIURPVLQNLQJ
LQWRWKH JURXQG RUWR SUHYHQW WKHPL[HUIURP RYHUWXUQLQJGXULQJ
RSHUDWLRQ
During mixer installation ensure easy access for barrows under the
mixer drum for loading.
(/(&75,&$/&211(&7,21
0DNH FHUWDLQ WKDW D UHVLGXDO FXUUHQW GHYLFH DQG PLQLDWXUH
FLUFXLWEUHDNHUDUHLQVWDOOHGRQWKHHOHFWULFDOSRZHUOLQH
&RQQHFWLQJYHUVLRQVZLWKPRWRU9+]
Ensure that the supply voltage corresponds to machine dataplate speci-
¿FDWLRQV$WIXOOORDGLWPXVWEHEHWZHHQ9DQG9
7R VXSSO\ WKH PDFKLQH LW LV QHFHVVDU\ WR XVH D SROH
JURXQGFDEOHLQRUGHUWRHQVXUHWKHPDFKLQHVFRQQHFWLRQWRWKH
VLWHVHTXLSRWHQWLDOV\VWHP
&RQQHFWLQJYHUVLRQVZLWKPRWRU9+]
Ensure that the supply voltage corresponds to machine dataplate speci-
¿FDWLRQV$WIXOOORDGLWPXVWEHEHWZHHQ9DQG9
7R VXSSO\ WKH PDFKLQH LW LV QHFHVVDU\ WR XVH D SROH
JURXQGFDEOHLQRUGHUWRHQVXUHWKHPDFKLQHVFRQQHFWLRQWRWKH
VLWHVHTXLSRWHQWLDOV\VWHP
&RQQHFWLQJYHUVLRQVZLWKPRWRU9+]
Ensure that the supply voltage corresponds to machine dataplate speci-
¿FDWLRQV$WIXOOORDGLWPXVWEHEHWZHHQ9DQG9
If the direction of rotation of the drum is opposite the one required
(clockwise when seen from the loading mouth), swap over two wires in
the supply plug.
7R VXSSO\ WKH PDFKLQH LW LV QHFHVVDU\ WR XVH D SROH
JURXQGFDEOHLQRUGHUWRHQVXUHWKHPDFKLQHVFRQQHFWLRQWRWKH
VLWHVHTXLSRWHQWLDOV\VWHP
6L]LQJWKHSRZHUVXSSO\FDEOH
The electrical power cable must be suitably sized to avoid voltage drops.
Cable drums must not be used. The size of the power cable wires must
be based on operating current and length of the power line to prevent
excessive voltage drops (tab.3).
Table 3
Model Type of motor
Cable (mm²)
1.5 2.5 4.0
Syntesi 190 EL
Syntesi 250 EL
22-230 V
5 A
0 ÷ 34 35 ÷ 57 58 ÷ 90
Cable length (m)
110 V
12 A
0 ÷ 14 15 ÷ 24 25 ÷ 38
380 V
2 A
0 ÷ 64 65 ÷ 100 -
Syntesi 300 EL
Syntesi 350 EL
230 V
8 A
0 ÷ 21 22 ÷ 36 37 ÷ 57
220 V
9.3 A
0 ÷ 18 19 ÷ 31 32 ÷ 49
110 V
14.5 A
0 ÷ 12 13 ÷ 20 21 ÷ 31
380 V
2.7 A
0 ÷ 48 48 ÷ 80 -
&DEOHVXVHGRQFRQVWUXFWLRQVLWHVPXVWEH¿WWHGZLWKVXLWDEOHH[WHUQDO
sheathing that is resistant to wear, crushing and extreme weather condi-
tions (for example H07RN-F).
$OO SRZHU VXSSO\ LQVWDOODWLRQV PXVW FRPSO\ ZLWK &(,
VWDQGDUGVKDUPRQLVHGGRFXPHQW&(1(/(&+'
0$&+,1(67$5783
Before connecting the cement mixer to the power supply, check that
all the safety devices are in place and working properly, that the power
supply cable is in good condition and that the plugs and sockets (of
the waterproof type) are not wet. Check that the metal grilles protecting
the electric motor are not clogged, to prevent overheating of the motor
itself.
Connect the power supply cable to the electric panel plug. Start the
FRQFUHWHPL[HUXVLQJWKHVZLWFKRQWKHHOHFWULFSDQHOUHI¿J7KLV
comprises two buttons: green for switching on, red for stopping. The
switch is provided with minimum voltage protection: in the event of a
power failure due to accidental causes, to start again, press the green
start button.
7KHHOHFWULFPRWRULVSURWHFWHGDJDLQVWRYHUORDGVE\DWHP-
SHUDWXUHVHQVRU,QWKHHYHQWRIRYHUKHDWLQJLWVWRSVDXWRPDWLFDOO\
:DLWPLQXWHVEHIRUHUHVWDUWLQJWKHHOHFWULFPRWRU
(0(5*(1&<6723
,QWKHFDVHRIDQHPHUJHQF\VWRSWKHPDFKLQHSUHVVLQJWKH
UHGVWRSEXWWRQSURWUXGLQJ7KHQGLVFRQQHFWWKHSRZHUSOXJ7R
VWDUWDJDLQUHFRQQHFWWKHSOXJDQGSUHVVWKHVWDUWEXWWRQ
86(
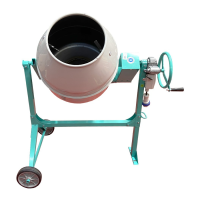
To obtain optimum mixing and regular operation, the concrete mixer
must be installed in the horizontal position. The user should adjust the
inclination of the mixing drum depending on the mix to be made.
,QVHUWPDWHULDOVZKLOHWKHGUXPLVWXUQLQJ
Drum tilt may be adjusted while materials are being loaded, in order to
keep the mix from dripping out of the drum.
Before beginning to load the materials inside the drum, it is best to pour
DFHUWDLQTXDQWLW\RIZDWHULQ¿UVW
When loading, insert the various materials to be mixed alternately, in the
amounts required for the type of mix to be obtained, so as to reduce the
mixing time to a minimum.
Keep the drum running until a smooth mix having the desired consisten-
GB
 Loading...