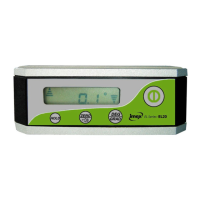
On/Off Button
Mode Select
Calibrate
Sound On/Off
Hold
Press to turn the EL20 on or off
Select to display ° or %
Long Press to enter calibrate mode
Short press to turn sound on or off
Press to freeze the display
1. Loosen the screws on the battery cover.
2. Open the battery cover and put batteries into the
battery case according to the polarity shown in the
battery slot. Replace the battery cover and tighten
the screw.
In order to ensure the measurement accuracy, it is
recommended that you check the accuracy before
operating.
After fitting the batteries, place on a flat horizontal surface
with the LCD display facing you and press the power button
to turn the EL20 on. Record the angle value (A) on the
display.
Rotate the EL20 180° with the screen facing away from you
and record the value (B).
If A, B angle value margin exceed 0.2 degree, it is
necessary to calibrate the horizontal accuracy.
Also follow above procedure in vertical position to check
vertical accuracy
1. Select a flat and horizontal platform as a reference
surface
2. Press the power button to turn the unit on
3. Press and hold the ZERO button until -0- is
displayed on the LCD screen. Wait 3 seconds,
press the ZERO button again the LCD will now
display -1-
4. Turn the unit 180 degrees, keeping the unit on the
same horizontal platform, and wait for 3 second,
then press ZERO, the LCD will display -2-, and then
will display angle value. Horizontal calibration is
now complete.
Note: all the above operation should be operated on the
same position of the same plane.
To calibrate vertical plane, repeat above procedure on
vertical plane.