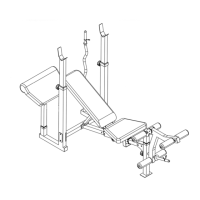
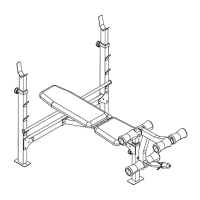
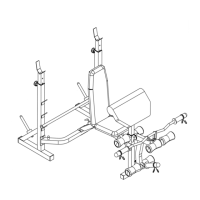
STEP 7 (See Diagram 7)
A.) Attach the Front Vertical Frame (#54) to the Rear Stabilizer (#53). Secure it with two
M10 x 5/8” Allen Bolts (#88) and ∅ ¾” Washers (#42).
B.) Attach one end of the Cross Brace (#51) to the left Rear Upright Beam (#48). Attach the
Left Support (#50) to the other side of the left Rear Upright Beam. Align the holes.
Secure them with two M10 x 2 ¾” Carriage Bolts (#81), ∅ ¾” Washers (#42), and M10
Aircraft Nuts (#44). Do not tighten all the nuts and bolts yet.
C.) Secure the other end of the Left Support (#50) to the Left Upright Beam (#47) with two
M10 x 5/8” Allen Bolts (#88) and Ø ¾” Washers (#42).
D.) Repeat Step B and C above to install the other side.
E.) Securely tighten all nuts and bolts previously installed.
F.) Attach the Rear Vertical Frame (#52) to the rear bracket on the Front Vertical Frame
(#54). Secure it to the Front Vertical Frame with two M10 x 5/8” Allen Bolts (#88) and ∅
¾” Washers (#42).
G.) Attach the Rear Vertical Frame (#52) to the Cross Brace (#51). Secure it with two M10 x
2 3/8” Carriage Bolts (#80), one 4 3/8” x 2 3/8” Bracket (#65), two ∅ ¾” Washers (#42)
and two M10 Aircraft Nuts (#44).
H.) Insert two Weight Posts (#63) to the holes on the Left & Right Supports (#50 & 49).
Secure each Weight Post with one M10 x 5/8” Allen Bolt (#88) and ∅ ¾” Washer (#42).
Slide an Olympic Sleeve (#20) onto each Post. Attach a Spring Clip (#22) to the Olympic
Sleeve.
I.) Insert the Left & Right Bar Holders (#93 & 92) into the selected holes on the Upright
Beams. Insert the Left & Right Safety Catches (#58 & 59) into the selected holes on the
Upright Beams.
11