INCRA MITER5000 OWNER’S MANUAL
©2016 by Taylor Design Group, Inc. All rights reserved. Rev.6.16
Page 7
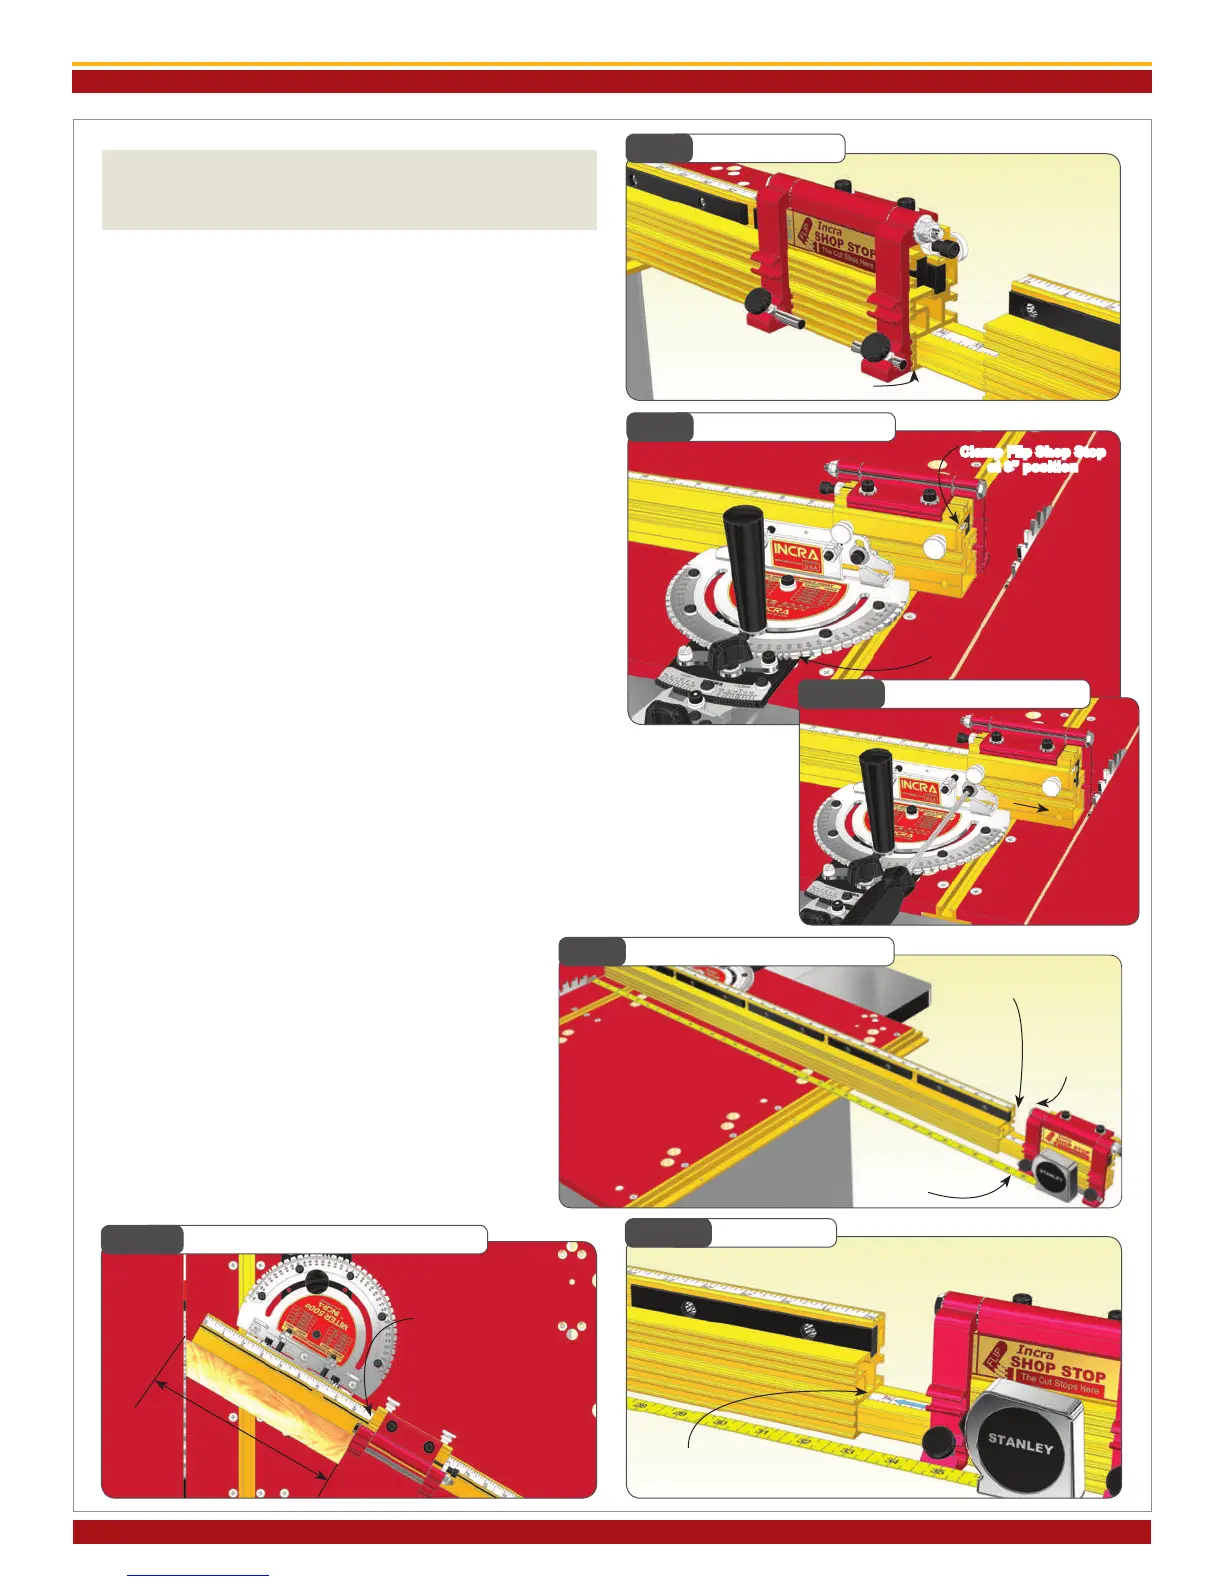
Fig. 23
Flip Shop Stop
Tongue and gr oove
Fig. 24
Zeroing Fence Scale
Protractor set to 0°
Fig. 26
Setting Scales for Angled Cuts
Slide scale to read
cut length here
Measure length
of cut
FLIP FENCE AND FLIP SHOP STOP
- CALIBRATION AND OPERATION
As you look at your new INCRA Flip Shop Stop and Flip
Fence for the rst time you will see an interesting detail.
The front face of the fence uses a tongue and groove
arrangement to accept a mating feature on the ip arms,
Fig. 23. When the ip arm is down with the two opposing
features engaged, it becomes impossible for the sharp cor-
ner of a mitered board end to wedge between the fence
and ip arm. Combined with INCRA’s famous incremental
positioning capabilities, you’ll soon be duplicating cut off
lengths with machine shop precision.
Zeroing the Fence Scales
To zero the main fence scale for 90° work, rst set the
protractor to the 0° setting and lock in place. Clamp
the Flip Shop Stop to the fence so that the 0” mark on
the fence scale reads directly under the end of the gold
component of the Flip Shop Stop, Fig. 24. Now loosen
the (2) 1/4-20 socket head screws that secure the fence to
the fence mounting bracket and slide the fence toward the
blade until the Flip Arm on the stop contacts the blade.
Re-tighten the fasteners, Fig. 24A.
For stopped cuts beyond the range of the main fence you’ll
need to calibrate the extender bar scale. Clamp the IN-
CRA Flip Shop Stop to the 4” fence extender. (Use the scale
on the short section of fence as a reference for clamping
the stop to the same position each time you use it.) Now
loosen the 1/4-20 socket head screw located at the end of
the longer fence and slide the 4” fence and extender bar
out. Use a tape measurer to set the distance between the
blade and the Flip Arm at 34-1/2” and re-tighten the fasten-
er, Fig. 25. Now simply slide the scale in the extender bar
to read 34-1/2” at the end of the longer main fence section,
Fig. 25A.
For mitered cutting, a test cut is often the most ac-
curate means of setting the fence and extender bar
scales since measuring to the tooth of a blade set at
an angle to the fence can be difcult. Begin by setting
the desired miter angle and check for safe clearance
between the fence and blade. Clamp the stop to the
fence about 10” away from the blade. Miter a piece
of scrap stock with this setup. Measure the length of
the cut piece, Fig. 26. Then simply slide the scale on
the fence to read the length of the cut directly under
one end of the stop.
Fig. 24A
Slide Fence to Blade
Fig. 25A
Align Scale
Clamp Flip Shop Stop
at 0” position
Slide fence until
ip arm contacts blade
then tighten fasteners
Fig. 25
Setting Extender Bar Scale
Loosen extender
bar fastener
Clamp stop to
4” section
Slide extender bar out until ip
arm is 34-1/2” from blade then
tighten fastener
Slide scale to read 34-1/2”
at the end of main fence
 Loading...