Do you have a question about the Incra Miter1000SE and is the answer not in the manual?
Attaching the clamping knob and T-clip to the miter bar for table saw use.
Adjusting the miter bar for a smooth fit in the table saw's miter slot.
Attaching the fence to the mounting bracket and setting clearance.
Converting the fence for use in the right-hand miter slot.
Squaring the fence mounting bracket to the saw blade for accuracy.
Using the protractor head for precise 5-degree angle settings.
Fine-tuning angle settings using the vernier cursor for precision.
Setting the fence and extender bar scales to zero for accurate cuts.
Calibrating the extender bar scale for stopped cuts beyond the main fence range.
Fine-tuning the Flip Shop Stop position using micro adjustment screws.
Using flip arms and stop rods for various stop configurations.
Using the Flip Shop Stop with a wooden sub fence for expanded capacity.
Adjusting the fence mounting bracket to tilt the fence forward.
Adjusting the fence mounting bracket to tilt the fence backward.
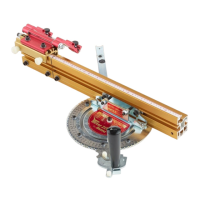
The INCRA Miter1000SE is a precision miter gauge designed to enhance accuracy and versatility in woodworking, particularly for table saw applications. Its primary function is to guide workpieces at precise angles for crosscuts, miter cuts, and other angled operations, ensuring repeatable and accurate results. The device integrates several innovative features that contribute to its high level of precision and ease of use, making it a valuable tool for both hobbyists and professional woodworkers.
A core feature of the Miter1000SE is its protractor head, which allows for highly accurate angle adjustments. The system includes both 5° indexing and continuous adjustment capabilities, providing flexibility for a wide range of cutting angles. For standard angles, the actuator tooth engages firmly into specific notches on the protractor head, ensuring quick and precise setting at 5° increments, including common angles like 22.5° and 67.5°. When finer adjustments are needed, the actuator tooth can be disengaged, and a 1/10° vernier cursor can be used to set angles with exceptional precision, allowing for adjustments finer than 5° increments. This dual adjustment system ensures that users can achieve both rapid setup for common angles and meticulous fine-tuning for custom cuts.
The Miter1000SE is designed for use in either the left or right miter slot of a table saw. The fence is factory-configured for left-hand use but can be easily converted for right-hand operation by following a series of steps involving repositioning the fence sections, extender bar, and scale. This adaptability ensures that the tool can be integrated into various workshop setups and user preferences. The miter bar itself features expansion mechanisms that allow it to be adjusted for a snug fit in different table saw miter slots, minimizing play and maximizing accuracy. These expansion points, located at the front and rear of the miter bar, are adjusted by turning screws, ensuring a smooth yet secure slide within the miter channel.
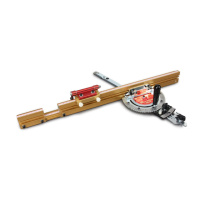
The fence system of the Miter1000SE is another key component, offering extended support for larger workpieces and incorporating a unique Flip Shop Stop. The fence is attached to a mounting bracket, which can be adjusted to ensure it is perfectly square to the saw blade. This initial 90° calibration is critical for the overall accuracy of the tool. The fence mounting bracket allows for fine adjustments to neutralize any twist or thickness variations, ensuring the fence remains perpendicular to the table. The Flip Shop Stop is a standout feature, designed for repeatable cut-off lengths with machine shop precision. It clamps to the fence and can be set to precise measurements using the fence scales. The stop's design includes a tongue and groove arrangement that prevents mitered board ends from wedging between the fence and the flip arm, enhancing accuracy and safety.
The Flip Shop Stop also includes micro-adjusting capabilities, allowing users to fine-tune its position with a socket head screw for ultimate precision. This is particularly useful for dialing in exact cut lengths after an initial setup. The stop's versatility is further enhanced by its dual flip arms and stop rods. The longer stop rod can be used to join the two arms, allowing them to pivot simultaneously, providing a continuous stop surface. Alternatively, shorter stop rods can be used in each arm independently, enabling the creation of multiple stop positions or different cut-off lengths from a single setup. This flexibility in stop configurations makes it possible to handle complex cutting tasks and optimize workflow.
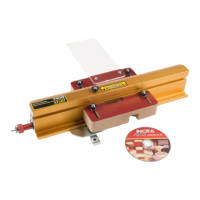
For enhanced tear-out control and workpiece support, the Miter1000SE accommodates a zero-clearance wooden sub-fence. Users can easily construct a sub-fence from 3/4" medium-density fiberboard (MDF) and attach it to the main fence using supplied fasteners. This sub-fence provides support for the workpiece up to and beyond the blade, significantly reducing tear-out. An optional strip of adhesive-backed sandpaper can be added to the front face of the wooden sub-fence to prevent the saw blade from pulling the workpiece into the cut, further improving safety and cut quality. The Flip Shop Stop is also designed to work with a sub-fence, featuring an expanded clamping mode that allows it to accommodate up to a 3/4" thick wooden sub-fence. This involves loosening socket head screws and sliding the upper portion of the stop to capture rectangular nuts in a second T-slot on the lower gold component of the stop body.
Calibration is an important aspect of using the Miter1000SE. The manual provides detailed instructions for initial setup, including attaching the clamping knob and T-clip, adjusting the miter bar for a smooth fit, and attaching the fence. A critical step is squaring the fence to the saw blade at 90°, which is achieved by adjusting the fence mounting bracket using a machinist square. This one-time calibration ensures the accuracy of all subsequent angle settings. For mitered cuts, a test cut is often recommended for setting the fence and extender bar scales, as measuring to the blade at an angle can be challenging. After a test cut, the scale can be slid to directly read the measured length, ensuring precise duplication of cut lengths.
Maintenance of the INCRA Miter1000SE primarily involves ensuring all fasteners are securely tightened after adjustments and verifying safe clearance between the blade and fence before operating the saw. The device is built with durability in mind, and its positioning racks come with a lifetime warranty, indicating the manufacturer's confidence in its robust construction. Should a positioning rack become damaged, it will be replaced free of charge for as long as the user owns the tool. This commitment to quality and long-term performance underscores the value of the INCRA Miter1000SE as a precision woodworking accessory.
| Type | Miter Gauge |
|---|---|
| Material | Aluminum |
| Increment Options | Micro-adjustable |
| Compatibility | Table Saws |
| Precision | 0.1 degree |